
Hulpmiddel Tekst

Met deze functie kan men tekst aan het kunstwerk toevoegen. Het wordt gebruikt in combinatie met het Vastzetter met teksteigenschappen. Sommige tekstbewerkingen kunnen ook met het Gereedschap voor selectie van vormen worden uitgevoerd. Ga naar Werken met tekst voor een overzicht van alle tekst-mogelijkheden.
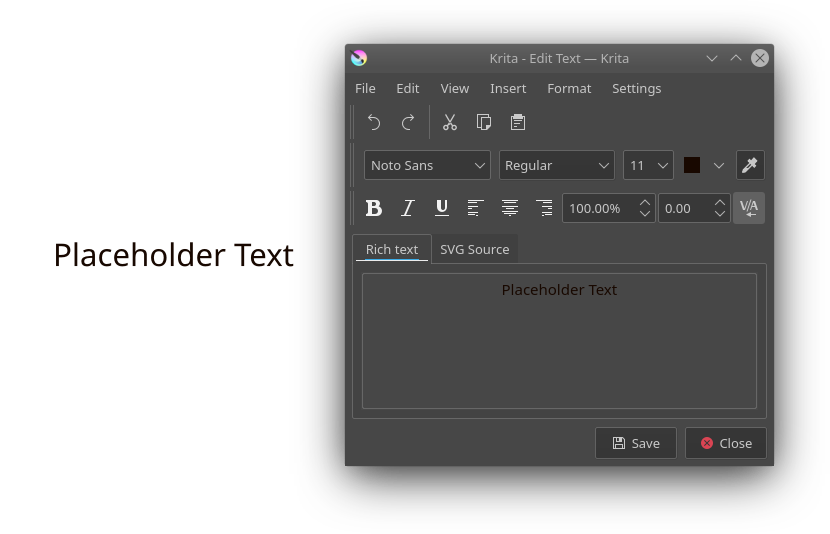
Klik op het werkvlak met de  om een tekst te creëren waarna een tekst met “Placeholder Text” zal verschijnen, klaar om bewerkt te worden.
Tekst bewerken
Als u net een tekst heeft gecreëerd, dan is bij de tekst een knipperende cursor zichtbaar. U kan nu het verplaatsen met de pijltjes-toetsen op het toetsenbord, tekst intypen en tekst verwijderen met de back-toets en de delete-toets, met daarbij elke invoermethode gebruiken voor complexe tekstinvoer. Tekst selecteren kan gedaan worden door shift ingedrukt te houden terwijl u met de pijl-toetsen navigeert naar het eindpunt van de selectie. U kan ook + verslepen gebruiken om tekst te selecteren, dubbelklikken + om een woord te selecteren en driemaal-klikken + om de hele tekst te selecteren.
Notitie
Omdat de toetsen op het toetsenbord nodig zijn voor het intypen van tekst, zijn daarom veelt sneltoetsen uitgeschakeld. Als u tijdens het bewerken van tekst een bepaalde sneltoets wilt gebruiken, dan is het verstandig om zo in te stellen dat naar wens met Ctrl, Alt of Ctrl + Shift gebruikt wordt, omdat Krita het anders als in te voeren tekst zal zien. Bewegingen op het canvas zoals roteren,  pan, of
  zullen gewoon werken omdat er geen toetsencombinatie bij hoort.
Daarnaast kan Krita overweg met alle standaard sneltoetsen van Qt voor verplaatsing. Deze komen overeen met de standaard sneltoetsen van het betreffende besturingssysteem, als voorbeeld, Ctrl + → zal bij Windows de cursor naar het eind van de woorden verplaatsen, maar bij MacOS komt dezelfde actie overeen met Alt + →. Omdat Krita met verticale tekst overweg kan, zullen we ook controleren op voor de toepasselijke sneltoetsen wat betreft van toepassing zijnde tekstindeling, wat inhoud dat bij verticale tekst, Ctrl + ↓ naar het eind van het woord zal verplaatsen.
Om de bewerking van de tekst te voltooien, klikt men buiten het tekstvak, of men begint met het bewerken van een andere tekst. Om dit laatste te doen, zweeft men boven een andere tekst. Deze kan op dezelfde laag zijn of elke andere bewerkbare vectorlaag. Als de muis boven de tekst zweeft, dan zal het begrenzingsvak daarvan oplichten. Door er op te klikken zal de laag worden geselecteerd, en de tekst in de bewerkingmode komen.
Naast het bewerken van de inhoud, kan ook de tekst in zijn geheel verplaatst worden. Om de tekst te verplaatsen, zweeft men met de cursor boven het begrenzingsvak waarna de cursor zal omschakelen naar een verplaatsing-cursor. Met + verslepen zal de tekst verplaatst worden.
Gebruik het Vastzetter met teksteigenschappen om de stijl van de tekst te wijzigen.
Tekst-types
Krita kan compleet met SVG 2 tekst overweg, wat betekent dat het verschillende teksttypes ondersteunt, die in ongeveer vijf types onderverdeeld kunnen worden:
Vooraf ingedeeld
Het meest eenvoudige type tekst. Dit type doet niet aan tekstomloop. Echter, witte spaties worden niet samengevoegd, wat inhoud dat nieuwe regels gecreëerd kunnen worden door op de Enter-toets te drukken.
Voorgepositioneerd
Voorgepositioneerd is een SVG 1.1 tekst, waar elke regel is absoluut geplaatst, en de witte spatie regel zodanig is ingesteld dat extra spaties worden samengevoegd. Oudere versies van Krita creëerde zulke teksten, en het is nog steeds bruikbaar voor SVGs die geëxporteerd worden om daarna gebruikt te worden in andere SVG 1.1 renderers.
Tip
Bij het hanteren van tekst die uit oudere versies van Krita komt, gebruik de teksttype conversie om het om te zetten naar Vooraf ingedeeld of Inline doorlopen naar volgende regel om het bewerken makkelijker te maken. Voorgepositioneerd is alleen zinvol als u de SVG-representatie later wilt gebruiken, zoals voor EPUB3 of web gebruik.
Tekst op Pad
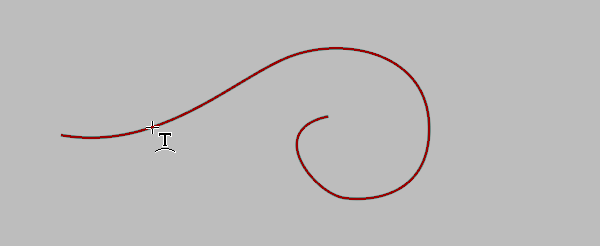
Zweef boven een al bestaande vorm om een Tekst op Pad te creëren. Tijdens het zweven boven de omtrek, zal cursor veranderen naar een tekst-op-pad cursor, en de zal een tekst op pad creëren.
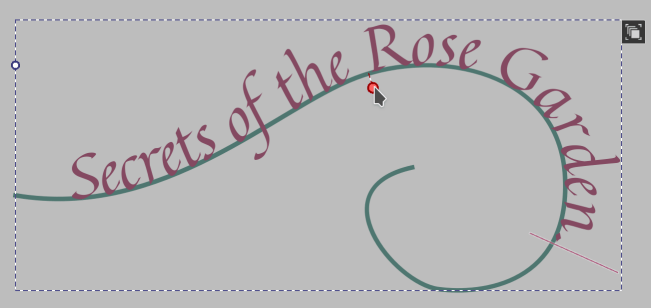
Om een tekst op een pad te bewerken, plaatst men een knipperende cursor in de betreffende tekst. Een hendel zal verschijnen om de start-offset en de zijde van het pad waarop de tekst is geplaatst te bewerken. Door aan deze hendel te trekken, kan de tekst over het pad worden verplaatst, en door hem naar de andere kant van de lijn te verplaatsen, zal de tekst naar de andere kant van het pad verplaatst worden.
Notitie
Alle tekst zonder tekstomloop kunnen in theorie in een enkele tekstvorm gemengd worden. Voor de creatie van een dergelijke vorm is een SVG source editor nodig om de SVG direct te bewerken, maar het houd in dat het onderscheid daartussen niet zo strikt is als dat de terminologie doet lijken. Krita zal zijn best doen om te informeren welk type tekst het denkt dat de vorm is voor de conversie-functies, Maar houd wel in gedachten dat dit fout kan zijn.
Inline doorlopen naar volgende regel
Om een eenvoudige doorlopende tekst (Inline doorlopend) te creëren, moet men + slepen om een rechthoekig vlak te creëren. Als het vlak groter is dan de hoogte van het geselecteerde lettertype, dan zal de cursor-afbeelding een cursor tonen voor inline doorlopend. De muis loslaten zal dan de standaard tekst met een ingeschakelde doorlopen toevoegen. Om te voorkomen dat tijdens het slepen een doorlopende tekst wordt gecreëerd, moet men tijdens het slepen Ctrl ingedrukt houden.
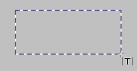
Het creëren van een groot genoeg vlak zal een inline doorlopende cursor tonen.
Tijdens het bewerken van een Inline doorlopende tekst, kan men ook tekstvlak bewerken. Aan elke zijde van de tekst zullen twee hendels verschijnen, die de grenzen tonen waarbij de tekst zal doorlopen naar de volgende regel. Door aan deze hendels met + slepen, kan de doorlopende vlak groter of kleiner gemaakt worden. Als de tekst tot aan deze hendels door loopt, zal het verplaatsen van een van deze hendels de tekst opnieuw over de regels indelen zodat het tot aan deze hendels uitgelijnd blijft. Als de uitlijning op het middel is ingesteld, dan blijft de tekst tussen de twee grenzen. Als men wil dat de tekst tijdens het bewerken van gecentreerde tekst op dezelfde plaats blijft en dat alleen de breedte van het doorloop-gebied verandert, houd dan tijdens het slepen de Ctrl ingedrukt.
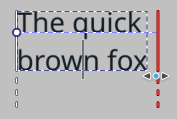
Inline doorlopend zal aan elke zijde van het vlak twee hendels tonen. Deze kunnen direct op het werkvlak aangepast worden.
Tekst in Vorm
Zweef boven een al bestaande gesloten vorm om een Tekst in Vorm te creëren. Tijdens het zweven boven de vulling, zal cursor veranderen naar een tekst-in-vorm cursor, en de zal de tekst in die vorm gieten.Zowel de tekst op het pad als de tekst in de vorm zal een nieuw pictogram rechtsboven in de vorm laten zien. Door hierop te klikken zal er omgeschakeld worden naar de Gereedschap voor selectie van vormen, waarmee de vormen gewijzigd kunnen worden.
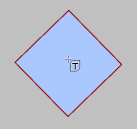
Als de muis boven een gesloten vorm zweeft, dan zal de tekst in de vorm-cursor worden getoond.
Tekst kan in een of meerdere vormen doorlopen. Als het in meerdere vormen wordt gegoten, dan zal elke binnen vorm eerst met zoveel mogelijk tekst worden gevuld voordat de volgende vorm in de ketting wordt gestart. En dan zijn er ook nog aftrek vormen. Deze worden van de binnen vormen afgetrokken bij het creëren van de tekstvlakken.
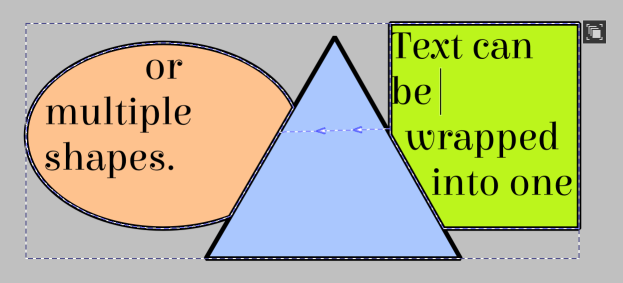
Voorbeeld van een tekst in meerdere vormen gegoten. De groene rechthoek en de oranje ellipse zijn binnen vormen en de driehoek is een aftrek vorm. De omlijning toont het effectieve vlak, waarbij de pijlen tussen de vlakken hoe ze aan elkaar gekoppeld zijn.
Tijdens het bewerken van tekst in vormen, wordt de uiteindelijke rand van het tekstvlak getoond op het scherm. Een ketting van pijlen wordt tussen de tekstvlakken getoond om de volgorde te tonen waarin de vlakken worden verwerkt. De Vulling en de rand van de vorm kunnen gewijzigd worden als de muis boven de rand van het tekstvlak zweeft en er met + slepen aan getrokken wordt. Als de cursor dichtbij een aftrek-vorm was tijdens de aanvang van het verslepen, dan zal de marge worden aangepast. Als daarentegen de cursor dichter bij een binnen-vorm is bij de aanvang van het verslepen, dan zal de vulling van de vorm worden aangepast.
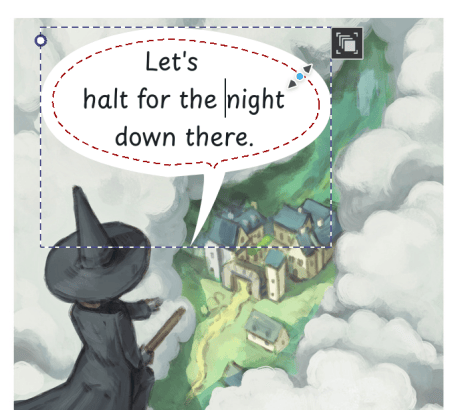
Bij deze tekstballon is vlakvulling toegepast door aan de zevende rand te slepen. Afbeelding met dank aan Pepper and Carrot, CC-BY David Revoy.
Het bewerken van de volgorde van de tekstvlakken in de ketting kan worden gedaan in de Gereedschap voor selectie van vormen, net zoals het toevoegen en verwijderen van vormen van een tekst.
Instellingen van dit onderdeel
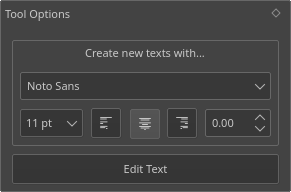
- Nieuwe teksten aanmaken met…
Hiermee kan bepaalt worden welke eigenschappen gebruikt worden bij de creatie van nieuwe teksten. Tekst kan gemaakt worden met elke Stijlvoorinstellingen., of met de huidige eigenschappen in het paneel voor teksteigenschappen door Huidige teksteigenschappen om te schakelen.
- Opties
- Huidige visuele cursor
Gebruik de visuele volgorde voor de tekst-caret ( ^) bij bidirectionele tekst. Als tekst bidirectioneel is, dan kan de logische volgorde van de letters naar links of naar rechts gaan afhankelijk van waar het in de tekst is, met de richting van de paragraaf wordt bepaald welke van de ← en de → de voorwaarts-toets is. Als de visuele volgorde is ingeschakeld, dan zal de caret ( ^) de logische volgorde negeren en plaats daarvan de visuele volgorde volgen.
- Opgemaakte tekst plakken is standaard
Krita kan tekststijlen zoals SVG en HTML van het klembord inlezen, en heeft aparte acties als sneltoets voor het plakken hiervan als ‘rich’ tekst of als gewone tekst. Dit regelt of het ook ‘rich’ tekst plakt bij het gebruik van de gewone Ctrl + V Plakken actie uit het bewerk-menu.
- Teksteigenschappen openen
Opent het Vastzetter met teksteigenschappen. Het paneel voor teksteigenschappen is waar de meeste functies voor tekststijl te vinden zijn.
- Letterzet modus
Schakelt de Letterzet modus om.
- Dialogen
- SVG-bron bewerken
Opent de SVG Source Editor.
- Glyph Palet
Opent de Glyph Palet.
- Type converteren…
Met deze knoppen kan de geselecteerde tekst geconverteerd worden. De beschreven functies zijn ook beschikbaar als sneltoetsen in de “Interactiehulpmiddel” bij sneltoets-voorkeuren.
- Vooraf ingedeeld
Converteert de tekst zodanig dat het niet automatisch in de volgende regel doorloopt. Daarbij is de CSS Witruimte samenval regel toegepast zodat alle verborgen witruimte wordt verborgen, en de regel wordt zo ingesteld dat extra witte spaties niet worden verwijderd. Alle absolute SVG 1.1 karakter transformaties worden omgezet naar nieuwe regels.
- Inline doorlopen naar volgende regel
Converteert de tekst zodanig dat het na een maximum lengte naar de volgende regel doorloopt (breedte voor horizontale tekst, en hoogte voor verticale tekst). Net zoals bij Vooraf ingedeeld, worden de CSS Witruimte regels en karaktertransformaties zodanig verwerkt dat regelafbrekingen worden gecreëerd en extra witte spaties vermeden.
- Voorgepositioneerd
Converteert tekst naar tekst met een SVG 1.1-stijl, waar extra Witruimte worden samengevoegd en nieuwe regels op absolute plaatsen komen. Dit is hoe oudere versies van Krita met tekst omgingen, maar dit is ook de meest gebruikte manier om met SVG-tekst om te gaan. Gebruik dit om tekst voor te bereiden voor een export wanneer het eindresultaat in een SVG 1.1 compatibel renderer getoond moet worden.
Tekst in een vorm en tekst op een pad kunnen niet geconverteerd worden. Gebruik in plaats daarvan Tekst in vorm vloeien en Zet tekst op pad uit rechtsklik-menu in het Mogelijkheden na selectie van tekstvormen.
Letterzet modus
In deze mode kan on-canvas de tekststijl voor een aantal teksteigenschappen worden aangepast.
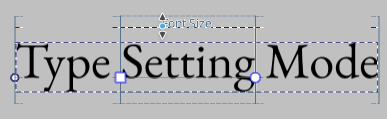
Tekst in de Letterzet modus, met “Setting” geselecteerd, en de cursor zwevend boven de Tekengrootte metric lijn.
Indien ingeschakeld, wordt de selectie vervangen door een aantal metrische lijnen. Als er geen selectie is, dan worden deze lijnen getrokken overeenkomstig de paragraaf, en gebruikt het lettertype van de paragraaf voor de indeling van de lijnen, en als er wel een selectie is, dan wordt de indeling van geselecteerde glyph-lettertype uit de tekstindeling gebruikt.
Door boven een lijn te zweven zal deze oplichten en de naam van de relevante metric tonen. + verslepen van een deze lijnen zal de grootte van deze metric vergroten of verkleinen. Op deze manier kunnen Tekengrootte, Lijnhoogte en Basislijnverschuiving direct op het werkvlak gewijzigd worden. Door Shift in te drukken zal er een andere metrics worden getoond: de Basislijn. Door te klikken op een basislijn zal de Dominante basislijn en de Uitlijning van basisregel op deze basislijn worden ingesteld, zodat de de tekst met verschillende afmetingen op deze basislijn worden uitgelijnd.

De afwisselende basislijn-modus. Cursor zweeft boven de Hangende basislijn.
Als de tekst is Vooraf ingedeeld of Voorgepositioneerd, dan komen twee extra controlepunten zichtbaar aan de start en aan het eind van de selectie. Hiermee kan de positie en de rotatiehoek van elke cluster worden gewijzigd. Met de vierkante hendel kan de hele selectie worden verplaatst, terwijl met de ronde hendel de selectie verschaald en geroteerd kan worden. Er zijn een aantal mogelijkheden voor de vierkante hendel in het instellingendialoog voor de sneltoetsen van teksten. Er is een (voor elke richting) Tekstselectie 1 pixel omlaag verplaatsen, dat de geselecteerde tekst in de opgegeven richting zal verplaatsen. Er is ook een Verwijder karaktertransformatie wat alle karaktertransformaties, (relatief, absoluut en rotatie) van de geselecteerde reeks verwijderd.
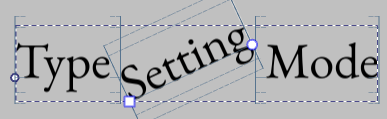
Het geselecteerde woord is geroteerd door met + aan de hendels te slepen.
Notitie
Voor gedetailleerde typografische aanpassingen, zoals handmatig kerning, wordt het aanbevolen om deze twee hendels voor CSS Afstand tussen letters te gebruiken. De laatste is bedoelt om letters over een heel stuk tekst te verdelen, en is in elke toepassing op subtiel verschillende manieren geïmplementeerd.
Intern wijzigen deze SVG 1.1 relatieve karaktertransformaties, wat inhoud dat ze de vorm niet breken en dat alle belangrijke browsers er mee overweg kunnen.
SVG Source Editor
Een klein venstertje waarin direct de SVG-broncode van de tekst bewerkt kan worden. De tekstindeling kan met meer complexe tekst overweg dan het tekst-functie op het on-canvas. Voor diegene die bekend zijn met SVG, kunnen het direct bewerken en zijn uitgebreide mogelijkheden zoals geneste Basislijnverschuiving, Tekstdecoratie en Richting gebruiken.
Bewerken
Druk op Opslaan als u klaar bent met uw bewerkingen zodat u het resultaat op het canvas kunt bekijken.
- Bestand
- Opslaan Ctrl + S
Slaat de huidige bewerkingen van de tekst op het werkvlak op.
- Sluiten Ctrl + W
Sluit de editor.
- Bewerken
Standaard bewerkingsfuncties:
- Ongedaan maken Ctrl + Z
Maakt de laatste actie in de tekstbewerker ongedaan.
- Opnieuw uitvoeren Ctrl + Shift + Z
voert de laatste ongedaan gemaakte actie in de tekstbewerker opnieuw uit.
- Knippen Ctrl + X
Knipt de geselecteerde tekst naar het klembord.
- kopiëren Ctrl + C
Kopieert de geselecteerde tekst naar het klembord.
- Plakken Ctrl + V
Plakt de tekst van het klembord.
- Alles selecteren Ctrl + A
Selecteert alle tekst in het actieve venster.
- Deselecteren Ctrl + Shift + A
Maakt de selectie van de tekst ongedaan.
- Zoeken Ctrl + F
Opent een venster met een invoerveld voor het zoeken van de opgegeven tekst in het actieve bewerkingvenster.
- volgende zoeken F3
Zoekt naar de volgende plek waar de opgegeven tekst voorkomt.
- Vorige zoeken Shift + F3
Zoekt naar de vorige plek waar de opgegeven tekst voorkomt.
- Vervangen… Ctrl + R
Opent een dialoogvenster met twee invoervelden: de tekenreeks waarna u wilt zoeken, en de tekenreeks waarmee u het wilt vervangen. Zal altijd ALLE gevonden locaties vervangen.
- Beeld
- Uitzoomen Ctrl + -
Zoomt uit op de tekst.
- Inzoomen Ctrl + +
Zoomt in op de tekst.
- Instellingen
Hier kunnen de kleuren ingesteld worden voor het kleur-formatteren.
Glyph Palet
Het dialoogvenster voor het glyph-palet laat in een rooster zien welke alternatieve karakters in een lettertype beschikbaar zijn via open-type-eigenschappen of unicode karakter-varianten. Dit is bedoelt als een hulpmiddel voor de Mogelijkheden van Opentype in het paneel voor teksteigenschappen.
Alternatieve glyphs
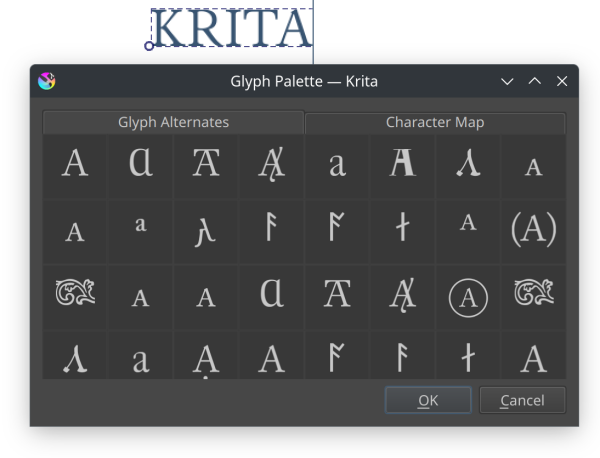
Glyph alternatieven voor het karakter “A” in het lettertype “Junicode”. Merk op dat niet in alle lettertypen evenveel alternatieven beschikbaar zijn.
Dit toont alle beschikbare alternatieven voor het geselecteerde karakter. Er zijn twee soorten alternatieven:
- Varianten van Unicode karakters
Dit zijn officieel gedefinieerde karaktervarianten. Eenvoudige voorbeelden hiervan zijn slashed 0 (ø) als een alternatief voor 0, maar in het algemeen worden deze gebruikt voor Han ideogrammen. Met name vereisen de namen van plaatsen en mensen dat bepaalde glyph varianten worden gebruikt om herkenbaar te blijven, en karaktervarianten maken dit mogelijk. Krita zal alleen de varianten tonen die in het lettertype zelf beschikbaar zijn.
- Open-type-eigenschappen
Dit zijn glyph alternatieven die beschikbaar zijn via een aantal open-type-eigenschappen zoals de karaktervarianten, alle alternatieven of stilistische alternatieven.
Karakter-map
Dit geeft een karaktermap voor het geselecteerde lettertype. Links is er een lijst van unicode blokken waarmee de karaktermap gefilterd kan worden.
Bovenaan is een zoekbalk, waar als een karakter wordt ingevoerd wordt getoond dat bij dat karakter andere karakter bij horen (als voorbeeld, een A zal laten zien ‘Á’, ‘Å’ en zelfs ‘Ấ’). Dit invoervak accepteert ook karakters in U+HEXCODE formaat.
Het overblivende gebied is toegewezen aan de karaktermap zelf. Als er geklikt wordt op een karakter dan opent een popup met glyph-alternatieven (indien beschikbaar), en als er gedubbelklikt wordt op het betreffende karakter dan wordt het betreffende karakter op de cursorpositie in de actieve tekst toegevoegd.