
Livelli
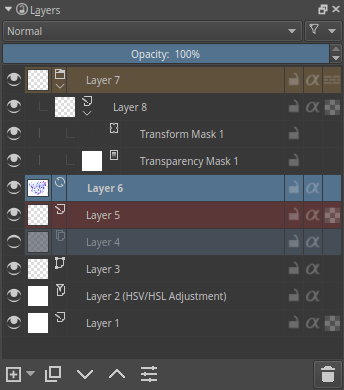
Panoramica generale dell’area di aggancio dei livelli per documenti con più livelli
L’area di aggancio Livelli è dedicata a uno dei concetti centrali di Krita: la gestione dei livelli. In quest’area puoi aggiungere, eliminare, rinominare, duplicare i livelli, e fare anche molte altre cose.
L’interfaccia si divide in tre parti principali:
Controlli
Pila dei livelli
Barra delle operazioni
Controlli
In cima sono presenti quattro controlli.

- Metodo di fusione

Un elenco a tendina per impostare il Metodo di fusione per il livello attivo.
- Opacità

Un cursore per impostare l’opacità per il livello attivo.
- Filtro

Ti permette di filtrare tutti i livelli esistenti, e può risultare utile se hai molti (centinaia!) livelli.
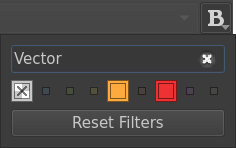
Finestrella opzionale a comparsa del filtro dal pulsante Filtro
Il filtro è applicabile su:
Etichette colore (disponibili solo se le etichette colore sono utilizzate; soltanto le etichette colore utilizzate possono essere filtrate)
Nomi dei livelli
- Impostazioni di visualizzazione

Ti permette di regolare alcune opzioni di visualizzazione aggiuntive della pila dei livelli.
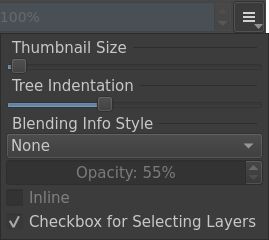
Finestrella a comparsa delle impostazioni di visualizzazione dal pulsante Impostazioni di visualizzazione
Le impostazioni di visualizzazione disponibili sono:
Cursore Dimensione delle miniature, per controllare la dimensione dell’anteprima delle miniature dei livelli
Cursore Rientro albero, per controllare il rientro dei livelli secondari, sia in una vista compatta, sia in una espansa
L’informazione dei metodi di fusione, definita da tre parametri
Added in version 5.2.
Modalità dettagli a tendina
Modalità
Descrizione
Nessuno
Non viene mostrata alcuna informazione aggiuntiva.
Semplice
Viene mostrata solo l’opacità o il metodo di fusione quando essi non sono al 100% e in modalità Normale.
Bilanciato
Viene mostrata sia l’opacità, sia il metodo di fusione per i livelli in cui l’opacità è sotto il 100% o il metodo di fusione non è in modalità Normale.
Dettagliato
Vengono sempre mostrate le opzioni di opacità e di fusione per tutti i livelli.
Il cursore Opacità (attivato se la modalità non è impostata a Nessuno) ti permette di controllare l’opacità dell’etichetta informativa aggiuntiva della fusione.
La casella di controllo In linea (attivata se la modalità non è impostata a Nessuno) fornisce informazioni in una singola riga compatta.
La Casella di controllo per la selezione dei livelli abilita le caselle di controllo aggiuntive tra l’icona della visibilità e l’etichetta.
Utile per quelle situazioni in cui non hai accesso al tasto Ctrl o Maiusc per selezionare più livelli, tipo una tavoletta grafica.
Pila dei livelli
Qui puoi selezionare il livello attivo. Tramite i tasti Maiusc e Ctrl puoi selezionare e trascinare più livelli. Puoi anche cambiarne la visibilità, lo stato di modifica, l’eredità alfa e il loro nome. Puoi aprire e chiudere gruppi, trascinare e rilasciare livelli, sia per riordinarli, sia per inserirli all’interno di un gruppo.
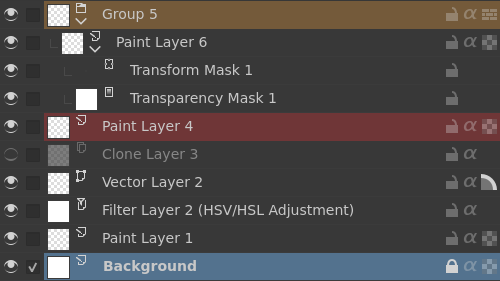
La Pila dei livelli è organizzata in tre parti:
Lato sinistro: icona a forma di occhio e casella di controllo opzionale
Centro: nome del livello e informazioni opzionali
Lato destro: controlli per le proprietà (i controlli disponibili variano in base al tipo di livello)
- Eredità alfa
*Disponibile solo nei * Livelli.
Facendo clic sull’icona Eredità alfa potrai attivare
 o disattivare
  .
.Ciò utilizzerà l’alfa di tutti i livelli sotto il livello attivo, ma all’interno dello stesso gruppo, come una maschera di trasparenza.
Per spiegazioni dettagliate ed esempi, consulta Eredita alfa o livelli di ritaglio o Maschere di ritaglio ed eredità alfa.
- Blocco alfa
*Disponibile solo sul * Livello disegno.
Facendo clic sull’icona Blocco alfa, potrai bloccare
 o sbloccare
  il canale alfa.
Blocca il canale alfa per impedire che venga cambiata la trasparenza di un livello. Utile quando si colorano le immagini.
- Anti-aliasing
Disponibile solo sui Livelli vettoriali.
Facendo clic sull’icona Anti-aliasing potrai attivare
 o disattivare
  la modalità anti-aliasing.
- Metodo di fusione
Disponibile su tutti i tipi di Livelli.
Imposta i Metodi di fusione del livello.
- Etichetta colore
È un colore che puoi attribuire al livello.
 sul livello per accedere al menu contestuale e assegnargli un colore. Potrai poi filtrare in base a questi colori.
- Stato Modifica (blocco del livello)
Facendo clic sull’icona Blocca potrai bloccare
 o sbloccare
  il livello.
Il blocco del livello impedisce qualsiasi modifica al livello. Utile quando si gestiscono tanti livelli o per essere sicuri di non modificare il contenuto di un livello per errore.
- Espandi o contrai i livelli
Disponibile solo su Livelli di gruppo non vuoti e Livelli per i quali sono definite maschere.
Facendo clic sull’icona Freccia potrai espandere
 o contrarre
  il gruppo/livello.
- Stile del livello
Disponibile solo sui Livelli che hanno Stili del livello assegnati.
Facendo clic sull’icona FX potrai rapidamente attivare
 o disattivare
  lo stile del livello.
- Nome
Il nome del livello, fai doppio
 per renderlo modificabile e premere il tasto Invio per completare la modifica.
- Buccia di cipolla
Disponibile solo nei livelli animati
Facendo clic sull’icona a forma di bulbo potrai attivare
 o disattivare
  le funzionalità «buccia di cipolla».
- Opacità
*Disponibile solo nei * Livelli.
Imposta l’opacità dell’intero livello.
- Modalità Attraverso
Disponibile solo nei Livelli di gruppo.
Facendo clic sull’icona Modalità passa attraverso potrai attivare
 o disattivare
  , il quale a sua volta influenzerà come vengono composti i metodi di fusione.
Quando attiva, consente che i metodi di fusione dei livelli all’interno del gruppo influenzino i livelli al di fuori del gruppo.
Attualmente non funziona con le maschere, di conseguenza queste presentano un simbolo di barrato sui livelli di gruppo impostati in modalità Attraverso.
Per spiegazioni dettagliate ed esempi, consulta Come vengono composti i livelli in Krita? o Maschere di ritaglio ed eredità alfa.
- Visibilità
Facendo clic sull’icona a forma di occhio potrai mostrare
 o nascondere
  un intero livello.
- Immagine della miniatura
Mostra una miniatura col contenuto del livello. Se ci fai clic sopra con Ctrl +
puoi creare una selezione dal contenuto di quel livello (vedi sotto la sezione Tasti singoli e combinazioni di tasti).- Avviso di discrepanza dello spazio dei colori del livello
Added in version 5.3.
In Krita i livelli possono avere uno spazio dei colori diverso da quello dell’immagine. Questo succede in genere quando importi un file esterno come livello. Tale differenza è uno stato perfettamente valido per Krita, ma potrebbe causare rallentamenti, in quanto Krita dovrà convertire al volo lo spazio dei colori di tali livelli. Quando lo spazio dei colori del livello è diverso da quello dell’immagine viene mostrata una piccola icona di avviso accanto alle proprietà del livello.
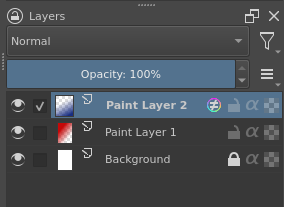
«Paint Layer 2» ha uno spazio dei colori diverso dal resto dell’immagine
Per rimuovere l’avviso puoi convertire manualmente lo spazio dei colori tramite la finestra di dialogo oppure usare l’azione Unifica lo spazio dei colori dei livelli (disponibile tramite il menu Ctrl + Invio).
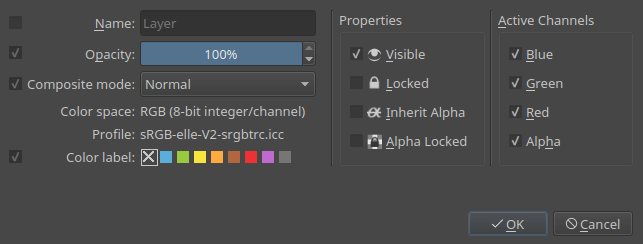
Per modificare congiuntamente queste proprietà in più livelli, premi l’opzione delle proprietà mentre sono selezionati più livelli, oppure premi il tasto F3. In questa finestra, per cambiare il nome di tutti i livelli devi selezionare la casella che si trova davanti a Nome e quindi inserire il nuovo nome. Krita aggiungerà automaticamente un numero dietro ai nomi dei livelli. Puoi cambiare anche altre proprietà quali la visibilità, l’opacità, gli stati di blocco, e via discorrendo.
Added in version 5.0: trascinando e rilasciando i colori dalla tavolozza alla pila dei livelli puoi creare rapidamente un livello riempimento.
Barra delle operazioni
Sono pulsanti che permettono di eseguire operazioni sui livelli.

- Aggiungi
Facendo clic sul pulsante
 aggiungerai in modo predefinito un nuovo Livello di disegno.
Il piccolo pulsante a forma di freccia al suo fianco apre un sottomenu con la Introduzione ai livelli e alle maschere.
- Duplica
Facendo clic sul pulsante
 potrai duplicare il livello attivo. Puoi eseguire rapidamente il comando con la scorciatoia Ctrl + + trascinamento.
- Sposta livello in alto
Facendo clic sul pulsante
 potrai spostare il livello in alto. Sposta i livelli dentro e fuori i gruppi se vi passi loro sopra.
- Sposta livello in basso
Facendo clic sul pulsante
potrai spostare il livello in basso. Sposta i livelli dentro e fuori i gruppi se vi passi loro sopra.- Proprietà del livello
Facendo clic sul pulsante
 potrai aprire la finestra delle proprietà del livello.
Il piccolo pulsante a forma di freccia al suo fianco apre il menu contestuale col
per il livello attualmente selezionato. Utile quando non hai accesso al pulsante .- Elimina
Facendo clic sul pulsante
 potrai eliminare i livelli attivi. Per ragioni di sicurezza puoi eliminare soltanto i livelli visibili e sbloccati.
Tasti singoli e combinazioni di tasti
Tasto Maiusc per selezionare più livelli adiacenti.
Tasto Ctrl per selezionare o deselezionare in modo indipendente un solo livello.
La scorciatoia Ctrl +
+ trascinamento crea un duplicato dei livelli selezionati, tramite il metodo trascina e rilascia.La scorciatoia Ctrl + E per unire in basso un livello. Unisce anche i livelli selezionati, gli stili di livello e mantiene intatte le maschere di selezione. Utilizzando la scorciatoia Ctrl + E su un singolo livello con una maschera, verrà unita in basso la maschera nel livello.
La scorciatoia Ctrl + Maiusc + E unisce tutti i livelli.
- La scorciatoia R + ti permette di selezionare il livello in cima con contenuto sotto il cursore come livello attivo. In aggiunta, puoi impostare le scorciatoie per quattro altre modalità:
«Seleziona tutti i livelli (sostituisci la selezione)» ti consente di selezionare tutti i livelli con contenuto sotto il cursore come livelli attualmente selezionati.
«Seleziona tutti i livelli (aggiungi alla selezione)» ti consente di selezionare tutti i livelli che hanno del contenuto sotto il cursore e aggiungerli ai livelli selezionati.
«Seleziona dal menu (sostituisci la selezione)» ti consente di selezionare un livello da un menu a comparsa o tutti i livelli nel menu come livello attivo o livelli attivi.
«Seleziona dal menu (aggiungi alla selezione)» ti consente di selezionare tutti i livelli nel menu come nuovo livello attivo o livelli attivi. Le ultime due modalità sono simili a Ctrl +
per selezionare un livello in Photoshop.
- La scorciatoia R +
Il tasto Ins aggiunge un nuovo livello.
Il tasto Maiusc + Ins aggiunge un nuovo livello vettoriale.
La scorciatoia Ctrl + G crea un livello di gruppo. Se sono selezionati più livelli, questi vengono inseriti nel livello di gruppo.
La scorciatoia Ctrl + Maiusc + G imposta velocemente un gruppo di ritaglio rapido: nel gruppo sono aggiunti i livelli selezionati e in cima viene creato un nuovo livello con l’opzione Eredità alfa attivata, pronto per il disegno!
La scorciatoia Ctrl + Alt + G separa i livelli contenuti in un gruppo.
La scorciatoia Alt +
crea la vista isolata di un livello. Essa verrà mantenuta tra i livelli fino alla ripetizione della stessa azione.I tasti PagSu e PagGiù servono per passare da un livello all’altro.
Le scorciatoie Ctrl + PagSu e Ctrl + PagGiù spostano su e giù i livelli selezionati.
Ctrl +
sulla miniatura di un livello sostituisce la selezione attuale con una nuova creata dal contenuto di quel livello.Ctrl + Maiusc +
sulla miniatura di un livello aggiunge alla selezione attuale una nuova selezione creata dal contenuto di quel livello.Ctrl + Alt +
sulla miniatura di un livello sottrae dalla selezione attuale una nuova selezione creata dal contenuto di quel livello.Ctrl + Maiusc + Alt +
sulla miniatura di un livello interseca la selezione attuale con una nuova selezione creata dal contenuto di quel livello.