
色ぼかしブラシエンジン

色ぼかしブラシは滲ませたりくすませたりすることで色を混ぜることを可能にするブラシです。絵描きにとってはとても強力なブラシです。
オプション
色ぼかしブラシの独特なオプション
描画色の割合
ぼかす描画色の割合を指します。混色の持続 と 混色範囲の半径 と連携して機能します。

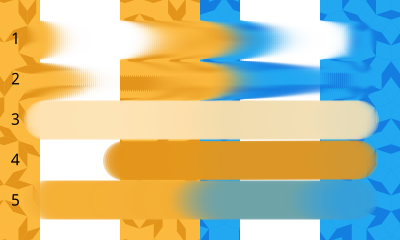
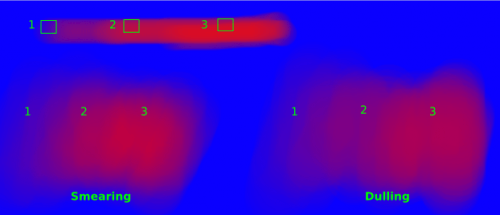
A variety of color smudge strokes in the Smear Mode with different opacities, smudge lengths and spacing. All are with 50% Color Rate. Left-hand set being the old algorithm and the right-hand set the new algorithm. The bottom two strokes are using the 覆い焼き(色) blending mode.
Added in version 5.0: The option Use new smudge algorithm greatly affects how the Color Rate works. With the old algorithm, the Color Rate will be affected by both smudge length and opacity, while with the new algorithm, Color Rate will only interact with Opacity.
At first glance, this may seem like it reduces nuance. But instead, the new algorithm simplifies brush creation, with it being far clearer which elements interact with Color Rate.

Same as figure above, but then in Dulling Mode.
Using the new algorithm, turning off the smudge length is all that's needed to make a brush that is similar to the ピクセルブラシエンジン. This is useful as a starting point for brushes that only need a little smudge.
When using the gradient mode, the Color Rate will control the colored brush tip instead of a flat color.
Blending modes are applied when the color part is composed onto the smudge part. This effectively means that color smudge brushes with a blending mode other than Normal will be greatly affected by Color Rate in addition to 描点間隔 and opacity.
混色の持続
Affects smudging and allows you to set it to Sensors. Smudging is greatly affected by 描点間隔 as well as Opacity. The former controls how many dabs are placed, and thus how many samples are made. This results in a smoother result for Smear Mode, and a more opaque result for Dulling Mode.
主要な2つのタイプを示します:
- 色をのばす
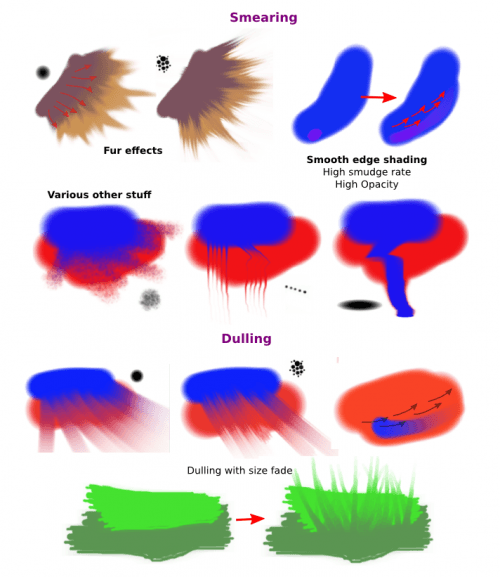
Copies the area underneath the previous position of the brush onto the new position, taking opacity into account. This tends to result in a smear-effect.
Great for making brushes that have a very impasto oil feel to them. It's recommended to have a low spacing for Smear, as this will result in a less grainy looking smear.

A variety of color smudge strokes in the Smear Mode with different opacities, smudge lengths and spacing. Left-hand set being the old algorithm and the right-hand set the new algorithm. The bottom two strokes are using the 覆い焼き(色) blending mode, which does not have any meaningful effect, given the 描画色の割合 is set to 0%.
- 混色して描画
Picks the color underneath the brush dab (using the Smudge Radius, if applicable), and first fills the whole dab with that before applying the color and the opacity. Named so because it dulls strong colors.
Using an arithmetic blending type, Dulling is great for more smooth type of painting. It's recommended to increase the spacing on dulling brushes as much as possible without the stroke looking choppy, as it speeds up the brush without losing smudge quality. The resulting stroke can be made stronger by increasing the smudge radius or the opacity.

Same as above, but then for the Dulling Mode.
- 強度
Affects how much the smudge length takes from the previous dab its sampling. This means that smudge length at 100% will never decrease, but smudge lengths under that will decrease based on 描点間隔 and Opacity.
- Smear Alpha
Controls whether the transparency of the smeared pixels is taken into account when painting. This can be helpful to get a more opaque effect, as if laying down thick layers of paint, without losing the smudge effect.
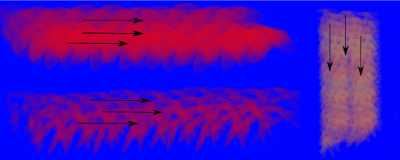
Different strokes showing how smear alpha functions.
Smear Mode with Smear Alpha.
Smear Mode without Smear Alpha.
Dulling Mode with Smear Alpha.
Dulling Mode without Smear Alpha.
Dulling Mode without Smear Alpha, and 混色範囲の半径 set to 100%.
- Use new smudge algorithm
Added in version 5.0.
The new smudge algorithm was initially introduced to allow lightness and gradient modes on the color smudge. But it allows for more: it is a little quicker, and it has a better separation between the 描画色の割合 and the Smudge Length.
共通動作:
Unchecking the smudge length function sets smudge length to 100% (not 0.00).
Opacity: Below 50%, there is practically no smudging left: keep opacity over 50%.
違い:
Spacing with Smearing: the lower the spacing, the smoother the effect, so for smearing with a round brush you may prefer a value of 0.05 or less. Spacing affects the length of the smudge trail, but to a much lesser extent. The strength of the effect remains more or less the same however.
間隔と混色: 間隔が小さいほど、効果は強くなります: 間隔を小さくしすぎると混色効果が強くなりすぎます(拾った色を決して手放しません)。効果の長さには影響します。
Both Smearing and Dulling have a "smudge trail", but in the case of Dulling, the brush shape is preserved. Instead, the trail determines how fast the color it picked up is dropped off.
混色範囲の半径
混色範囲の半径 は 混色して描画 モードで混色の持続設定を使用する時に、より大きい半径で混色することを可能にします。
スライダーはブラシサイズのパーセンテージを示します。センサー から修正できます。
A variety of brush strokes using 50% color rate, 50% smudge length and 50% opacity, but different smudge radii. The top stroke is in smear mode and thus smudge radius is not in effect.
バージョン 5.0 で変更: In versions prior to 5.0, Smudge Radius can go up to 3,00,00%, while the program's internal value is 1/100 of the displayed value. Starting from 5.0, the displayed and the internal value of Smudge Radius are unified, they can only go up to 300%, as intended.
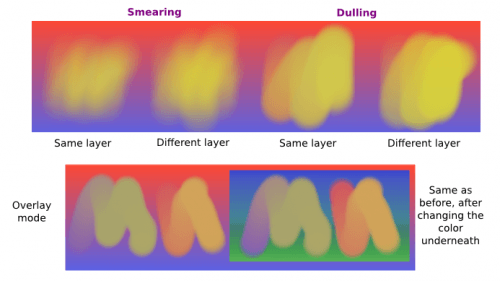
オーバーレイ
Overlay is a toggle that determine whether the smudge brush will sample all layers (overlay on), or only the current one.
デフォルトでは、色ぼかしブラシは現作業レイヤーの色情報を参照しますが、すべてのレイヤーの色情報を参照したい場合には、合成モードをオンにすることができます。
しかし、下にあるレイヤーから「拾い上げる」ことに注意してください。後から下にあるレイヤーに変更を加えると絵が崩れてしまうかもしれません。
Paint Thickness
Added in version 5.0.
This affects how strong the lightness modes affect the current color. Because the Color Smudge Brush smudges, what actually happens is that the lightness part is painted into a separate height map. This prevents the shadows and highlights of the current lightness brush tip from being mixed into the smudge, which would have resulted in all smudges becoming white or black. The height map is discarded when switching brush engines, layers or tools. Because this heightmap only exists for the layer currently being edited, lightness brushes and paint thickness cannot be used together with オーバーレイ.
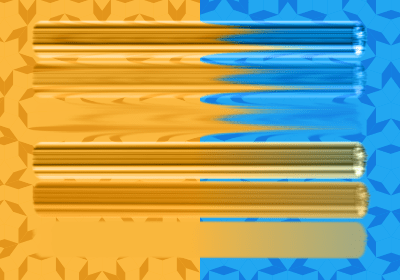
Image showing off different variations of Paint Thickness, with the top three strokes being in Smear Mode and the bottom three in Dulling Mode. Strengths are 100%, 50%, and 0% from top to bottom.
This has two modes, which change how the existing heightmap is interpreted:
- Overwrite (Smooth out when low) existing paint thickness
Here the lightness value of the brushstroke overrides the value that was there before, effectively smoothing out previous paint if the thickness value is low. The Opacity setting will cause it to blend with the previous paint height, but that will also bring down the color. This mode is useful for a brush that can paint with thickness, but can also smooth out existing paint if you wish.
- Paint over existing paint thickness (controlled by smudge length)
Here the lightness value blends with the previous values, based on the Smudge Length, as described above. It allows the kind of blending with previous paint height that Opacity allows in the Overwrite mode, but without affecting the color rate.

Image demonstrating the two modes, with the top strokes being Overwrite Existing Paint Thickness and the bottom strokes Paint over existing paint thickness. In both cases, a red stroke was laid with 100% paint thickness. Blue strokes were overlaid going from thin to thick. Notice how the Paint over existing type differs between 0% and 100% Smudge Length.
Hue, Saturation, Value
Identical to 色相、彩度、明度 in the Pixel Brush Engine, this will adjust the current foreground color before it is mixed in via 描画色の割合. Introduced because this brush engine used to have a small rounding error leading to iridescent smears, which was fixed. Artists who liked this effect can now emulate it by enabling Hue, enabling Fuzzy Dab and disabling Pressure and finally setting Strength to 40%.

Top: without hue variance, Bottom: with hue variance.
Hue, Saturation and Value don't affect brush-tips using the gradient mode.
ブラシ形状
The Color Smudge Brush has all the same ブラシ形状 as the ピクセルブラシエンジン!
ぼかし効果はブラシの不透明度が低いと弱くなるので、不透明度の低いブラシでは不透明度とぼかし半径と描画色の割合を高くしてください。
散布とその他の粒子の形状の変化
The Color Smudge Brush shares a number of options with the ピクセルブラシエンジン.
しかしながら、ぼかし効果のために、描画結果はピクセルブラシとは異なります。特に、散布オプションはとても重要です。
特記することはわずかです:
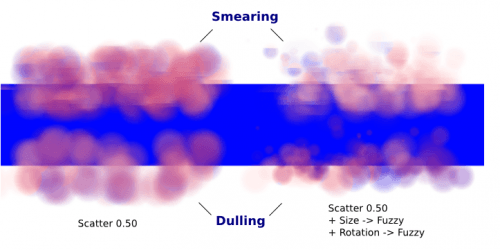
Scattering is proportional to the brush size. It's fine to use a scattering of 500% for a tiny round brush, but for bigger brushes, you may want to get it down to 50% or less.
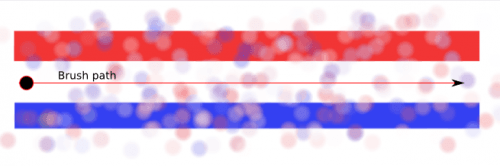
色のばし オプションで描いた線だと分かるでしょう。これは、ブラシが長方形のしっかりとした線の色を拾い上げたという事実による結果です。
散布では、ブラシ直下の色を直接拾うのではなく、ある距離離れたところから色を拾います。
チュートリアル: 色ぼかしブラシ
何がどう動作しているのかを理解するために、最初の部分は読み飛ばすことをお勧めします。
Smudging and blending
ここでは、描画色の割合をオフにした使用例で説明します。
設定の詳細な説明はしませんが、ピクセルブラシチュートリアル で見つけることができます。
ぼかし効果
シンプルなぼかし:
色ぼかしブラシで、色のばしか混色を使うことができます。
描画色の割合をオフにする
ぼかす
不透明度の低いブラシを使うときは、ぼかし半径 と 不透明度 を必要に応じて最大まで上げて目に見えにくい効果を「補償」することを記憶に留めてください。
色のばしに関するいくつかの設定
滑らかに伸ばすためには間隔を減らしてください。間隔はブラシサイズと比例関係にあることを記憶に留めてください。小さい円形ブラシでは、0.10の間隔で良くとも、中程度サイズ以上のブラシでは間隔を0.05以下に減らしてください。
混色に関するいくつかの設定
間隔を減らすほどぼかし効果は強くなるため、適切なバランスを見つけてください。ほとんどの中程度サイズの円形ブラシで値を0.10すれば問題ありません。
色のばしと違って、混色はブラシ形状・大きさを保持するので、色のばしブラシのようなブラシサイズをフェードオフする挙動はしません。似たような効果はシンプルなサイズフェードダイナミクスで得られます。
テクスチャ合成
ここで「合成」と呼んでいるものは、単に次の2つのダイナミクスのうちの一つを使うことです。
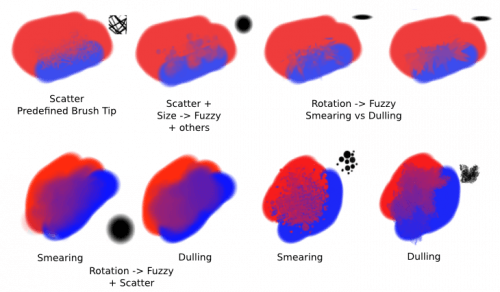
回転 を 距離 あるいは ファジー に設定する。
- 積/和 散布:
For most mid-sized brushes you will probably want to lower the scatter rate to 50% or lower. Higher settings are okay for tiny brushes.
散布はブラシ直下の色を拾うのではなく、ある距離離れたところから色を拾うことを覚えていてください。(ブラシ形状)
Optional: Pile on size and other dynamics and vary brush tips. In fact, the Color Smudge Brush is not a blur brush, so smudging is not a very good method of "smooth" blending. To blend smoothly, you'll have better luck with:
後述する中間値で描画することで変化を作る。
あるいは、このチュートリアルの最後で述べる、「選択範囲を塗り広げてかすませる」機能を用いる。
I've tried to achieve smooth blending with Color Smudge Brush by adding rotation and scatter dynamics, but honestly they looked like crap.
However, the Color Smudge Brush is very good at "textured blending":
基本的に最初に絵を描いて、その後にテクスチャトランジションを追加できます。
Coloring
この最後のセクションでは 描画色の割合 機能をオンにしています。
レイヤーオプション
Before we get started, notice that you have several possibilities for your set-up:
同じレイヤー上でシェード
アルファ継承を使用した異なるレイヤー上にシェーディング。ブラシはレイヤーの透明情報を参照して合成します。これが意味することは:
ブラシ直下の領域が一様であれば、同一レイヤーでシェーディングをかけるのと同じような効果を得ます
ブラシ直下の領域が一様でなければ、色の変化はわずかなものとなるでしょう。
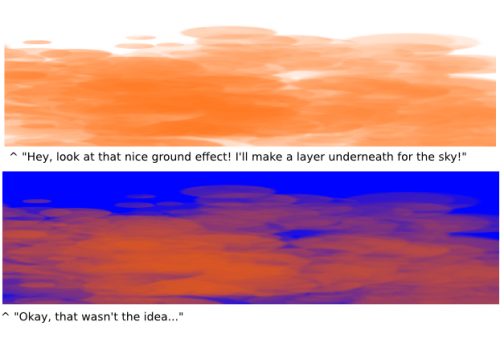
Shading on a separate layer, using オーバーレイ mode. Use this only if you're fairly sure you don't need to adjust the layer below, or the colors may become a mess.
透明性に関するイシュー
The Color Smudge Brush blends with transparency. What this means is that when you start a new, transparent layer and "paint" on this layer, you will nearly always get less than full opacity.
基本的に:
何も描かれていないキャンバスに色を付けると強い効果を見ることができます
しかし、そのレイヤーの下に別の何かを追加すると、より強い効果が見られます
解決策はとってもシンプルです:
- 最初に下にある領域に色をつけておいてください:
着色すれば、その時点で下のレイヤーに既に色がついているので、それで完了です
絵の場合、最初に背景レイヤーにざっくりと色を塗ります
あるいは、新しいレイヤーの形に合わせて着色して、アルファ継承を使用してください
最後の解決法としては、最大の効果を得るために使用している色と非常に対照的な色を使用してください。例えば、暗い影の領域あるいは明るいハイライト領域を最初にシェードしておき、色ぼかしブラシをその対照色で使用してください
ソフト・シェーディング
多少の滑らかな色の変化をつけたいと仮定します。次のいずれかの選択肢があります:
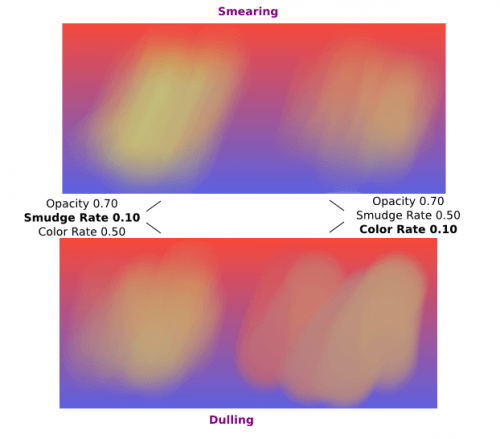
Color Rate as low as 10% for round brushes, higher with non fully opaque brush tips.
Or set the Smudge Rate as low as 10% instead.
あるいは其の二つを組み合わせてください。自分が最も気に入る効果を自身で試してください。
オプション: より滑らかな合成に 回転 機能をオンにする
オプション: 確かな効果のために 散布 機能をオンにする
オプション: 必要に応じて サイズ と 不透明度 のダイナミクスを操作する
実際にはこれは、滑らかな色変化をつけることに関しては、まあまあな方法です。代わりに中間値を構成するのがベストです。例を挙げると:
最初に青い領域の上に三回、赤色で塗り重ねました。そこから3段階を選択しています。
ショートカット Ctrl +
 で色を抽出し、この色を継承して使用しています。
ペインティング: 濃い油絵スタイル
色ぼかしブラシのプリセットの多くは、濃い油絵のような効果を生み出します。これは主に色をのばすモードをオンにすることで得られます。基本的に:
- 描画色の割合と高いぼかし度合いでの色をのばすモード
通常の円形ブラシ、あるいは完全に不透明な定義済みブラシのどちらでも、値は0.50で問題ありません。
密度の低いブラシ、あるいは完全不透明ではない定義済みブラシの場合は、最大は1.00までです。
サイズ/回転/散布のダイナミクスを必要に応じて追加してください。その場合、ぼかし度合いと描画色の割合を増やして、混色の度合いが増加するよう補償してください。

私が本当にやりたいことの一つは、前景色と背景色に異なる色を設定してから をオンにするか、あるいは異なる色で続けて塗るだけです。(例 右下)
Here's some final random stuff. With pixel brushes, you can get all sorts of frill designs by using elongated brushes and setting the dynamics to rotation. You won't get that with Color Smudge Brushes. Instead, you'll get something that looks more like... yarn. Which is cool too. Here, I just used oval brushes and .
ペインティング: デジタル水彩スタイル
ここでの「デジタル水彩」は、しばしばオンラインで見られる水彩スタイル、つまり、現実の水彩よりも柔らかで滑らかなシェーディングのスタイルを参照しています。これには混色して描画するモードが主に必要です。いくつかの事項:
Contrary to the Smearing mode, you may want to lower opacity for normal round brushes to get a smoother effect, to 70% for example.
ブラシ形状のフェード値も同様に変化させます。
散布 あるいは他のダイナミクスを使用する際には、様々な結果に応じてぼかし程度あるいは色の値を高く設定するか低く設定するか選ぶことができます。

かすみ
できること:
色を塗ると、ほとんどテクスチャ変化のためにぼかします。
あるいは、中間色の値を用いた変化を作り上げます。
より滑らかな効果が欲しい場合には、かすみを使用してください。正確には、ガウスぼかしです。
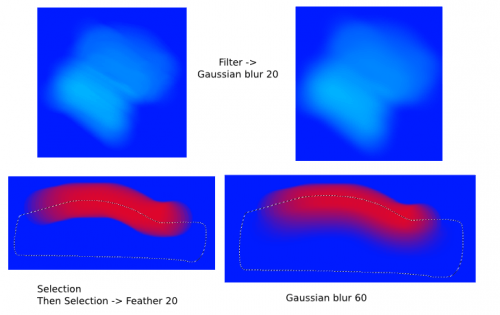
さあ進みましょう。最後のちょっとしたトリックでこのチュートリアルは終わりです。