
リソース管理
リソースはブラシプリセットやパターンといった、接続可能なデータのかたまりです。Krita には洗練されたリソース管理システムがあり、タグ付けや無効化、共有などができます。
バージョン 5.0 で変更.
すべてのリソースはリソースフォルダに保存されます。このフォルダは 全般設定 で設定できます。これらのリソースを追跡するのは大変なので、Krita は SQLite キャッシュを作り、リソースのタグ、名前、バージョン、その他のデータを保存します。
このキャッシュのおかげで、Krita は必要になるまでリソースの読み込みをする必要がありません。これにより Krita は以前よりも軽くなりました。キャッシュを削除すると、Krita が追跡しているタグや関係性も削除されるので注意してください。
もしリソースフォルダの場所を変更していなければ、リソースは次の場所にあります。
- Linux
$HOME/.local/share/krita/- Windows
%APPDATA%\krita\- macOS
~/Library/Application Support/Krita/- Windows ストアで Krita をインストールした場合、カスタムリソースは次のような場所にあります:
%LOCALAPPDATA%\Packages\49800Krita_ランダムな文字列\LocalCacheRoamingkrita
リソースライブラリ
Krita は様々なリソースライブラリを読み込むことができます。
- リソースフォルダ
リソースフォルダは主要なライブラリと考えられています。新しいリソースを作成するときはここに保存されます。場所は 全般設定 で設定できます。
- リソースバンドル
リソースを共有する主要な形式は リソースバンドル で、リソースをまとめた圧縮ファイルです。メタデータやマニフェストといった他の情報も含まれていて、Krita はファイルにエラーがないか確認します。
- Adobe Brush Library
複数の画像が入った
ABRファイルです。以前のバージョンの Krita では読み込めませんでしたが、現在では Krita はこれを ブラシ形状 のライブラリとして読み込みます。- Adobe Style Library
これは Photoshop の
ASLフォーマットで、レイヤースタイル を保存します。- ドキュメントストレージ
すべての Krita ドキュメントはリソースを保存し、リソースライブラリとして機能することもできます。現在はパレットにしか使われていません。
- メモリストレージ
最後に、メモリライブラリは Krita が生成しディスクに物理的なバージョンがないリソースを一時的に保存する場所です。現在は前景色から背景色へのグラデーションに使われています。
リソースライブラリは で管理できます。このダイアログでは、リソースライブラリをインポートしたり無効化したり、自分自身のバンドルを作る こともできます。
バンドルのインポート
バンドルをインポートするにはダイアログ右側の上にある インポート ボタンをクリックします。選択されていなければ .bundle ファイル形式を選択し、ダウンロードしたバンドルがあるフォルダを開いて、ファイルを選択し 開く をクリックします。バンドルがインポートされると バンドル一覧に表示されます。バンドルを有効化または無効化するには、一覧でエントリを選択し 非アクティブ化 を選択します。
On Android, you can also get more resource bundles through the application itself in return for supporting Krita, see Android Supporter Packs.
自分自身のバンドルを作る
選んだリソースから自分自身のバンドルを作ることができます。バンドルを作成 をクリックすれば、下に示すダイアログボックスが開きます。
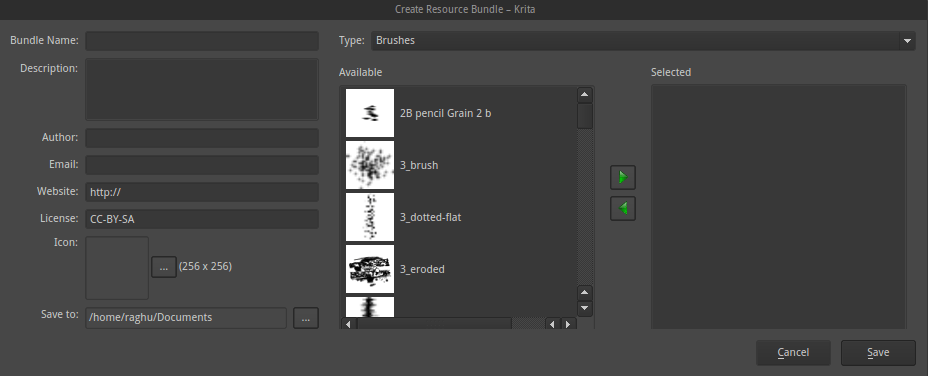
What follows is a so-called wizard, that is, Krita will run you through bundle creation, step-by-step.
Choosing Resources
Krita will ask you which resources you want to use. Double-click a resource to add it to the bundle.
Choosing tags
Krita will ask you which tags you want to include inside the bundle. Click the + button to select a dropdown of tags.
Enter Bundle Details
Here you can set the bundle title, icons and some info about you as the author.
Choose Save Location
Finally, Krita will present you with a summary of the bundle you've created. All that's left is to select a spot where you want to save the bundle and clicking on the Save button
You can now share this bundle with other artists or load it on other workstations.
バージョン 5.3 で変更: The bundle creator was overhauled for 5.3.
インポートしたバンドルの削除
インポートしたバンドルを 完全 に削除したい場合には リソースを管理 ダイアログの リソースフォルダを開く ボタンをクリックします。するとファイルブラウザでリソースフォルダが開きます。バンドルフォルダに入りもう必要ないバンドルファイルを削除します。次回 Krita を起動するとバンドルと関連付けられたリソースは読み込まれません。
リソースの管理
上でも述べたとおり Krita には柔軟なリソース管理システムがあります。バージョン 2.9 から上で述べた多くのリソースを Krita 内で作る ZIP 書庫ファイルを使って共有することができます。
設定のリソース管理画面もアーティストが簡単にバンドルファイルを準備できるように改修されました。リソース管理画面に行くには メニューを使います。
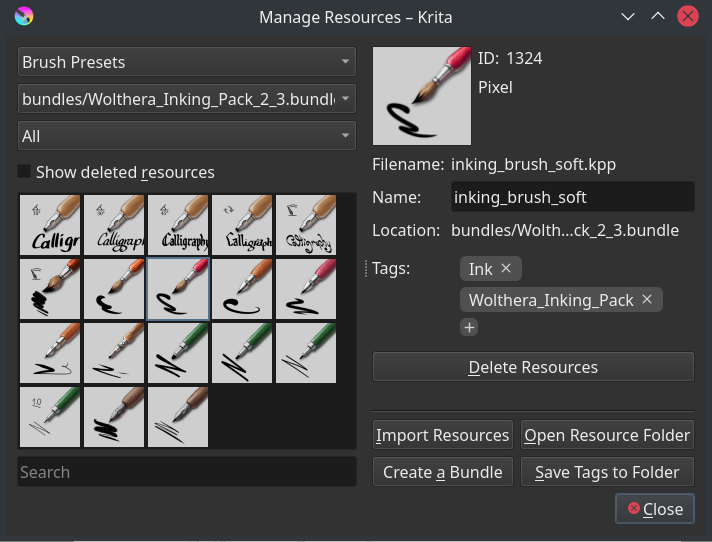
ここでは様々なことができます。バックアップファイルの削除、同時タグ付け、リソース自体の削除/無効化、リソースのインポート、バンドルの作成ダイアログの開き方などです。
リソースのインポート
リソースをインポートするには、リソース選択画面またはリソースマネージャーで インポート を選択します。
リソース選択画面でのインポートはかなり簡単です。特定の種類のファイルしか選択できず、選択できるファイルはそのリソースにインポートできます。
リソースマネージャーのインポートボタンは、インポートする *.png ファイルがブラシ形状かテクスチャかを選択する必要があります。複数のリソースタイプで使えるフォーマットをインポートすると、どのリソースタイプにインポートするかを選択するウィンドウが表示されます。
有効化と無効化
リソース選択画面でリソースを選択し、ごみ箱アイコンをクリックすることでリソースを無効化できます。
リソースを有効化するには に行き、削除したリソースを表示 をオンにします。無効化されたリソースが表示されるようになるので、それらを選択し リソースを復元 をクリックします。
リソースを以前のバージョンに戻す
まずリソースフォルダに行きます。 です。
そして
paintoppresetsフォルダに入ります。関連するリソースのすべてのバージョンをバックアップ(選択して切り取り)して見つけやすい場所に置きます。そして
paintoppresetsフォルダからこれらのファイルをすべて削除します。Krita を再起動します。
追加したいバージョンのリソースだけを追加します。
バックアップファイルの削除
Krita でプリセットを削除しても、Krita は実際にはプリセットを物理的に削除しているわけではありません。ブラックリストに追加して次回 Krita を起動してもこのリストにあるものは読み込まれないだけです。このリストにあるブラシを削除するには バックアップファイルを削除 をクリックします。
注釈
バックアップファイルの削除は 5.0 では一時的に無効になっています。
タグ
タグ付けを行うことで、ペイント中にリソースを管理することができます。Krita のすべてのリソースにタグを付けることができます。これらのタグはリソースマネージャーで追加することもできますが、ブラシプリセットドッカーやパターンドッカーなどのドッカーでも追加することができます。ドッカーの + アイコンをクリックしてタグ名を追加します。追加するだけでなく、タグの名前を変更したり削除することもできます。

リソースには一つ以上のタグを付することができます。例えば、お気に入りの インクペン を変えたブラシプリセットにタグを付けて線画、塗り、コミックとお気に入りのブラシグループに表示させることができます。
すべてのリソースにタグを付けることができるので、ブラシ設定エディタの 事前定義 タブのブラシにもタグを付けてグループ化することができます。
リソースマネージャーでは複数のリソースに一度にタグ付けできます。複数のリソースを選択する場合、個々のリソースを選択するには Ctrl を使い、一度にすべてのリソースを選択するには Shift を使います。そして タグ セクションの横のプラスアイコンをクリックして選択したリソースにタグを付けます。
いくつかのタグは翻訳されます。他の人のためにバンドルを作るときには、このようなタグを使うことで言語間の互換性を確保することができます。翻訳されるタグは次のとおりです。
デジタル
消しゴム
FX
お気に入り
インク
ペイント
ドット絵
スケッチ
テクスチャ
フィルタリング
いくつかのドッカー、例えば下に示すブラシプリセットドッカーには、検索バーで検索するような機能を持つ、リソースフィルタを持つことができます。
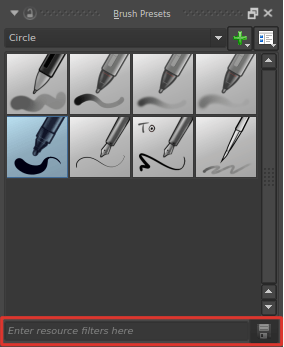
ブラシ名やタグ名を入力し、引き出したいブラシプリセットの一覧を素早く出すことができます。ドロップダウンからタグを選択した上で他のタグからのブラシプリセットも含めたい場合は、部分名 または !部分名 を使ってフィルタを追加します。(大文字小文字の区別なし、部分一致)
- リソースの拡大
見本やブラシ、パターンといったリソースのサムネイルが小さいと感じたら、大きく作るか 拡大 することができます。すべてのリソースセレクタは、セレクタの上にマウスを置き、Ctrl +
 ショートカットを使って拡大・縮小することができます。
Krita リソースの種類
主要なリソースの種類