
アニメーション出力
Render animation allows you to render your animation to an image sequence and to .gif, .mp4, .mkv, or other video files.
For rendering to an animated file format, Krita will first render to a PNG sequence and then use a video encoder to render that sequence to an animated file format. The reason for this two-step process is that animation files can be really complex and really big, and this is the best way to allow you to keep control over the export process. For example, if your computer has a hiccup, and one frame saves out weird, first saving the image sequence allows you to only resave that one weird frame before rendering.
つまり出力を開始する前にフレームを置いておく良い場所を見つけておかなければなりません。簡素なアニメーションだけであれば、十分な容量のあるハードドライブの場所を使って Delete Sequence After Rendering を選択します。
注釈
On Android, file handling and video rendering works differently. You can only either export an image sequence or a video, not both. FFmpeg is not used, do not attempt to install it.
General
- 最初のフレーム
範囲の最初のフレームを調節できます。自動的にタイムラインで選択された最初のフレームに設定されます。一部のみを再出力したいときに便利です。
- 最後のフレーム
上のように、範囲の最後のフレームを調節できます。自動的にタイムラインで選択された最後のフレームに設定されます。
Export as Image Sequence
- ファイル形式
The file format to export the sequence to. When rendering we enforce PNG. The usual export options can be modified with the edit button next to the drop-down.
- Image Location
Where you render the image sequence to. Some people prefer to use a flash-drive or perhaps a harddrive that is fast. On Android, you will be prompted for a directory instead.
- 基本名
画像シーケンスの基本名です。フレームごとの番号が後に付けられます。
- Start numbering at
フレームは上の 基本名 を使いフレーム番号を追加することで名前が付けられます。これはフレーム番号をどこから開始させるか設定でき、8から10フレームを開始点3で出力すると11と15になります。正確な出力や、0で始まるシーケンスを認識しないプログラムに有用です。
- Only Unique Frames
Normally Krita generates a frame for every FPS in the sequence. Ticking this will only generate keyframes, saving space.
Export as Video
- Width
Set the desired width in pixels.
- Height
Set the desired height in pixels.
- FPS
Set the desired frames per second.
注釈
Widths and heights above 1920 pixels and FPS values beyond 30 are not widely supported. They can cause the video export to fail outright or the resulting video may not play back properly on some devices. Krita will warn you about this, but still allows you to try such exports.
Some video formats require width and height to be even numbers. Krita will automatically adjust the size if necessary.
- Filter
Set the scaling filter. Bicubic is fine for most cases, but if you want to, say, export a pixel art animation at twice the size, Nearest Neighbour will preserve the fine details better.
- 出力
The file format to render to. Some have extra options that can be manipulated via the edit button next to the drop-down.
- Video Location
Location and name of the rendered animation. On Android, you will be prompted for a file name instead.
- Include Audio
Include any audio you have added.
- FFmpeg
The location where your have FFmpeg. On Android, the operating system's video encoder is used instead.
バージョン 5.2 で変更: This is now optional. Krita's bundled FFMpeg functionality is able to provide some options, but it is still useful to set this if you want to use a specific version of FFMpeg for rendering videos.
- Delete Sequence After Rendering
Delete the prerendered image sequence after done rendering. This allows you to choose whether to try and save some space, or to save the sequence for when encoding fails. On Android, the image sequence is only stored internally and always deleted afterwards.
バージョン 5.2 で非推奨: Since 5.2, Krita will always delete the image sequence if Export as Image Sequence is not checked while Export as Video is.
警告
Krita は現在透過要素の動画出力はサポートしておらず、代わりに黒として表示されます。これに対応するには、動画出力前にファイルの一番下に色の付いた不透明のレイヤーを追加することができます。
アニメーション出力の準備をする
バージョン 5.2 で変更.
Since Krita 5.2, Krita bundles a small part of FFmpeg. This means that you will not strictly have to download and setup FFMpeg to render animations. Different versions of the program have different options however, and video experts might want to use a specific version of FFMpeg to get more codec options.
The bundled FFmpeg supports the following containers: Webm, Matroska and OGG, which are a wrapper around the video data (amongst others), which are encoded with codecs, of which the bundled FFMpeg supports:
AOM AV1
VPX VP9
VPX VP8
264 (via openH264)
Theora
The following instructions will explain how to get a non-bundled version of FFMpeg and set it up. The setup is a one-time thing so you won't have to do it again.
ステップ1 - FFmpeg のダウンロード
Windows では
FFmpeg の ダウンロードページ を開きます。
release セクションの ffmpeg-release-essentials.zip とあるダウンロードリンクを選びます。
注釈
shared とあるファイル名のファイルはダウンロード しないで ください。それは Krita では動きません。
ファイル名が .7z で終わっていても使用することはできますが、7zip 書庫(例えば 7zip そのもの など)は展開できるプログラムが必要になります。.zip ファイルの場合、Windows のファイルブラウザを使うだけで開けます。
macOS では
上のセクションを見てください。しかし、FFmpeg は代わりに ここ から入手します。FFmpeg ヘッダのある所、左側にある大きな緑のボタンを選びます。また FFmpeg が macOS ビルドを .7z 形式で提供しているため、.7z をサポートする展開ソフトが必要になります。もしなければ、Keka のようなものを試してください。
もしくは大きな緑のボタン下に Download as ZIP と書かれた小さいテキストがあります。それなら Finder を使って展開できます。
Linux では
FFmpeg が多くの Linux システムでリポジトリからインストールできます。GIF を正しくサポートするには、palettegen 機能を使用するため FFmpeg 2.6 が必要です。
For Android
Krita does not use FFmpeg on Android. Don't attempt to install it.
ステップ2 - 展開して Krita と紐づける
Windows では
ダウンロードしたらファイルの場所に行きます。FFmpeg ファイルを右クリックして 展開する... を選択します。ファイルの場所を選んで、ファイルを 'ffmpeg' に名前変更します。
ヒント
C:ドライブに保存するのが最も簡単ですが、どこでも構いません。
Krita を開いて に行きます。出力 > 動画 のところで、FFmpeg とある隣のファイルアイコンをクリックします。このファイル C:/ffmpeg/bin/ffmpeg.exe を選択し OK をクリックします。
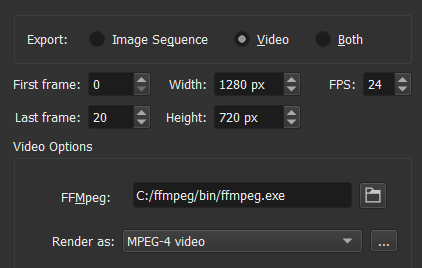
ヒント
FFmpeg を違う場所に保存したのなら、<ffmpeg の場所>/ffmpeg/bin/ffmpeg.exe を選びます。
macOS では
FFmpeg をダウンロードした後は、展開し Krita で /Users/user/Downloads/ffmpeg (.7z をダウンロードした後に /Users/user/Downloads に展開した場合)にリンクします。
Linux では
FFmpeg は、リポジトリからインストールしたのであれば、通常 /usr/bin/ffmpeg にあります。
ステップ3 - アニメーションをテストする
ffmpeg.exe が Krita がアニメーション出力魔法に使うすべてのものです。これで準備はできましたので、試してみましょう。
アニメーション GIF を作りましょう。アニメーション出力ダイアログで、出力 フィールドを "GIF 画像" にします。下の "動画の保存場所" メニューから場所を選びます。私はデスクトップに "export.gif" としました。終わったら、開いてアニメーションになっているはずです。
警告
既定では、FFmpeg は MP4 を新しすぎるコーデックでエンコードし、Windows Media Player で開くことができません。なので Windows では動画出力前に、プロファイルを "high422" の代わりに "baseline" を選択する必要があります。
注釈
macOS は MP4 や MKV ファイルを再生できるソフトが標準で付属しません。もしウェブブラウザに Chrome を使っている場合、動画ファイルをドラッグすると再生できるはずです。でなければ、VLC といったプログラムを入手して動画を見ます。