
レイヤー

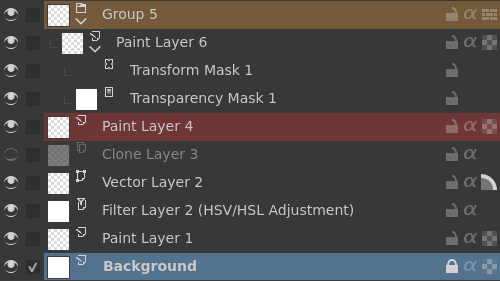
General overview of layer docker for a document with multiple layers
レイヤードッカーは Krita で中核となる概念の一つ: レイヤー管理 です。追加や削除、名前変更、複製など多くのことをここでレイヤーにすることができます。
The interface is split in three main parts:
Controls
レイヤー並び
Operations Bar
Controls
At the top there are four controls.

- Blending mode

A dropdown list to set the Blending mode for the active layer.
- 不透明度

A slider to set the opacity for the active layer.
- Filter

This allows you to filter all existing layers, which can be useful if you have a lot (say, hundreds!) of layers.
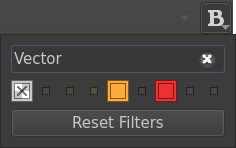
Filter option popup from filter button
Filtering can be applied on:
Color labels (available only if there are color label being used, and only used color labels can be filtered)
Layer names
- Display settings

This allows you to adjust some extra display options of the layer stack.
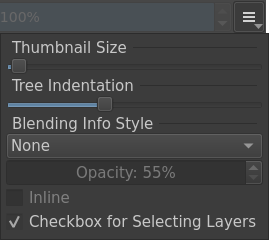
Display settings popup from display settings button
Available display settings are:
Thumbnail size slider, to let you control the size of layer's thumbnail preview
Tree indentation slider, lets you control the indentation of sub-layers, for either an expanded or compacted view
The blending mode information, defined by 3 parameters
Added in version 5.2.
Drowpdown Detail mode
Mode
Description
None
No extra information is shown.
Simple
This will only display the opacity or the blending mode when these are not 100% and Normal.
Balanced
This will display both the opacity and the blending mode for layers where either the opacity is below 100%, or the blending mode is not Normal.
Detailed
This will always show the opacity and blending options for all layers.
The Opacity slider (enabled if mode is not None) allows you to control the opacity of the extra blending info label.
The Inline checkbox (enabled if mode is not None) will provide information on a single compact line.
The Checkbox for Selecting Layers enables the extra checkboxes between the visibility icon and the label.
This is useful for situations where you may not have access to a Ctrl or Shift key to select multiple layers, such as on a tablet.
レイヤー並び
ここでアクティブなレイヤーを選択することができます。Shift と Ctrl キーを使うことで複数レイヤーを選択しドラッグ&ドロップすることができます。また表示、編集状態、アルファ継承やレイヤー名の変更も行うことができます。グループを開いて閉じたり、レイヤーをドラッグ&ドロップして並び替えたり、グループに入れることもできます。
The Layer Stack is organized in three parts:
Left side: an eye-icon and optional checkbox
Middle: layer name and optional information
Right side: Property controls (available controls will vary according to layer type)
- アルファ継承
Only available on Layers.
Clicking the alpha inheritance-icon allows you to activate
 or disable
  .
.This will use the alpha of all the layers under the active layer, but within the same group, as a transparency mask.
Check アルファやクリッピングレイヤーの継承 or クリッピングマスクとアルファ継承 for detailled explanations and examples.
- アルファをロック
Only available on ペイントレイヤー.
Clicking the alpha lock-icon will let you lock
 or unlock
  the alpha channel.
Lock the alpha channel to prevent the transparency of a layer being changed. Useful when coloring images.
- Anti-aliasing
Only available on ベクターレイヤー.
Clicking the anti-aliasing icon to activate
 or deactivate
  the anti aliasing mode.
- 合成モード
Available on all type of Layers.
レイヤーに 合成モード を設定します。
- Color Label
レイヤーに設定できる色です。レイヤーを
 して表示されるコンテキストメニューから割り当てる色を選びます。その後その色に基づいてフィルタすることができます。
- Edit State (Layer lock)
Clicking the lock-icon allow to lock
 or unlock
  the layer.
Lock the layer prevents any modifications to be made on layer. Useful when handling large amounts of layers or to ensure not modifying a layer's content by mistake.
- Expand or Collapse layers
Only available on non-empty グループレイヤー and Layers for which masks are defined.
Clicking the arrow-icon to expand
 or collapse
  group/layer.
- レイヤースタイル
Only available on Layers which have a レイヤースタイル assigned.
Clicking the FX-icon allow to quickly activate
 or deactivate
  the layer style.
- 名前
The Layer name, double-
 to make it editable, and press the Enter key to finish editing.
- Onion Skin
Only available on animated layers
Clicking the bulb-icon to activate
 or deactivate
  onion skin features.
- 不透明度
Only available on Layers.
レイヤー全体の不透明度を設定します。
- パススルーモード
Only available on グループレイヤー.
Clicking the pass-through mode icon allows you to activate
 or deactivate
  , which in turns affects how blending modes are composited.
When active, this allows you to have the blending modes of the layers within affect the layers outside the group.
Doesn't work with masks currently, therefore these have a strike-through on group layers set to pass-through.
Check レイヤーは Krita でどのように合成されるの? or クリッピングマスクとアルファ継承 for detailled explanations and examples.
- 表示
Clicking the eye-icon allow to show
 or hide
  a whole layer.
- Thumbnail Image
This shows a miniature image with the layer contents. If you Ctrl +
on it then you can make a selection from the contents of that layer (see Hot keys and Sticky Keys section below).- Layer Color Space Mismatch Warning
Added in version 5.3.
In Krita layers can have a color space different from the color space of the image. It usually happens when you import an external file as a layer. Such difference is a perfectly valid state for Krita, but it may cause visible slowdowns, because Krita will have convert color space of such layers on the fly. When layer's color space is different from the color space a small warning icon is shown next to the layer's properties.
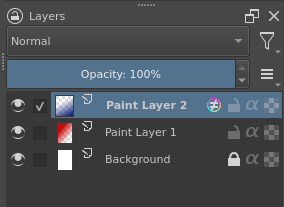
"Paint Layer 2" has a color space different from the rest of the image
To remove the warning you can either manually convert it using dialog or use Unify Layers Color Space action (available via Ctrl + Enter menu).
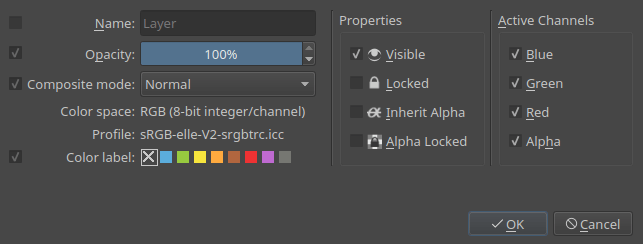
これら設定を複数レイヤーに同時に編集する場合、複数レイヤーを選択した状態でプロパティを開くか F3 キーを押します。そこで全レイヤーの名前を変更するには 名前 の前にあるチェックボックスを入れて入力できるようにしておく必要があります。Krita は自動でレイヤー名の後ろに番号を付与します。表示、不透明度、ロック状態など他のレイヤープロパティも変更することができます。
Added in version 5.0: By drag-and-dropping colors from the palette onto the layer stack, you can quickly create a fill layer.
Operations bar
レイヤー処理をするのに使うボタンです。

- 追加
Clicking the
 button will by default add a new Paint Layer.
The little arrow button aside will popup a sub-menu with all available レイヤーとマスクの紹介.
- 複製
Clicking the
 button will duplicate the active layer(s). Can be quickly invoked with the Ctrl + + drag shortcut.
- レイヤを上に移動。
Clicking the
 button will move the active layer up. Will switch them out and in groups when coming across them.
- レイヤーを下に移動。
Clicking the
button will move the active layer down. Will switch them out and in groups when coming across them.- レイヤーのプロパティ
Clicking the
 button open the layer properties window.
The little arrow button aside will popup the
context menu for the currently selected layer. This is useful when you don't have access to a button.- 削除
Clicking the
 button will delete the active layer(s). For safety reasons, you can only delete visible and unlocked layers.
ホットキーと長押しキー
Shift キーで複数連続したレイヤーを選択します。
Ctrl キーで他レイヤーの選択に影響することなくレイヤーを選択したり選択解除します。
Ctrl +
+ ドラッグ ショートカットで選択レイヤーの複製を作り、ドラッグ&ドロップできます。Ctrl + E ショートカットで下のレイヤーと統合します。また選択されたレイヤーも統合され、選択マスクはそのまま維持されます。Ctrl + E ショートカットを単一のレイヤーに使うことでマスクは下のレイヤーのマスクと統合されます。
Ctrl + Shift + E ショートカットで全レイヤーを統合します。
- R + shortcut allows you to select the top layer with content below the cursor as the active layer. In addition to this, you can set shortcuts for 4 other modes:
"Select All Layers (Replace Selection)" allows you to select all layers with content below the cursor as the currently selected layers.
"Select All Layers (Add to Selection)" allows you to select all layers that have content below the cursor and add them to the selected layers.
"Select from Menu (Replace Selection)" allows you to select a layer from a pop-up menu or all layers in the menu as the active layer or active layers.
"Select from Menu (Add to Selection)" allows you to select all layers in the menu as the new active layer or active layers. The latter two modes are similar to using Ctrl +
to select a layer in Photoshop.
- R +
新しいレイヤーを追加するには Ins キーを使います。
Shift + Ins key for adding a new vector layer.
Ctrl + G ショートカットでグループレイヤーを作ります。複数レイヤーが選択されていれば、それらがグループレイヤーに入れられます。
Ctrl + Shift + G ショートカットで素早くクリッピンググループを作り、選択されたレイヤーをグループ内に入れ、アルファ継承をオンにした新しいレイヤーが一番上に追加され、すぐに描き始めることができます!
Ctrl + Alt + G ショートカットでグループ内のレイヤーをグループ解除します。
Alt +
ショートカットでレイヤーの表示を独立させます。同じ操作をするまでレイヤー間で維持されます。Page Up と Page Down キーでレイヤーを切り替えます。
Ctrl + Page Up と Ctrl + Page Down ショートカットで選択されたレイヤーを上や下に移動させます。
Ctrl +
over a layer's thumbnail to replace the current selection with a new one created from the contents of that layer.Ctrl + Shift +
over a layer's thumbnail to add a new selection created from the contents of that layer to the current selection.Ctrl + Alt +
over a layer's thumbnail to subtract a new selection created from the contents of that layer from the current selection.Ctrl + Shift + Alt +
over a layer's thumbnail to intersect the current selection with a new selection created from the contents of that layer.