
Strumento Testo

Questo strumento permette di aggiungere del testo alla tua opera. Viene utilizzato insieme con l`:ref:text_properties_docker. Alcune operazioni sul testo possono essere gestite dallo Strumento Selezione forme. Per una panoramica su tutte le funzionalità di testo, vedi Lavorare con il testo.
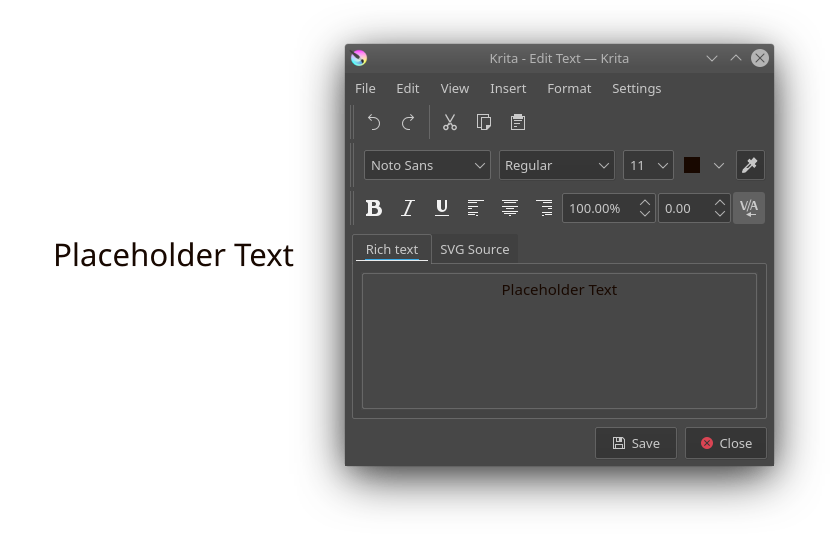
Per creare un testo, fai clic col  : apparirà un testo con la scritta «Testo del segnaposto», pronto per la modifica.
Modificare un testo
Se hai appena creato un testo, sarà visibile un cursore lampeggiante sul testo. Potrai spostarlo in giro con l’aiuto dei tasti freccia, digitare e rimuovere il testo con i tasti Backspace e Canc, così come usare qualsiasi metodo del sistema per l’inserimento di testo complesso. Puoi selezionare il testo tenendo premuto il tasto Maiusc mentre ti sposti con i tasti freccia verso il punto finale della selezione. Puoi anche usare il + trascinamento per selezionare il testo, doppio-clic + per selezionare una parola e triplo-clic + per selezionare l’intero testo.
Nota
Dato che hai bisogno dei tasti della tua tastiera per digitare del testo, molte scorciatoie sono disabilitate. Se vuoi utilizzare una scorciatoia particolare mentre stai modificando il testo, è meglio configurarla per utilizzarla con Ctrl, Alt o Ctrl + Maiusc come modificatori, dato che Krita considererà inserimento di testo gli altri tasti. I gesti di inserimento su tela, come ruotare col tocco, spostamento con  o
o  funzioneranno se non avranno alcun tasto (della tastiera) associato.
In aggiunta, Krita supporta tutte le scorciatoie di movimento di testo predefinite Qt. Queste corrispondono alle impostazioni predefinite per un sistema operativo specificato, dunque, per esempio Ctrl + → sposterà il cursore alla fine delle parole in Windows, mentre su macOS la stessa azione corrisponde ad Alt + →. Dato che Krita supporta il testo verticale, si confronteranno anche i tasti corretti per la modalità di scrittura specificata, pertanto in verticale Ctrl + ↓ sposterà alla fine della parola.
Per terminare la modifica del testo, fai clic fuori della casella oppure inizia a modificare un testo differente. Per farlo, passa il mouse sopra un qualsiasi altro testo. Puoi farlo sullo stesso livello o su un qualsiasi altro livello vettoriale. Quando passi il mouse sopra il testo, il suo riquadro di contorno verrà evidenziato. Facendovi clic sopra selezionerai il livello ed entrerai in modalità modifica sul quel testo.
Oltre che modificato, il testo può essere anche spostato. Per spostare un testo, passa il mouse sopra il suo riquadro di contorno, in modo che il cursore diventi un cursore di spostamento. Quindi fai + trascinamento per spostare il testo.
Per cambiare lo stile del testo, usa la Area di aggancio Proprietà del testo.
Tipi di testo
Krita supporta completamente il testo SVG 2, ossia è presente il supporto per vari tipi di testo, suddivisibili grossolanamente in cinque categorie:
Preformattato
Tipo di testo di base. Questo tipo non va a capo automaticamente. Tuttavia, gli spazi bianchi non vengono ridotti, il che significa che si possono creare nuove righe premendo il tasto Invio.
Preposizionato
Preposizionato è un testo SVG 1.1, in cui ciascuna riga è posizionata in modo assoluto, e la regola per gli spazi bianchi è impostata per ridurre qualsiasi spazio aggiuntivo. Le versioni precedenti di Krita creavano testi di questo tipo, ed esso è ancora utile per i file SVG che vengono esportati e utilizzati in altri motori di resa SVG 1.1.
Suggerimento
Nella gestione di testo proveniente da versioni precedenti di Krita, usa la conversione del tipo di testo per passarlo a Preformattato o a A capo in linea, in modo da semplificare la modifica del testo. Preposizionato è utile solo quando vuoi usare la rappresentazione SVG in un momento successivo, per esempio per l’uso con EPUB3 o il web.
Testo su tracciato
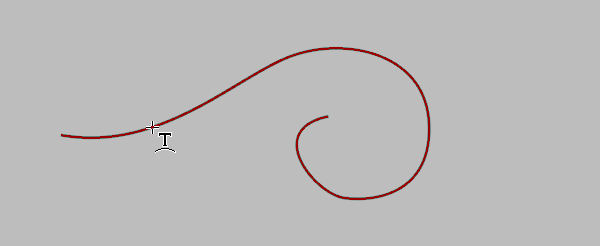
Per creare del Testo su tracciato, passa col mouse sopra una forma. Al passaggio sul contorno, il cursore cambierà in un cursore testo-su-tracciato, e con creerai il testo.
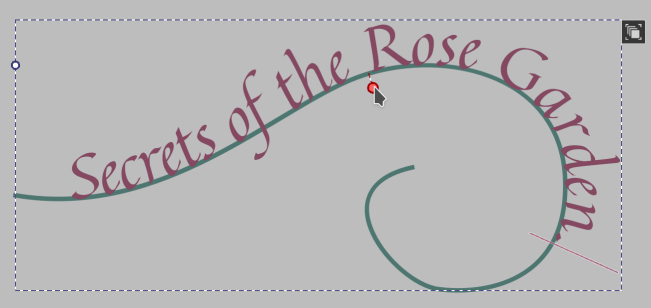
Per modificare un testo su tracciato, imposta il cursore lampeggiante all’interno di tale testo. Apparirà una maniglia per modificare lo scostamento di inizio e il lato del tracciato in cui poggia il testo. Trascinando la maniglia, il testo può essere spostato lungo il tracciato, mentre ribaltandola sull’altro lato il testo verrà impostato per utilizzare l’altro lato del tracciato.
Nota
Tutti i tipi senza «a capo automatico» si possono in teoria combinare in un’unica forma di testo. Per creare una forma di questo genere è necessario utilizzare un editor di sorgenti SVG in moda da modificare direttamente il file SVG, ma questi significa che la divisione tra di loro non è così rigida come questa tipologia potrebbe far sembrare. Krita farà il suo meglio per informarti sul tipo di testo pensa che la forma debba essere per le funzioni di conversione nelle opzioni dello strumento, ma tieni presente che potrebbe anche sbagliarsi.
A capo in linea
Per creare un testo a capo semplice (A capo in linea), fai + tracina per creare un’area rettangolare. Quando l’area è più grande dell’altezza di riga del tipo di carattere attualmente selezionato, l’immagine del inizierà a mostrare il cursore per l’interruzione di riga in linea. Rilasciando il pulsante del mouse aggiungerai quindi il testo predefinito con l’interruzione di riga abilitata. Per evitare di creare un testo a capo durante il trascinamento, premi Ctrl mentre trascini.
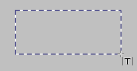
Il trascinamento di un’area sufficientemente grande mostrerà il cursore «A capo in linea».
Quando modifichi un testo a capo in linea, puoi anche modificare l’area di interruzione della riga. Compariranno due maniglie su ciascun lato del testo, mostrando i limiti in cui il testo andrà a capo. Facendo + trascinamento su queste maniglie puoi aumentare o ridurre l’area di interruzione riga. Quando il testo è allineato a una delle maniglie, lo spostamento dell’altra scambierà l’allineamento del testo, in modo che stia allineato a quella maniglia. Quando è impostato l’allineamento centrato, il testo starà tra le due barre. Se vuoi che il testo rimanga nella stessa posizione quando modifichi un testo centrato e vuoi solo modificare la larghezza dell’area di interruzione, mantieni premuto Ctrl mentre trascini.
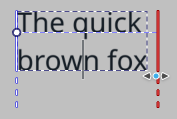
A capo in linea mostrerà due maniglie in ciascun lato dell’area. Queste possono essere regolare direttamente sulla tela.
Testo nella forma
Per creare del Testo nella forma, passa il mouse sopra una forma esistente chiusa. Quando passi il mouse sopra il riempimento, il cursore cambierà in un un cursore testo-nella-forma e premendo il farà scorrere il testo all’interno di quella forma. Sia «Testo su tracciato», sia «Testo nella forma» mostreranno una nuova icona in alto a destra della forma. Facendo clic sopra questa icona si passerà allo Strumento Selezione forme, dove è possibile modificare le forme.
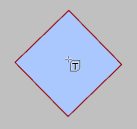
Passare il mouse sopra una forma chiusa farà comparire il cursore «testo nella forma».
Il testo può essere mandato a capo in una o più forme. Quando scorre in più forme, ciascuna forma interna è riempita per prima con quanto più testo possibile prima di passare alla forma successiva nella catena in cui è iniziato lo scorrimento. Esistono, poi, anche delle forme da sottrarre. Queste vengono sottratte dalle forme interne per creare le aree di testo.
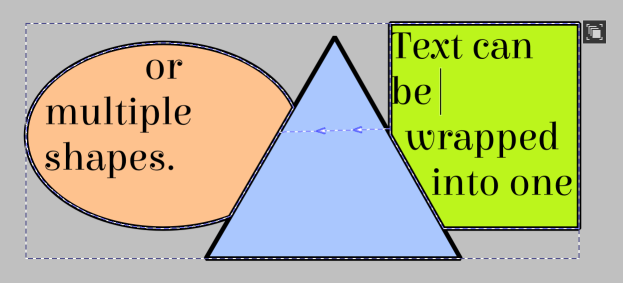
Esempio di testo a capo in più forme. Il rettangolo verde e l’ellisse arancione sono forme interne, mentre il triangolo è una forma in sottrazione. Il contorno mostra le aree di testo dell’effetto, mentre le frecce tra le aree mostrano come sono collegate.
Quando modifichi il testo in una forma, il bordo dell’area di testo finale viene disegnato sullo schermo. Viene disegnata una catena di frecce tra le aree di testo, per mostrare l’ordine in cui vengono valutate le aree. Margine e padding della forma possono essere modificati passando il mouse sopra il bordo dell’area di testo e facendo + trascinandolo. Qualora il cursore si trovasse più vicino a una forma in sottrazione quando inizi a trascinare, il margine sarà modificato. Al contrario, se il cursore si trova più vicino a una forma interna quando inizi a trascinare, sarà modificato il padding della forma.
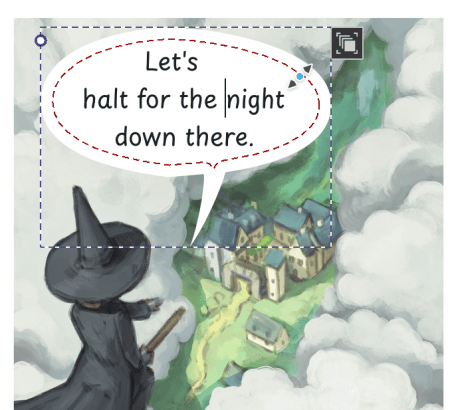
A questo fumetto è stato applicato il padding della forma, trascinando il bordo evidenziato. Per gentile concessione di Pepper and Carrot, CC-BY David Revoy.
La modifica dell’ordine delle aree di testo nella catena viene eseguita nello Strumento Selezione forme, così come l’aggiunta e la rimozione delle forme da un testo.
Opzioni dello strumento

- Crea nuovi testi con…
Permette di scegliere quali proprietà utilizzare quando si creano nuovi testi. Il testo può essere creato con le Preimpostazioni degli stili, oppure utilizzando le proprietà attuali nell’area di aggancio Proprietà del testo attivando l’opzione Proprietà attuali del testo.
- Opzioni
- Usa cursore visivo
Usa l’ordine visivo per il testo bidirezionale con cursore. Quando il testo è bidirezionale, l’ordine logico delle lettere può andare a sinistra o a destra a seconda della posizione nel testo, con la direzione del paragrafo che determina quale tra ← e → rappresenta il tasto per andare in avanti. Quando l’ordine visivo è attivato, il cursore ignorerà l’ordine logico in favore di quello visivo.
- Incolla testo formattato in modo predefinito
Krita può leggere il testo con stile, come SVG e HTML, dagli appunti del sistema, e possiede azioni separate nelle scorciatoie per incollare sia il testo “formattato”, sia il testo semplice. Questo comando controlla anche se incollare il testo formattato quando utilizzi la normale azione Ctrl + V Incolla dal menu Modifica.
- Apri proprietà del testo
Apre l`:ref:text_properties_docker. Qui si trovano la maggior parte delle funzioni degli stili di testo.
- Modalità composizione tipografica
Attiva/disattiva la Modalità composizione tipografica.
- Finestre di dialogo
- Modifica sorgente SVG
Apre l`:ref:svg_source_editor.
- Tavolozza dei glifi
Apre la Tavolozza dei glifi.
- Converti tipo…
Questi pulsanti permettono la conversione del testo selezionato. Queste funzioni di conversione sono disponibili anche come scorciatoie nello «Strumento Interazione» nelle preferenze delle scorciatoie.
- Preformattato
Converte il testo in modo che non vada a capo in automatico. Inoltre, viene applicata la regola di contrazione CSS Spazio bianco in modo che qualsiasi spazio bianco nascosto venga rimosso, e la regola viene attivata in modo che spazi bianchi aggiuntivi non siano rimossi. Tutte le trasformazioni di carattere SVG 1.1 assolute vengono modificate per divenire nuove righe.
- A capo in linea
Converte il testo in modo che vada a capo a una lunghezza in linea massima (larghezza per il testo orizzontale, altezza per quello verticale). Come per il tipo Preformattato, la regola CSS Spazio bianco e le trasformazioni dei caratteri sono elaborati in modo da creare nuove interruzioni di riga ed evitare la contrazione di spazi bianchi aggiuntivi.
- Preposizionato
Converte il testo in testo di stile SVG 1.1, in cui lo Spazio bianco aggiuntivo viene contratto e le nuove righe posizionate in modo assoluto. Questo è il metodo con cui le versioni precedenti di Krita gestivano il testo, così come è il metodo prevalente per gestire il testo SVG. Usa questa opzione per preparare il testo per l’esportazione quando il risultato finale deve essere mostrato in un motore di resa compatibile con SVG 1.1.
Testo nella forma e testo su tracciato non sono presenti tra le opzioni di conversione. Usa invece Scorri testo nella forma e Metti testo su un tracciato dal menu contestuale nelle Opzioni di testo nella Selezione forme.
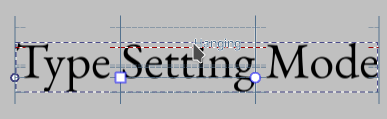
Modalità composizione tipografica
Questa modalità abilita l’attribuzione di stile del testo sulla tela per varie proprietà del testo.
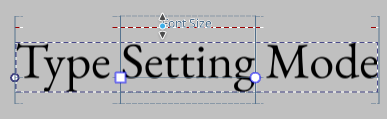
Testo in Modalità composizione, con «Setting» selezionato e il cursore sopra la linea di dimensione Dimensione caratteri.
Quando abilitata, la selezione verrà sostituita con alcune righe di dimensione. Senza selezione queste righe vengono disegnate per il paragrafo, utilizzando le dimensioni del paragrafo, mentre con una selezione si utilizzeranno le dimensioni dei glifi selezionati come recuperati durante la disposizione del testo.
Passandovi sopra il mouse, le righe saranno evidenziate e mostreranno il nome della dimensione pertinente. + trascinando su queste righe aumenterà o diminuirà la dimensione della metrica. In questo modo, Dimensione caratteri, Altezza riga e Scostamento linea di base possono essere modificati direttamente sulla tela. Premendo Maiusc si visualizzerà un gruppo diverso di dimensioni: la Linea di base. Facendo clic su una linea di base verrà impostata la Linea di base dominante e la Linea di base allineamento a quella linea di base, consentendo l’allineamento del testo di dimensioni differenti a detta linea.
La modalità di linea di base alternativa. Il cursore è sopra la linea di base Sporgente.
Quando il testo è Preformattato o Preposizionato, sono visibili due ulteriori controlli all’inizio e alla fine di una selezione, che permettono la modifica della posizione e della rotazione di ciascun gruppo. La maniglia quadrata permette lo spostamento dell’intera selezione, mentre quella rotonda ridimensiona e ruota la selezione. Sono disponibili delle azioni per spostare la maniglia quadrata nella configurazione delle scorciatoie per lo strumento Testo. L’azione (per ciascuna direzione) Sposta la selezione del testo a destra di un pixel sposterà il testo selezionato nella direzione indicata. È presente anche l’azione Rimuovi trasformazioni del carattere che rimuoverà tutte le trasformazioni dei caratteri (relative, assolute e di rotazione) dall’intervallo specificato.
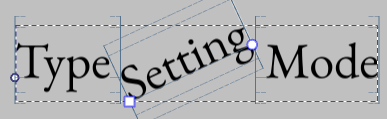
La parola selezionata è stata ruotata tramite + trascinamento delle maniglie.
Nota
Per regolazioni tipografiche precise, tipo la crenatura manuale, si raccomanda di utilizzare le due maniglie sulla Spaziatura delle lettere CSS. L’ultima maniglia serve per distanziare le lettere su un’intera parte di testo, ed è integrata in maniera leggermente differente in ciascuna implementazione.
Internamente, queste modificano le trasformazioni dei carattere relative SVG 1.1, il che significa che non rompono la costruzione della forma e sono supportate dalla maggior parte dei browser.
Editor sorgente SVG
Piccola finestra per modificare direttamente il codice sorgente SVG del testo. Il layout del testo è in grado di gestire testo più complesso rispetto a quanto lo strumento Testo sia in grado di fare sulla tela. Se conosci il codice SVG, potrai modificare direttamente il codice e utilizzare funzionalità avanzate quali Scostamento linea di base annidata, Decorazione testo e Direzione.
Modifica
Quando hai finito le modifiche, premi Salva per visualizzare l’anteprima sulla tela.
- File
- Salva Ctrl + S
Salva le modifiche correnti al testo sulla tela.
- Chiudi Ctrl + W
Chiude l’editor.
- Modifica
Funzioni di modifica di base:
- Annulla Ctrl + Z
Annulla l’ultima azione nell’editor di testo.
- Rifai Ctrl + Maiusc + Z
Ripristina l’ultima azione annullata nell’editor di testo.
- Taglia Ctrl + X
Taglia il testo selezionato negli appunti.
- Copia Ctrl + C
Copia il testo selezionato negli appunti.
- Incolla Ctrl + V
Incolla il testo dagli appunti.
- Seleziona tutto Ctrl + A
Seleziona tutto il testo nell’editor attivo.
- Deseleziona Ctrl + Maiusc + A
Deseleziona qualsiasi testo selezionato.
- Trova Ctrl + F
Apre una finestra con un campo di immissione per trovare il testo specificato nell’editor attivo.
- Trova successivo F3
Cerca il testo successivo utilizzando l’ultima chiave di ricerca.
- Trova precedente Maiusc + F3
Cerca il testo precedente utilizzando l’ultima chiave di ricerca.
- Sostituisci… Ctrl + R
Apre una finestra di dialogo con due campi di immissione: la stringa da trovare e la stringa con cui sostituire il testo trovato. Sostituisce sempre TUTTE le occorrenze trovate.
- Vista
- Rimpicciolisci Ctrl + -
Rimpicciolisce il testo.
- Ingrandisci Ctrl + +
Ingrandisce il testo.
- Impostazioni
Qui puoi modificare i colori utilizzati per la formattazione del codice.
Tavolozza dei glifi
La finestra di dialogo Tavolozza dei glifi fornisce una vista a griglia dei caratteri alternativi in un tipo di carattere tramite le funzioni OpenType o le varianti di carattere Unicode. È pensata per lavorare assieme alle Funzioni OpenType nell’area di aggancio Proprietà del testo.
Glifi alternativi
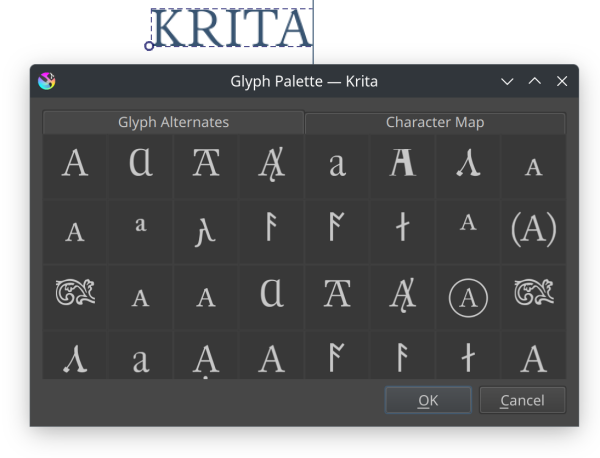
Glifi alternativi per il carattere «A» nel tipo di carattere “Junicode”. Non tutti i tipi di carattere hanno a disposizione tutti questi alternativi.
Mostra tutti gli alternativi disponibili per il punto di codice attuale. Esistono due tipi di alternativi:
- Varianti di carattere Unicode
Sono ufficialmente definiti varianti di carattere. Esempi semplici includono lo 0 con barra come alternativa a 0, ma più comunemente sono utilizzati per gli ideogrammi Han. In particolare, nomi di luoghi e persone richiedono l’uso di determinati varianti di glifi affinché essi appaiano riconoscibili, e le varianti di carattere forniscono questa possibilità. Krita mostrerà soltanto le varianti disponibili nel tipo di carattere stesso.
- Funzioni OpenType
Sono glifi alternativi disponibili tramite una serie di funzioni OpenType, come le varianti di carattere, hanno accesso a tutti gli alternativi o agli alternativi stilistici.
Mappa caratteri
Fornisce una mappa caratteri per il tipo di carattere specificato. Alla sinistra è presente un elenco di blocchi unicode utilizzabili per filtrare la mappa caratteri.
In alto è presente una barra di ricerca, dove verrà mostrato il carattere digitato o i punti di codice che scompongono quel carattere (ossia A mostrerà “Á”, “Å” e anche “Ấ”). La barra accetta anche caratteri in formato U+HEXCODE.
L’area restante è dedicata alla mappa carattere vera e propria. Facendo clic su un carattere si apre una finestrella a comparsa con i glifi alternativi, se disponibili, mentre facendo doppio clic si aggiunge quel carattere alla posizione del cursore all’interno del testo attivo.