
Camadas
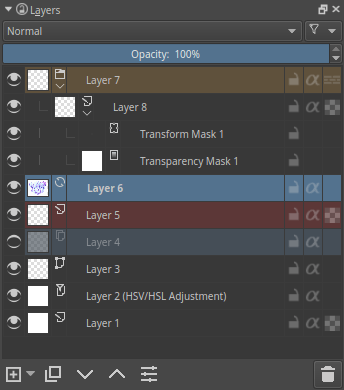
General overview of layer docker for a document with multiple layers
A área das Camadas é um dos conceitos mais básicos do Krita: a Gestão de Camadas. Poderá adicionar, apagar, mudar o nome, duplicar e fazer muitas mais coisas com as camadas aqui.
The interface is split in three main parts:
Controls
A Pilha de Camadas
Operations Bar
Controls
At the top there are four controls.

- Blending mode

A dropdown list to set the Blending mode for the active layer.
- Opacidade

A slider to set the opacity for the active layer.
- Filter

This allows you to filter all existing layers, which can be useful if you have a lot (say, hundreds!) of layers.
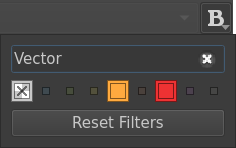
Filter option popup from filter button
Filtering can be applied on:
Color labels (available only if there are color label being used, and only used color labels can be filtered)
Layer names
- Display settings

This allows you to adjust some extra display options of the layer stack.
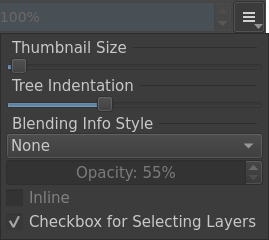
Display settings popup from display settings button
Available display settings are:
Thumbnail size slider, to let you control the size of layer’s thumbnail preview
Tree indentation slider, lets you control the indentation of sub-layers, for either an expanded or compacted view
The blending mode information, defined by 3 parameters
Added in version 5.2.
Drowpdown Detail mode
Mode
Description
None
No extra information is shown.
Simple
This will only display the opacity or the blending mode when these are not 100% and Normal.
Balanced
This will display both the opacity and the blending mode for layers where either the opacity is below 100%, or the blending mode is not Normal.
Detailed
This will always show the opacity and blending options for all layers.
The Opacity slider (enabled if mode is not None) allows you to control the opacity of the extra blending info label.
The Inline checkbox (enabled if mode is not None) will provide information on a single compact line.
The Checkbox for Selecting Layers enables the extra checkboxes between the visibility icon and the label.
This is useful for situations where you may not have access to a Ctrl or Shift key to select multiple layers, such as on a tablet.
A Pilha de Camadas
Poderá seleccionar aqui a camada activa. Se usar o Shift e o Ctrl, poderá seleccionar várias camadas, arrastá-las e largá-las. Poderá também alterar a visibilidade, modificar o estado, a herança do alfa e mudar os nomes das camadas. Poderá abrir e fechar os grupos, podendo ainda arrastar e largar as camadas, seja para as reordenar ou para as colocar em grupos.
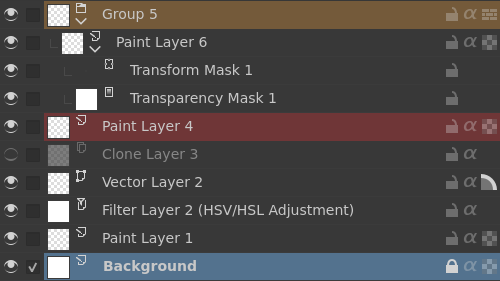
The Layer Stack is organized in three parts:
Left side: an eye-icon and optional checkbox
Middle: layer name and optional information
Right side: Property controls (available controls will vary according to layer type)
- Herança do Alfa
Only available on Layers.
Clicking the alpha inheritance-icon allows you to activate
 or disable
  .
.This will use the alpha of all the layers under the active layer, but within the same group, as a transparency mask.
Check Camadas com Herança do Alfa ou de Recorte or Máscaras de Recorte e Herança do Alfa for detailled explanations and examples.
- Bloqueio do Alfa
Only available on Camadas de Pintura.
Clicking the alpha lock-icon will let you lock
 or unlock
  the alpha channel.
Lock the alpha channel to prevent the transparency of a layer being changed. Useful when coloring images.
- Anti-aliasing
Only available on Camadas Vectoriais.
Clicking the anti-aliasing icon to activate
 or deactivate
  the anti aliasing mode.
- Modo de Mistura
Available on all type of Layers.
Isto irá definir os Modos de Mistura da camada.
- Legenda da Cor
Esta é uma cor que poderá atribuir à camada. Use o
 sobre a camada para obter um menu de contexto, onde poderá atribuir uma cor a ela. Poderá então filtrar com base nessas cores.
- Edit State (Layer lock)
Clicking the lock-icon allow to lock
 or unlock
  the layer.
Lock the layer prevents any modifications to be made on layer. Useful when handling large amounts of layers or to ensure not modifying a layer’s content by mistake.
- Expand or Collapse layers
Only available on non-empty Camadas de Grupo and Layers for which masks are defined.
Clicking the arrow-icon to expand
 or collapse
  group/layer.
- Estilo da Camada
Only available on Layers which have a Estilos da Camada assigned.
Clicking the FX-icon allow to quickly activate
 or deactivate
  the layer style.
- Nome
The Layer name, double-
 to make it editable, and press the Enter key to finish editing.
- Pele de Cebola
Only available on animated layers
Clicking the bulb-icon to activate
 or deactivate
  onion skin features.
- Opacidade
Only available on Layers.
Isto irá configurar a opacidade da camada inteira.
- Modo à passagem
Only available on Camadas de Grupo.
Clicking the pass-through mode icon allows you to activate
 or deactivate
  , which in turns affects how blending modes are composited.
When active, this allows you to have the blending modes of the layers within affect the layers outside the group.
Doesn’t work with masks currently, therefore these have a strike-through on group layers set to pass-through.
Check Como é que são compostas as camadas no Krita? or Máscaras de Recorte e Herança do Alfa for detailled explanations and examples.
- Visibilidade
Clicking the eye-icon allow to show
 or hide
  a whole layer.
- Imagem em Miniatura
Isto mostra uma imagem em miniatura com o conteúdo da camada. Se carregar em Ctrl +
sobre ele, então poderá fazer uma selecção do conteúdo dessa camada (veja abaixo a secção de Teclas Fixas e Atalhos).- Layer Color Space Mismatch Warning
Added in version 5.3.
In Krita layers can have a color space different from the color space of the image. It usually happens when you import an external file as a layer. Such difference is a perfectly valid state for Krita, but it may cause visible slowdowns, because Krita will have convert color space of such layers on the fly. When layer’s color space is different from the color space a small warning icon is shown next to the layer’s properties.
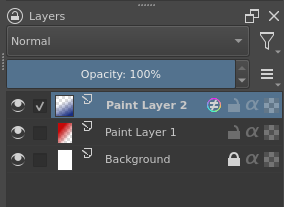
«Paint Layer 2» has a color space different from the rest of the image
To remove the warning you can either manually convert it using dialog or use Unify Layers Color Space action (available via Ctrl + Enter menu).
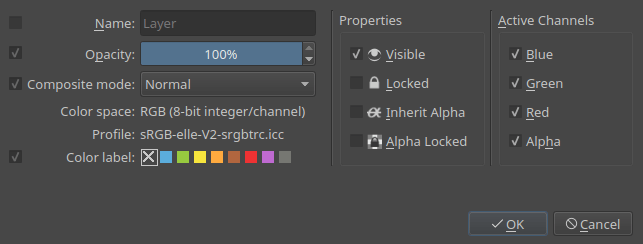
Para editar estas propriedades várias camadas de uma vez, carregue na opção de propriedades, quando tiver várias camadas seleccionadas, ou carregue em F3. Nesse caso, para alterar os nomes de todas as camadas, deverá assinalar a opção antes do guilabel:Nome, a partir da qual poderá escrever um nome. O Krita irá adicionar automaticamente um número atrás dos nomes das camadas. Também poderá alterar outras propriedades da camada, como a visibilidade, a opacidade, os estados de bloqueio, etc.
Added in version 5.0: Ao arrastar e largar cores da paleta para a pilha de camadas, poderá criar rapidamente uma camada de preenchimento.
Operations bar
Estes são botões para criar operações com camadas.

- Adicionar
Clicking the
 button will by default add a new Paint Layer.
The little arrow button aside will popup a sub-menu with all available Introdução às Camadas e Máscaras.
- Duplicar
Clicking the
 button will duplicate the active layer(s). Can be quickly invoked with the Ctrl + + drag shortcut.
- Subir a camada.
Clicking the
 button will move the active layer up. Will switch them out and in groups when coming across them.
- Descer a camada.
Clicking the
button will move the active layer down. Will switch them out and in groups when coming across them.- Propriedades da camada.
Clicking the
 button open the layer properties window.
The little arrow button aside will popup the
context menu for the currently selected layer. This is useful when you don’t have access to a button.- Apagar
Clicking the
 button will delete the active layer(s). For safety reasons, you can only delete visible and unlocked layers.
Combinações de Teclas e Teclas Fixas
Shift para seleccionar as várias camadas contíguas.
Ctrl para seleccionar ou deseleccionar a camada sem afectar a selecção das outras camadas.
Ctrl + |mouseleft| + arrastamento - faz um duplicado das camadas seleccionadas, para você poder arrastar e largar.
Ctrl + E para reunir abaixo uma camada. Isto também reúne as camadas seleccionadas, os estilos de camadas e irá manter as máscaras de selecção intactas. Se usar o Ctrl + E sobre uma única camada com uma máscara, irá reunir a máscara com a camada.
Ctrl + Shift + E reúne todas as camadas.
- R + shortcut allows you to select the top layer with content below the cursor as the active layer. In addition to this, you can set shortcuts for 4 other modes:
«Select All Layers (Replace Selection)» allows you to select all layers with content below the cursor as the currently selected layers.
«Select All Layers (Add to Selection)» allows you to select all layers that have content below the cursor and add them to the selected layers.
«Select from Menu (Replace Selection)» allows you to select a layer from a pop-up menu or all layers in the menu as the active layer or active layers.
«Select from Menu (Add to Selection)» allows you to select all layers in the menu as the new active layer or active layers. The latter two modes are similar to using Ctrl +
to select a layer in Photoshop.
- R +
Ins para adicionar uma nova camada.
Shift + Ins para adicionar uma nova camada vectorial.
Ctrl + G irá criar uma camada de grupo. Se estiverem seleccionadas várias camadas, serão colocadas na camada do grupo.
Ctrl + Shift + G irá configurar rapidamente um grupo de recorte, com as camadas seleccionadas a serem adicionadas ao grupo, sendo depois adicionada uma nova camada no topo com a herança do alfa activada, ficando assim pronta a pintar!
Ctrl + Alt + G irá desagrupar as camadas dentro de um grupo.
Alt +
para a visualização isolada de uma camada. Esta manter-se-á entre as camadas até repetir a mesma acção de novo.Page Up e Page Down para mudar de camadas.
Ctrl + Page Up e Ctrl + Page Down para subir ou descer as camadas seleccionadas.
Ctrl +
sobre a miniatura de uma camada para substituir a selecção actual por uma nova criada a partir do conteúdo dessa camada.Ctrl + Shift +
sobre a miniatura de uma camada para adicionar uma nova selecção, a partir do conteúdo dessa camada, à selecção actual.Ctrl + Alt +
sobre a miniatura de uma camada para subtrair uma nova selecção, a partir do conteúdo dessa camada, da selecção actual.Ctrl + Shift + Alt +
sobre a miniatura de uma camada para intersectar a selecção actual com uma nova selecção criada a partir do conteúdo dessa camada.