Fill Tool
Krita has one of the most powerful and capable Fill functions available. The options found in the Tool Options docker and outlined below will give you a great deal of flexibility working with layers and selections.
To get started, clicking anywhere on screen with the fill-tool will allow that area to be filed with the foreground color.
Tool Options
- Fill Mode
- Current Selection
Activating this will result in the shape filling the whole of the active selection.
- Contiguous Region
This option is the default and allows filling a region of contiguous pixels obtained from the image at the point where the user clicks.
- Regions of Similar Color
Added in version 5.2.
This option allows filling all the regions similar in color to the pixel where the user clicks

a: An image with a selection. The red dot marks where the user clicked to fill. b: The region filled using:guilabel:Current Selection. c: The region filled using Contiguous Pixels, filling all pixels that are both similar and contiguous to the one the user clicked. d: The region filled with Regions of Similar Color, filling pixels similarly colored to the one the user clicked.
- Fill Source
- Foreground Color
Selecting this option will fill the obtained region with the foreground color.
- Background Color
Added in version 5.1.
Selecting this option will fill the obtained region with the background color.
- Pattern
Selecting this option will fill the obtained region with the current pattern.
- Scale
Added in version 4.4.
This allows you to scale the pattern used in the fill.
- Rotation
Added in version 4.4.
This allows you to rotate the pattern used in the fill.
- Fill Extent
- Pixel Selection Modes
Added in version 5.2.
When filling a contiguous region, the user can choose how the pixels are selected based on color similarity.
- Fill Similar Pixels
The contiguous pixels that are similar to the one the user clicked on are selected.
- Fill All Pixels Until a Boundary
All the contiguous pixels are selected as long as they are not similar to the user defined boundary color.
- Boundary Color
Defines the color used as a boundary.

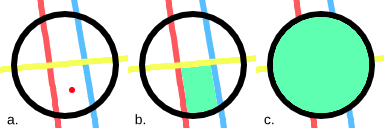
a: An image with a red dot marking where the user clicked to fill. b: The filled region when selecting only the similar contiguous pixels. c: The filled region all the pixels until the boundary color (here set to the color black).
- Threshold
Determines when the fill-tool sees another color as a border. In other words, how far the region should extend from the selected pixel in terms of color similarity.
- Spread
Added in version 5.1.
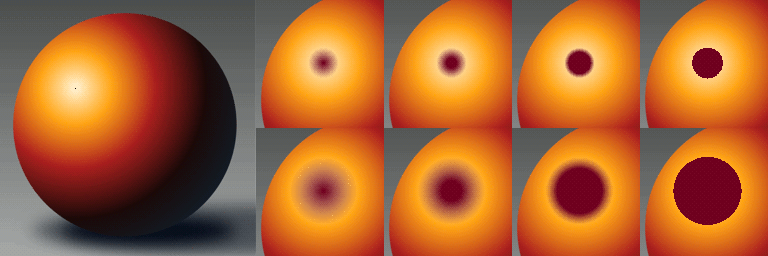
Set how far the fully opaque portion of the region should extend. 0% will make opaque only the pixels that are exactly equal to the selected pixel. 100% will make opaque all the pixels in the region up to its boundary.

Left: Original image. The black dot indicates where the fill operation starts. Top-right: a row of images that show the result of filling with a threshold value of 30 and a spread value of 0, 30, 60 and 100 percent from left to right. Bottom-right: a row of images that show the result of filling with a threshold value of 65 and a spread value of 0, 30, 60 and 100 percent from left to right.
- Use Selection as Boundary
Added in version 4.4.
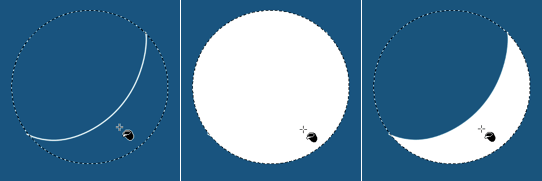
When checked, this will count the borders of the selection as an extra boundary on top of the pixel difference.

Left: Original selection with a line. Middle: Filled with ‘use selection as boundary’ off. Right: Filled with ‘use selection as boundary’ on.
- Adjustments
- Anti-aliasing
Added in version 5.1.
This will smooth the jagged edges present in the region. It differs from feathering in that this will smooth in the direction of the edge instead of all directions, and only if the edge is jagged (high contrast).
- Grow Selection
This value extends (positive values) or contracts (negative values) the region.
- Stop Growing at the Darkest and/or More Opaque Pixels
Added in version 5.2.
This option is useful when filling inner regions of a lineart. When the lines have smooth borders, some unwanted pixels may remain unfilled between the line’s darkest or more opaque parts and the filled region. To improve that, it is common to grow the region a bit to cover those pixels.
One issue that may arise is that the lines vary in width and the expanded region exceeds some of the thinner ones. If this option is selected, the growing process will stop adaptively if the color of the pixels begins to get lighter or less opaque. This effectively prevents the expanded region from reaching the opposite side of the lines.

Comparison of the filled region with and without the option selected. The filled regions were painted with the multiply blending mode for clarity. a: An image with some lineart that varies in width and a red dot indicating where the user clicked to fill. b: The filled region without being expanded. c: The filled region after being expanded by twelve pixels. Note that the region exceeds the line in some points. d: The filled region after being expanded by twelve pixels, but stopping adaptively at the darkest pixels.
- Feathering Radius
This value will add a soft border to the region.
- Reference
Added in version 4.3.
Select which layers to use as a reference for the fill tool. The options are:
- Current Layer
Only use the currently selected layer.
- All layers
Use all visible layers.
- Color Labeled Layers
Use only the layers specified with a certain color label. This is useful for complex images, where you might have multiple lineart layers. Label them with the appropriate color label and use these labels to mark which layers to use as a reference.
- Labels Used
Select the color labels of the layers that should be used as reference.
- Drag-Fill Mode
Added in version 5.1.
Select what should happen when one clicks and drags the pointer on the canvas.
- Fill Regions of Any Color
With this option selected, the tool will fill any region along the path described by the pointer while dragging, regardless of its color.
- Fill Regions of Similar Colors
With this option selected, the tool will fill the regions along path described by the pointer while dragging that have the same color as the first region filled.
