
Resource Management
Resources are pluggable bits of data, like brush presets or patterns. Krita has a sophisticated resource management system, which allows tagging, disabling, sharing and more.
Changed in version 5.0.
All resources are stored in the resource folder. This folder can be configured in the general preferences. As keeping track of all those resources can be a handful, Krita creates a SQLite cache in which it keeps the tags, names, version and other data about the resource.
Thanks to this cache, Krita can avoid loading a resource until necessary. This makes Krita a lot lighter than when it did not have this cache. Deleting the cache will delete the tags and relationships it keeps track of, so be careful.
If you have not changed your resource folder location, the resources can be found at…
- Linux
$HOME/.local/share/krita/- Windows
%APPDATA%\krita\- macOS
~/Library/Application Support/Krita/- If you installed Krita in the Windows Store, your custom resources will be in a location like:
%LOCALAPPDATA%\Packages\49800Krita_RANDOM STRING\LocalCacheRoamingkrita
Resource Libraries
Krita can load a variety of resource libraries.
- Resource Folder
The resource folder is considered the primary library. When creating new resources, they will all end up here. You can configure its location in the general preferences.
- Resource Bundle
The primary format to share resources is Resource Bundles, which is a compressed file containing all the resources together. It also contains some other information like metadata and a manifest so Krita can check there’s no errors in the file.
- Adobe Brush Library
An
ABRwith multiple images inside. Previous versions of Krita could not load this, but now Krita will load them as a library of brushes.- Adobe Style Library
This is the Photoshop
ASLformat, which stores Layer Styles.- Document Storage
Every Krita document can store resources and act as a resource library. This is currently only used for palettes.
- Memory Storage
Finally, the memory library is where temporary resources are kept, which are generated by Krita and have no physical version on disk. This is currently used for the fore-to-background gradient.
You can manage resource libraries by going to . In this dialog, you can import resource libraries, deactivate them, and also Creating your own Bundle.
Importing Bundles
To import a bundle click on Import button on the top right side of the dialog.
Select .bundle file format from the file type if it is not already selected, browse to the folder where you have downloaded the bundle, select it and click Open. Once the bundle is imported it will be listed in the bundle view. To enable or disable a bundle, select the entry in the view, and then select Deactivate.
On Android, you can also get more resource bundles through the application itself in return for supporting Krita, see Android Supporter Packs.
Creating your own Bundle
You can create your own bundle from the resources of your choice. Click on the Create bundle button. This will open a dialog box as shown below.

What follows is a so-called wizard, that is, Krita will run you through bundle creation, step-by-step.
Choosing Resources
Krita will ask you which resources you want to use. Double-click a resource to add it to the bundle.
Choosing tags
Krita will ask you which tags you want to include inside the bundle. Click the + button to select a dropdown of tags.
Enter Bundle Details
Here you can set the bundle title, icons and some info about you as the author.
Choose Save Location
Finally, Krita will present you with a summary of the bundle you’ve created. All that’s left is to select a spot where you want to save the bundle and clicking on the Save button
You can now share this bundle with other artists or load it on other workstations.
Changed in version 5.3: The bundle creator was overhauled for 5.3.
Deleting Imported Bundles
In case you wish to delete the bundles you have imported permanently click on the Open Resource Folder button in the Manage Resources dialog. This will open the resource folder in your file browser. Go inside the bundles folder and delete the bundle file which you don’t need any more. The next time you start Krita the bundle and its associated resources will not be loaded.
Managing Resources
As mentioned earlier Krita has a flexible resource management system. Starting from version 2.9 you can share various resources mentioned above by sharing a single compressed ZIP file created within Krita.
The manage resources section in the settings was also revamped for making it easy for the artists to prepare these bundle files. You can open manage resource section by going to menu item.
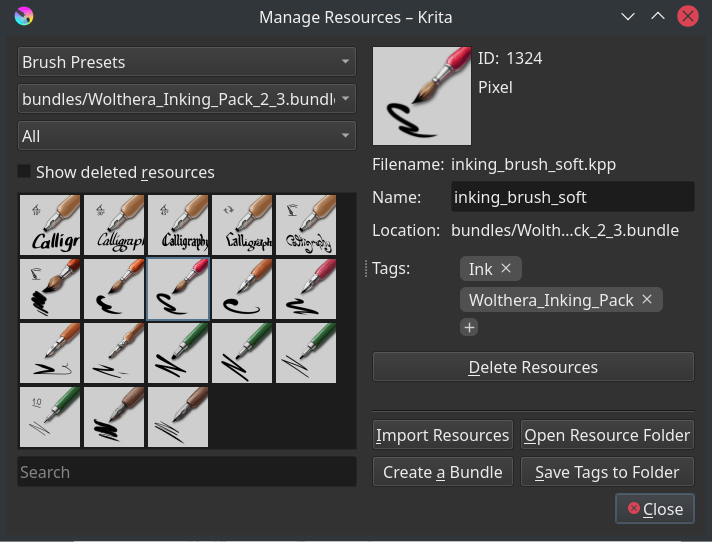
You can do a variety of things here, like deleting backup files, mass-tagging, deleting/deactivating the resource itself, importing resources and open the create bundle dialog.
Importing resources
To import resources, select the import in the resource choosers or the resource manager.
The resource chooser import is fairly straight forward. You can only select certain kinds of files, and all the files you can select are possible to import for that resource.
The import button in the resource manager however sometimes needs to make a choice on whether an imported *.png file is a brush tip or a texture. When importing a format that can be used for multiple types of resources, a window will pop up asking which resource type you intended to import the file for.
Activating and Deactivating
Deactivating resources is done by selecting them in their respective resource chooser, and pressing the trashcan icon.
For activating a resource, go to , then turn on Show Deleted Resources. The deactivated resources should now be visible, select them, and then press Undelete Resource.
Returning a resource to the previous version
First go to the resource folder, .
Then go into the
paintoppresetsfolder.Backup (select and cut) all versions of the related resource into a place you can find them. Delete all these files from the
paintoppresetsfolder.restart Krita.
add only the desired version of the resource.
Deleting Backup files
When you delete a preset from Krita, Krita doesn’t actually delete the physical copy of the preset. It just adds it to a black list so that the next time when you start Krita the presets from this list are not loaded. To delete the brushes from this list click on Delete Backup Files.
Note
Deleting backup files has temporarily been disabled for 5.0.
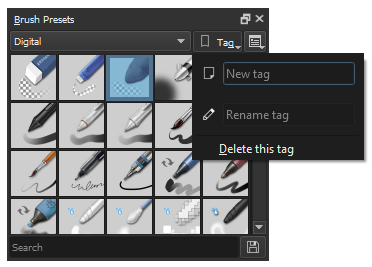
Tags
Tagging allows you to manage the resources on the fly while painting. All Krita resources can be tagged. These tags can be added via the resource manager, but also via the respective dockers such as brush preset docker, pattern docker etc. You can  the + icon in the docker and add a tag name. In addition to adding you can rename and delete a tag as well.
Resources can belong to one or more tags. For example, you may have a Brush Preset of a favorite Ink Pen variant and have it tagged so it shows in up in your Inking, Painting, Comics and Favorites groups of brushes.
Every resource can be tagged, so brushes in the Predefined tab of the Brush Settings Editor can be also tagged and grouped for convenience.
In the resource manager, you can tag multiple resources at once. To select multiple resources, use Ctrl for adding individual resources to the selection or Shift for adding every resource at once. Then press the plus icon next to the tags section to add a tag to every selected resource.
Some tags are translated. If you make bundles for others, using such tags can be useful to ensure cross-language compatibility. The tags that get localized are…
Digital
Erasers
FX
Favorites
Ink
Paint
Pixel_Art
Sketch
Textures
Filtering
Some dockers, for example the brush preset docker as shown below, have a resource filter, which functions like a search bar for the resource in question.
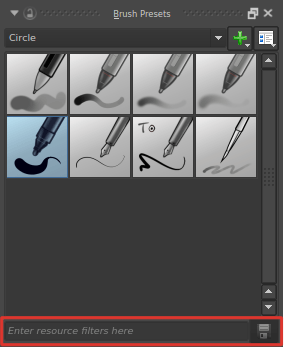
You can enter brush name, tag name to quickly pull up a list of brush presets you want. When you select any tag from the tag drop-down and want to include brush presets from other tags as well then you can add filters based on the partial, case insensitive name of the resources by using partialname or !partialname.
- Resource Zooming
If you find the thumbnails of the resources such as color swatches brushes and pattern to be small you can make them bigger or Zoom in. All resource selectors can be zoomed in and out of, by hovering over the selector and using the Ctrl +
 shortcut.
Resource Types in Krita
Main Resource Types