
General Settings
You can access the General Category of the preferences by first going to menu item.
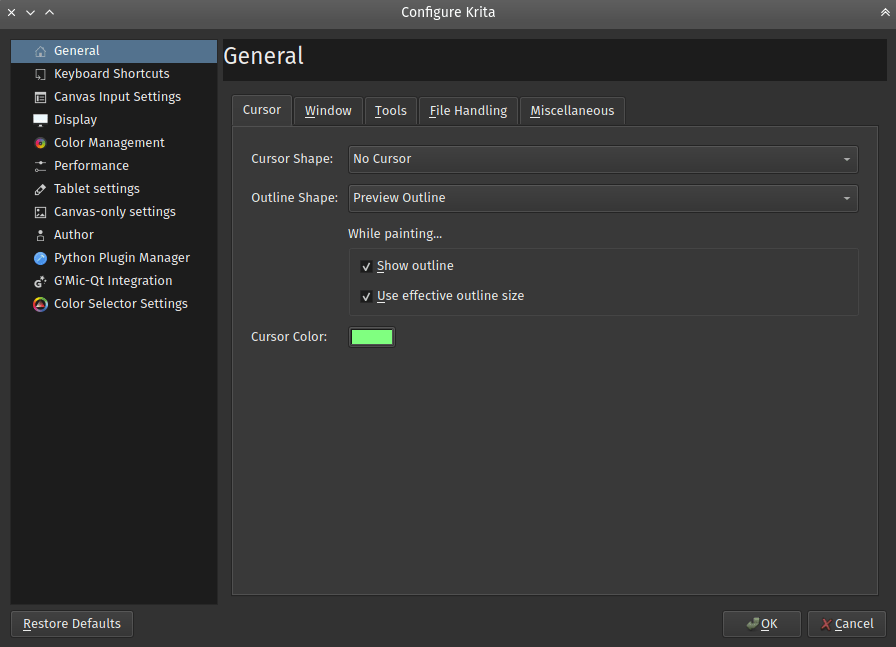
Cursor Settings
Customize the drawing cursor here:
Cursor Shape
Select a cursor shape to use while the brush tools are used. This cursor will always be visible on the canvas. It is usually set to a type exactly where your pen nib is at. The available cursor types are shown below.
- Tool Icon
Shows the currently selected tool icon, even for the freehand brush.

- Arrow
Shows a generic cursor.

- Crosshair
Shows a precision reticule.

- Small circle
Shows a small white dot with a black outline.

- No Cursor
Show no cursor, useful for tablet-monitors.

- Triangle Right-Handed.
Gives a small white triangle with a black border.

- Triangle Left-Handed.
Same as above but mirrored.

- Black Pixel
Gives a single black pixel.

- White Pixel
Gives a single white pixel.

Outline Shape
Select an outline shape to use while the brush tools are used. This cursor shape will optionally show in the middle of a painting stroke as well. The available outline shape types are shown below. (pictures will come soon)
- No Outline
Turns the outline off.
- Circle Outline
Gives a circular outline approximating the brush size.
- Preview Outline
Gives an outline based on the actual shape of the brush.
- Tilt Outline
Gives a circular outline with a tilt-indicator.
While Painting…
- Show Outline
This option when selected will show the brush outline while a stroke is being made. If unchecked the brush outline will not appear during stroke making, it will show up only after the brush stroke is finished. This option works only when Brush Outline is selected as the Cursor Shape.
Changed in version 4.1: Used to be called “Show Outline When Painting”.
- Use effective outline size
Added in version 4.1: This makes sure that the outline size will always be the maximum possible brush diameter, and not the current one as affected by sensors such as pressure. This makes the cursor a little less noisy to use.
- Cursor Color:
The default cursor color. This is mixed with the canvas image so that it will usually have a contrasting color, but sometimes this mixing does not work. This is usually due driver problems. When that happens, you can configure a more pleasant color here.
Use separate settings for eraser
This allows you to configure all of the above, but then when the blending mode is set to erase, which is the default on eraser presets as well when toggling erase with E. The settings are mostly identical except of the additional eraser tool icon.
Window Settings
- Multiple Document Mode
This can be either tabbed like GIMP or Paint Tool SAI, or sub windows, like Photoshop.
- Show on-canvas popup messages
Whether you want to see the on-canvas pop-up messages that tell you whether you are in tabbed mode, rotating the canvas, or mirroring it.
- Zoom Margin Size
This determines how much margin in pixels will be added when using Fit Page. This is particularly useful for large monitors, where the total canvas area might be larger than the center of your field of vision. Using a margin can then center the image inside the canvas area more comfortably.
Added in version 5.1.
- Subwindow mode
- Background image
Allows you to set a picture background for sub window mode.
- Window Background
Set the color of the sub window canvas area.
- Don’t show contents when moving sub-windows
This gives an outline when moving windows to work around ugly glitches with certain graphics-cards.
- Use Custom Interface Font
This allows you to tweak the interface font and the size. Requires a restart.
- Enable Hi-DPI support
Attempt to use the Hi-DPI support. It is an option because we are still experiencing bugs on Windows.
- Enable fractional scale factor
Allow the Hi-DPI support to use fractional (not multiples of 100%) display scaling. If you use a fractional display scaling, this option can make the interface of Krita match the interface size of the rest of your system, but it may cause some visual artifacts.
Added in version 5.0.
- Allow only one instance of Krita
An instance is a single entry in your system’s task manager. Turning this option makes sure that Krita will check if there’s an instance of Krita open already when you instruct it to open new documents, and then have your documents opened in that single instance. There’s some obscure uses to allowing multiple instances, but if you can’t think of any, just keep this option on.
Deprecated since version 5.0: Since Krita 5.0 this has been deprecated, as it now uses a SQLite database for handling the resources, and this cannot be managed by multiple instances.
Tools Settings
- Tool Options Location
- In Docker (default)
Gives you the tool options in a docker.
- In Toolbar
Gives you the tool options in the toolbar, next to the brush settings. You can open it with the \ key.
- Brush Flow Mode
In Krita 4.2 the behavior of flow in combination with opacity was changed. This allows you to turn it back to the 4.1 behavior. This will however be removed in future versions.
- CMYK Blending Mode
This allows you to control the way blending modes are handled for CMYK.
- Subtractive (Krita 5.2+)
Channels are inverted before the blending mode is applied. This will result in most blending modes having a similar effect to the same blending modes in RGB. This is useful when you are doing interchange using PSD files.
- Additive (Krita 5.1 and earlier)
Channels are not inverted before the blending mode is applied, which means that for example, the multiply mode, which decreases pixel values, will in RGB look like it makes things darker, while in this additive CMYK mode it will make things lighter.
Added in version 5.2.
- Switch Control/Alt Selection Modifiers
This switches the function of the Ctrl and Alt keys when modifying selections. Useful for those used to Gimp instead of Photoshop, or Lefties without a right Alt key on their keyboard.
- Touch Painting
Toggles whether to allow painting by touching on a capacitive screen. Enabled will let you draw via touch and Disabled will let you pan the canvas instead. Auto (the default) will automatically detect whether you have a stylus available and enable or disable touch painting accordingly.
Changed in version 5.2.13: The Auto option was added and became the default.
Changed in version 5.0: When this is disabled, panning the canvas can be done with by dragging a single finger over the canvas, while when enabled, panning will only be done by dragging three fingers.
- Activate transform tool after pasting
Added in version 4.2: A convenience feature. When enabling this, the transform tool will activate after pasting for quick moving or rotating.
- Enable Touch Rotation
Without this, gestures on the canvas only allow zoom and pan, with this turned on, the two-finger gesture also allows to rotate.
Deprecated since version 5.1: Since Krita 5.1, this is removed. Instead it’s now possible to configure the navigation gestures inside the Canvas Input Settings.
- Enable Smooth Zooming
When using
 , zooming switches between predefined zoom levels. Turning this on switches that to be a smooth increment.
Deprecated since version 5.1: This got replaced with the Zoom Steps between powers of Two option.
- Zoom Steps between powers of Two
How many zoom steps there are between values that are powers of 2 (For example, 2^-1 is 50%, 2^-2 is 25%, 2^2 is 400%). With this, you can decide how many steps steps go inbetween those. The higher the value, the smoother the zoom with a
.- Kinetic Scrolling (Needs Restart)
This enables kinetic scrolling for scrollable areas.
Kinetic scrolling on the brush chooser drop-down with activation mode set to On Click Drag, with this disabled all of these clicks would lead to a brush being selected regardless of drag motion.
- Activation
How it is activated.
- On Middle-Click Drag
Will activate when using the middle mouse button.
- On Touch Drag
Will activate if it can recognize a touch event. May not always work.
- On Click Drag
Will activate when it can recognize a click event, will always work.
- Sensitivity
How quickly the feature activates, this effective determines the length of the drag.
- Hide Scrollbar
Whether to show scrollbars when doing this.
File Handling
Added in version 4.2.
- Enable Autosaving
Determines whether Krita should periodically autosave.
- Autosave Every
Here the user can specify how often Krita should autosave the file, you can tick the checkbox to turn it off. For Windows these files are saved in the
%TEMP%directory. If you are on Linux it is stored in/home/'username'.- Unnamed autosave files are hidden by default
This determines whether the filename of autosaves has a period prepended to the name. On Linux and macOS this is a technique to ensure the file is hidden by default.
- Create Backup File
When selected Krita will, upon save, rename the original file as a backup file and save the current image to the original name. The result is that you will have saved the image, and there will be a copy of the image that is saved separately as a backup. This is useful in case of crashes during saves.
- Backup File Location
The default location these backups should be stored.
- Same Folder as Original File
Store the file in the same folder as the original file was stored.
- User Folder
This is the main folder of your computer. On Linux and macOS this is the ‘Home’ folder, on Windows, the
c:UsersYOUR_USER_NAMEfolder (whereYOUR_USER_NAMEis your windows username).- Temporary File Folder
This stored the file in the temp folder. Temp folders are special folders of which the contents are emptied when you shut down your computer. If you don’t particularly care about your backup files and want them to be ‘cleaned’ automatically, this is the best place. If you want your backup files to be kept indefinitely, this is a wrong choice.
- Backup File Suffix
The suffix that will be placed after the full filename.
filename.krawill then be saved asfilename.kra~, ensuring the files won’t show up in Krita’s open file dialog.- Number of Backup Files Kept
Number of backup files Krita keeps, by default this is only one, but this can be up to 99. Krita will then number the backup files.
- Compress
\*.krafiles more (slows loading/saving) This increases the ZIP compression on the saved Krita files, which makes them lighter on disk, but this takes longer to load.
- Use Zip64
KRA files are ZIP files. Zip64 allows you to make really large image files (which is useful for animation), however, not all ZIP file programs can read Zip64, including older versions of Krita.
- Trim Files before Saving
Normally, Krita will always keep pixels outside the visible canvas area and save that. With this option turned on, Krita will first crop all the layers to the canvas-area and then save it.
- Trim frames when importing animations
This will crop frames that where imported using any of the options Krita has available. This saves RAM, but may not always be what is required.
When Pasting Into Krita From Other Applications
Added in version 5.1.
Some applications, like Google Chrome, provide multiple formats when pasting or dropping an image. This toggle asks which of these you prefer.
- Prefer downloading the original source (this requires Internet access).
If the clipboard data contains an URL, Krita will try to download those contents and paste them inside Krita.
- Prefer a local copy (if available; metadata may be lost)
If the file had been downloaded by your computer previously (for example, to show it inside the web browser), Krita will use that instead.
- Paste the attached sRGB bitmap (no filesystem or Internet access required, but metadata will be lost).
Just paste the attached bitmap. This will always work, and may be the best option if all you copy images for is to make small edits to share with friends. If you intend to copy and edit HDR images however, this option will make your life harder because the HDR version of the image will not be selected by default.
- Ask each time
Krita will show a prompt whenever there are multiple options.
Miscellaneous
- When Krita starts
This is the option for handling user sessions. It has the following options:
- Open Default Window
This opens the regular empty window with the last used workspace.
- Load Previous Session
Load the last opened session. If you have Save session when Krita closes toggled, this becomes the last files you had open and the like.
- Show Session Manager
Show the session manager directly, so you can pick a session.
Added in version 4.1.
- Save session when Krita closes
Save the current open windows, documents and the like into the current session when closing Krita, so you can resume where you left off.
Added in version 4.1.
- Upon importing Images as Layers, convert to the image color space.
This makes sure that layers are the same color space as the image, necessary for saving to PSD.
- Undo Stack Size
This is the number of undo commands Krita remembers. You can set the value to 0 for unlimited undo commands.
- Enable Logging For Bug Reports
This controls whether Krita keeps a log of the important actions, which can then be attached to a bug report. You can view the log itself via , and the log itself is stored in the shared application settings.
Note
Krita does not automatically transfer data anywhere. The log needs to be uploaded by users themselves if necessary.
- Hide splash screen on startup.
This’ll hide the splash screen automatically once Krita is fully loaded.
Deprecated since version 4.1: Deprecated because Krita now has a welcome widget when no canvas is open.
- Enable Native File Dialog
This allows you to use the system file dialog. Turned off by default, because we cannot seem to get native file dialogues 100% bug free.
- Maximum brush size
This allows you to set the maximum brush size to a size of up to 10,000 pixels. Do be careful with using this, as a 10,000 pixel size can very quickly be a full gigabyte of data being manipulated, per dab. In other words, this might be slow.
- Recalculate animation cache in background.
Krita will recalculate the cache when you’re not doing anything.
Changed in version 4.1: This is now in the Performance Settings under Animation Cache.
- Automatically Pin New layers To Timeline.
Used with the Animation Timeline Docker, this will pin all animation layers to the timeline automatically. Depending on your workflow, this can be quite intense, so hence the option to turn it off.
Added in version 5.0.
- Adapt playback range to key frames.
This option decides whether adding key frames outside the current playback range automatically extends the playback range or not.
Added in version 5.0.
- Font DPI Workaround
We had a bug in Krita 4.x where the DPI of the display affected the DPI of the text.
Now when loading a file created in Krita 4.4 we convert its font sizes using the DPI of the display and bake this new value into the file. The user can override this behavior by selecting another DPI in here. Setting this value to 72 DPI will effectively disable any scaling.
In Krita 4.x the size of the text was also affected by the HiDPI settings, the best conversion results are dependent on whether Use HiDPI and Use Fractional HiDPI were used when creating the text. In other words, if you want the text to look exactly the same, try to match the Krita 5 HiDPI settings to the Krita 4 HiDPI settings. You don’t have to keep these settings the same after the conversion has happened.
Added in version 5.0.
Automatic Layer Suffixes
By default, Krita will add extra info behind layers it generates. These toggles allow you to turn that off.
- Add “Merged” to merged group layers.
When you flatten a group layer into a single paint layer, Krita will add “Merged” after the layer name. If you make frequent use of merging, it can be useful to turn this off.
- Add “(Pasted)” to pasted layers.
When you copy and paste a section of a layer, Krita will add “(Pasted)” after the layer name so you can keep track of that.
Added in version 5.2.
Long-press to open context menus
Allows you to summon context menus by pressing and holding, useful when you don’t have an easy way to make a right-click. This is enabled by default on Android.
Added in version 5.2.14.
Resources
For determining the location of the resource folder and the cache.
Added in version 5.0.
- Cache Location
Sets where the SQLite Database that manages all the resources is located.
- Resource Folder
Sets where the Resource Folder itself is located.