
Impostazioni sulla gestione del colore
Krita offre funzionalità estese per la gestione dei colori con l’uso di Little CMS La gestione dei colori viene descritta con maggior dettaglio qui: Flusso di lavoro di gestione dei colori.
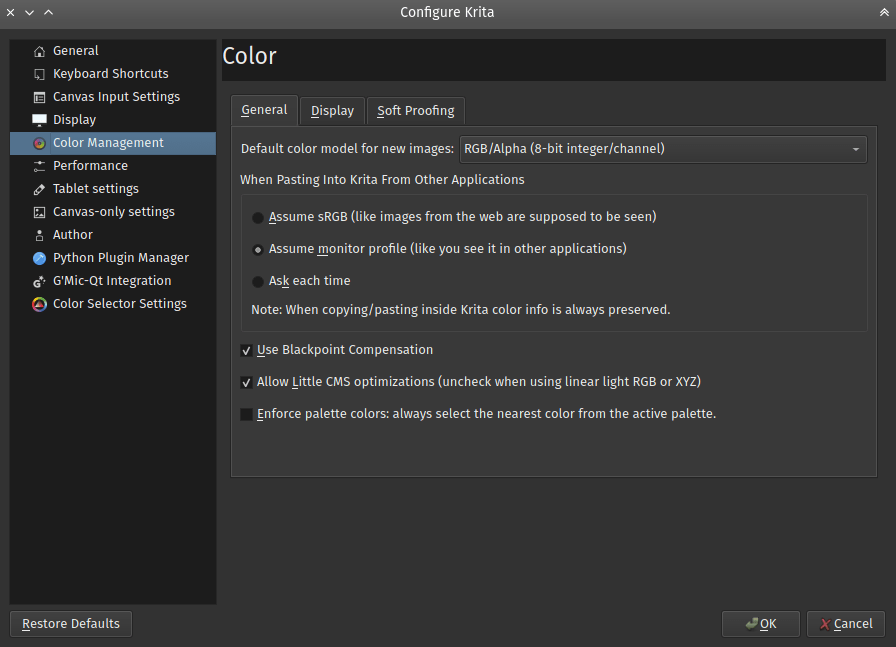
Generale
Modello del colore predefinito per le nuove immagini
Scegli il modello predefinito che preferisci per tutte le tue immagini.
Quando si incolla in Krita da altre applicazioni
L’utente può definire che tipo di conversione, se presente, Krita eseguirà su un’immagine copiata da altre applicazioni, ossia un browser, GIMP, e via discorrendo.
- Presumi sRGB
Questa opzione mostra l’immagine incollata nel profilo predefinito ICC di Krita di sRGB.
- Presumi profilo del monitor
Questa opzione mostra l’immagine incollata nel profilo del monitor selezionato nelle preferenze del sistema.
- Chiedi ogni volta
Krita chiederà all’utente cosa fare ogni volta che un’immagine è incollata. Questa è l’opzione predefinita.
Nota
Quando copi e incolli dentro Krita, le informazioni sui colori sono sempre mantenute.
Usa compensazione del punto nero
Questa opzione attiverà la Compensazione del punto nero (BPC) per la conversione. La BPC è spiegata dal responsabile di LCMS nel modo seguente:
Permetti le ottimizzazioni LittleCMS
Togli la spunta a questa opzione per disattivare le ottimizzazioni. Durante il lavoro con spazi dei colori lineari, a volte le ottimizzazioni Little CMS non restituiscono i migliori risultati.
Cambiato nella versione 5.0: Da Krita 5.0 forniamo l’estensione a virgola mobile rapida per LittleCMS. La disattivazione di questa opzione disattiverà anche questa estensione.
Forza i colori della tavolozza: seleziona sempre il colore più vicino dalla tavolozza attiva
Per impostazione predefinita gli oggetti di selezione della tavolozza prelevano il colore di primo piano corrente, lo confrontano con i campioni nella sua tavolozza attiva e evidenziano il campione che più si avvicina al colore di primo piano corrente.
Quando l’opzione Forza i colori della tavolozza è attivata, il selettore dei colori interno passa a una modalità per cui il colore di primo piano corrente viene sostituito col colore del campione più approssimato, anziché soltanto evidenziarlo.
Vista
Nei sistemi che forniscono accesso diretto allo schermo
In tutti le piattaforme, ad eccezione di Wayland nativo, Krita presume di avere accesso diretto allo schermo. In questa modalità, puoi fondamentalmente aver bisogno di selezionare tre semplici opzioni per configurare correttamente la gestione del colore dello schermo.
- Usa profilo del monitor di sistema
Quando attivata, questa opzione istruisce Krita di utilizzare il profilo ICC selezionato nelle preferenze del tuo sistema.
- Profili del monitor
Ci sono tanti profili quanti monitor hai collegato. Puoi selezionare un profilo ICC che Krita utilizzerà indipendentemente dal profilo del monitor impostato nelle preferenze di sistema. Il predefinito è
sRGB incorporato.Se non possiedi un colorimetro fisico, prova a usare il profilo fornito dal produttore del tuo schermo. Per gli schermi di buona qualità, questi profili sono in genere di qualità decente (per lo meno nelle linearizzazione delle sfumature).
Nota
Se utilizzi un compositore compatibile con Wayland, ma esegui Krita in modalità XWayland, allora devi selezionare
sRGB incorporatocome profilo del monitor, poiché Wayland considererà la finestra di Krita come «superficie sRGB non gestita».Nei sistemi Unix verrà proposto il profilo memorizzato in $/usr/share/color/icc (posizione di sistema) o $~/.local/share/color/icc (posizione locale). I profili memorizzati nella cartella delle preferenze di Krita, $~/.local/share/krita/profiles sarà visibile solo in Krita.
- Obiettivo di resa
La tua scelta degli obbiettivi di resa è un modo di dire a Littlecms come vuoi che vengano mappati i colori da uno spazio dei colori a un altro. Ci sono quattro opzioni disponibili, spiegate tutte sulla pagina del manuale di Profili ICC.
Nei sistemi che usano Wayland
Added in version 6.0.
Nota
A partire da Krita 6.0.0, per impostazione predefinita il programma non usa il protocollo Wayland anche quando è disponibile un compositore Wayland. Krita preferisce il vecchio protocollo XWayland. Per forzare Krita usa il protocollo Wayland nativo, eseguilo con la seguente configurazione d’ambiente QT_QPA_PLATFORM:
QT_QPA_PLATFORM=wayland krita
- Obiettivo di resa
Questa opzione istruisce Wayland sul modo di mappare i colori delle immagini all’interno dello spazio dei colori dello schermo. Se hai configurato correttamente il profilo dello schermo nello stesso compositore Wayland, allora dovresti mantenere questo valore impostato a Colorimetrico relativo e tenere abilitata l’opzione Usa compensazione del punto nero. Ciò garantirà che i punti di bianco e nero della tua immagine verranno regolati ai punti corrispondenti del tuo schermo e l’intero volume dei colori sarà ridimensionato per adattarsi allo spazio del tuo schermo.
Se non hai impostato correttamente il profilo dello schermo nel compositore Wayland o preferisci usare le funzionalità di regolazione personalizzate del colore del tuo compositore, allora puoi impostare Percettivo come obiettivo di resa. Fai attenzione che in questo caso i colori resi sul tuo schermo potrebbero risultare colorimetricamente non corretti. Nella modalità percettiva, al compositore è permesso cambiare i colori in maniera arbitraria, per esempio, stirare lo spazio sRGB in qualcosa di più ampio per rendere i colori di «aspetto migliore» sugli schermi con gamut ampio. L’obiettivo di resa Percettivo potrebbe dunque non essere adatto per il lavoro critico sul colore.
- Abilita la gestione del colore della tela
Questo interruttore è presente solo a scopo di debug. Quando disattivata, la tela di Krita smette di utilizzare una superficie nativa di gamut ampio separata per la resa delle immagini. Al suo posto, riutilizza la superficie sRGB principale dell’applicazione. Questo implica che la tela cambia realmente in modalità sRGB.
- Spazio dei colori superficie della tela
Seleziona lo spazio dei colori in cui i dati dell’immagine sono inviati al compositore.
- Preferito dal sistema operativo
I dati dell’immagine saranno inviati al compositore nel formato preferito dallo stesso compositore. Nella maggior parte dei casi, risulterà essere il metodo più efficiente di comunicazione tra Krita e il compositore.
L’esatto formato preferito dal compositore può essere osservato nella parte inferiore della pagina.
Usa questa opzione a meno che non abbia una ragione per non farlo.
- Rec 709 Gamma 2.2
Questo è uno spazio dei colori SDR con colori primari uguali a sRGB e funzione di trasferimento impostata a «gamma 2.2».
- Rec 709 Linear
Questo è uno spazio dei colori SDR con colori primari uguali a sRGB e una funzione di trasferimento lineare. A meno che il tuo sistema non supporti la profondità di 16 bit in virgola mobile della superficie, usa questa opzione solo per scopi di debug.
- Rec 2020 PQ
Questo è uno spazio dei colori HDR come definito dalla specifica Rec. 2100. È l’unico spazio dei colori nel quale Krita può passare i dati HDR al compositore!
Nota
Nell’attuale implementazione delle conversioni HDR in Krita, il bianco diffuso di questo spazio dei colori HDR è sempre fissato a 80 cd/m². In altre parole, se se scatti un’immagine in uno spazio lineare «scene-referred» (es. ACEScg), la converti in Rec 2020 PQ, il valore dei colori RGB
(1.0, 1.0, 1.0)di questa immagine saranno poi mappati al valore di 80 cd/m² nell’intervallo PQ.Quando Krita passa i dati «Rec 2020 PQ» al compositore, gli dichiara correttamente questo punto di bianco diffuso. Il compositore, a sua volta, applica una curva aggiuntiva all’immagine, per adattare questo livello al «livello di luminosità SDR» selezionata dall’utente nella pagina di configurazione HDR a livello di sistema.
- Non gestito (solo per prova)
Questa opzione disabilita l’impostazione di qualsiasi metadato dello spazio dei colori sulla superficie della tela. Sostanzialmente lascia che il compositore lavori con i colori come preferisce.
- Profondità in bit della superficie della tela (richiede il riavvio)
Seleziona la profondità di bit della superficie della tela. A causa di limitazioni in Qt, nell’applicazione la profondità in bit dovrà essere uguale per tutte le superfici, quindi la modifica del valore richiede il riavvio di Krita.
- Profondità in bit attuale della superficie della tela
L’attuale profondità in bit utilizzata per la superficie della tela. Questa profondità viene selezionata all’avvio di Krita, e non cambierà durante la sua esecuzione.
- Spazio dei colori preferito dal sistema operativo
Mostra le informazioni sullo spazio dei colori preferito dal compositore. Questo spazio verrà utilizzato quando è selezionato lo spazio dei colori Preferito dal sistema operativo.
Questi dati possono mostrare se il tuo compositore funziona attualmente in modalità HDR. Verifica il valore di
Spazio dei colori -> Luminanza. SeLuminanza maxè più alta dellaLuminanza di riferimento, allora nel compositore è abilitata la modalità HDR.
Opzioni di Prova colore
Ti permettono di configurare le opzioni di prova colore predefinita. Per configurare la prova colore reale per l’immagine attuale, vai a .
Per dettagli più approfonditi sull’uso della prova colore, consulta la pagina sulla prova colore.