
Vector Layers
What is a Vector Layer?
A Vector Layer, also known as a Shape Layer, is a type of layers that contains only vector graphics elements.
The vector layer appear in Krita’s Layers docker with the following icon  right to the layer thumbnail.

About Vector Graphics & Raster Images
Krita is primarily a Raster Graphics editing tool, which means that most of the editing changes the values of the pixels on the raster that makes up the image.
A Vector Graphics editing tool will use mathematics to describe shapes. Shapes can be edited at any time (modified, deleted). Because it uses formulas, vector graphics can be resized to any size without any ‚pixel‘ or ‚blur‘ effect.
Vector Graphics are useful to generate logo and banners. They’re also useful to manipulate and render texts (a vector graphic text can be edited where a rasterized text can’t).
Creating a Vector Layer
In Layers docker, click on dropdown arrow right to the Add layer  button; this will popup a sub-menu with the Add Vector Layer entry.
Default shortcut to create a new vector layer is Shift + Ins.
Creating Shapes
When active layer is a vector layer, the following tools can be used to create vector shapes.
- Specialized vector shapes
Krita provides differents specialized vector shapes tools:
 Ellipse Tool (also allow to create pie shapes)
 Rectangle Tool (also allow to create rounded rectangle shapes)
- Paths shapes
Krita provides differents paths shapes tools:
- Text shapes
- Import of SVG document
In addition, you can import a Scalable Vector Graphic (SVG):
Paste a SVG content copied from another software like Inkscape for example
Open a SVG file in a new document, edit Vector Layer content, copy/paste it or copy/paste shapes from it


Arranging Shapes
A vector layer has its own hierarchy of shapes, also named z-Order.
When a Vector Layer is rendered, shapes are drawn from the bottom to the top:
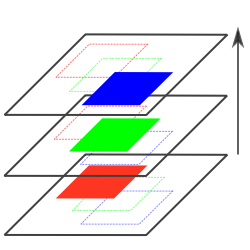
z-Order Visualization of shapes¶ |

Rendered image from shapes¶ |
The z-Order of shapes can be modified in 2 way:
From Docker Arrange
From context menu, accessible with

Both provides the same functions:
 Bring to Front: move z-Order position to the top
 Raise: move z-Order position on step up
 Lower: move z-Order position on step down
 Send to Back: move z-Order position to the bottom
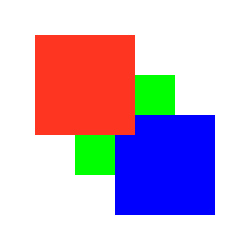
Red square has been „Bring to front“¶ |
Selecting Shapes
To manipulate shapes, you need to select them with the Shape Selection Tool  .
.
The Shape Selection Tool also provides access to options to manage shape geometry, stroke and fill properties.
Editing Shapes Outline
Outline for a shape can be edited with the Shape Edit Tool  .
.
Rendering Vector Layer content
By default, vector layer content are rendered using an anti-aliasing algorithm.
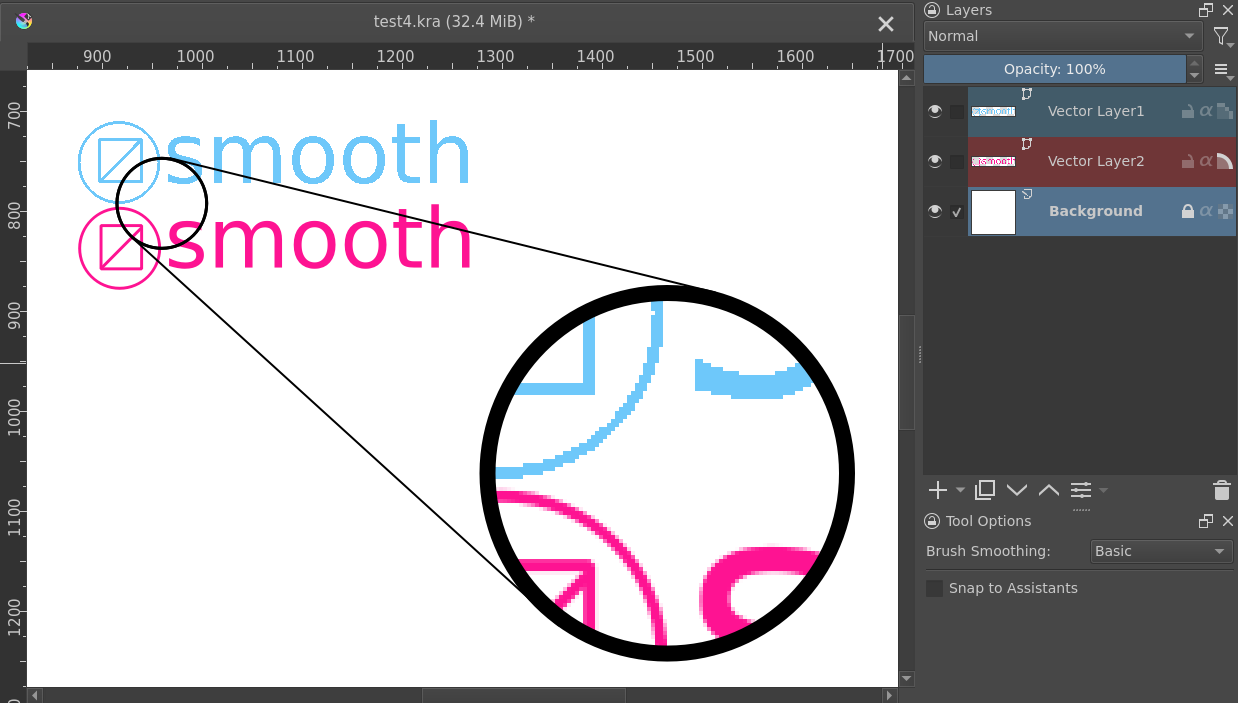
- In the Layers docker the vector layer icon
 indicates the anti-aliasing is disabledOn blue vector shapes, you can see aliased pixels in magnified view
 - In the Layers docker the vector layer icon
 indicate the anti-aliasing is enabledOn pink vector shapes, you can see anti-aliased pixels in magnified view