
Render Animation
Render animation allows you to render your animation to an image sequence and (on computers) to .gif, .mp4, .mkv, or .ogg file. It replaces Export Animation.
For rendering to an animated file format, Krita will first render to a PNG sequence and then use FFmpeg, which is really good at encoding into video files, to render that sequence to an animated file format. The reason for this two-step process is that animation files can be really complex and really big, and this is the best way to allow you to keep control over the export process. For example, if your computer has a hiccup, and one frame saves out weird, first saving the image sequence allows you to only resave that one weird frame before rendering.
This means that you will need to find a good place to stick your frames before you can start rendering. If you only do throwaway animations, you can use a spot on your hard-drive with enough room and select Delete Sequence After Rendering.
General
- First Frame
The first frame of the range of frames you wish to adjust. Automatically set to the first frame of your current selection in the timeline. This is useful when you only want to re-render a little part.
- Last Frame
As above, the last frame of the range of frames you wish to adjust. Automatically set to the last frame of your current selection in the timeline.
Export as Image Sequence
- File Format
The file format to export the sequence to. When rendering we enforce PNG. The usual export options can be modified with ….
- Image Location
Where you render the image sequence to. Some people prefer to use a flash-drive or perhaps a harddrive that is fast.
- Base Name
The base name of your image sequence. This will get suffixed with a number depending on the frame.
- Start numbering at.
The frames are named by using Base Name above and adding a number for the frame. This allows you to set where the frame number starts, so rendering from 8 to 10 with starting point 3 will give you images named 11 and 15. Useful for programs that don’t understand sequences starting with 0, or for precision output.
- Only Unique Frames
Normally Krita generates a frame for every FPS in the sequence. Ticking this will only generate keyframes, saving space.
Export as Video
Opomba
On Android, exporting videos is unavailable. To render a video, you will have to transfer the KRA file to a computer or export an image series and find an Android application that can turn them into a video.
- Width
Set the desired width in pixels.
- Height
Set the desired height in pixels.
- FPS
Set the desired frames per second.
- Filter
Set the scaling filter. Bicubic is fine for most cases, but if you want to, say, export a pixel art animation at twice the size, Nearest Neighbour will preserve the fine details better.
- Render As
The file format to render to. All except GIF have extra options that can be manipulated via ….
- Video Location
Location and name of the rendered animation.
- Include Audio
Include any audio you have added.
- FFmpeg
The location where your have FFmpeg.
Spremenjeno v verziji 5.2: This is now optional. Krita’s bundled FFMpeg functionality is able to provide some options, but it is still useful to set this if you want to use a specific version of FFMpeg for rendering videos.
- Delete Sequence After Rendering
Delete the prerendered image sequence after done rendering. This allows you to choose whether to try and save some space, or to save the sequence for when encoding fails.
Zastarelo od verzije 5.2: Since 5.2, Krita will always delete the image sequence if Export as Image Sequence is not checked while Export as Video is.
Opozorilo
Krita currently does not support rendering video with transparent elements, and will instead render them as black. To combat this, you can add in a fully colored, opaque layer at the bottom of the file before rendering.
Setting Up Krita for Exporting Animations
Spremenjeno v verziji 5.2.
Since Krita 5.2, Krita bundles a small part of FFmpeg. This means that you will not strictly have to download and setup FFMpeg to render animations. Different versions of the program have different options however, and video experts might want to use a specific version of FFMpeg to get more codec options.
The bundled FFmpeg supports the following containers: Webm, Matroska and OGG, which are a wrapper around the video data (amongst others), which are encoded with codecs, of which the bundled FFMpeg supports:
AOM AV1
VPX VP9
VPX VP8
264 (via openH264)
Theora
The following instructions will explain how to get a non-bundled version of FFMpeg and set it up. The setup is a one-time thing so you won’t have to do it again.
Step 1 - Downloading FFmpeg
For Windows
Open the FFmpeg download page.
Go to release section and choose the download link that says ffmpeg-release-essentials.zip.
Opomba
Don’t download the file which filename contains the word shared. It won’t work with Krita.
If the filename ends with .7z, you can still use it, but then you need to have a program that can open 7zip archives (for example 7zip itself). In case of a .zip file, you can open it just using the Windows file browser.
For macOS
Please see the section above. However, FFmpeg is obtained from here instead. Just pick the big green button on the left under the FFmpeg heading. You will also need an archiving utility that supports .7z, since FFmpeg provides their macOS builds in .7z format. If you don’t have one, try something like Keka.
Alternatively you can find the smaller text under the big green button that says Download as ZIP. Then you should be able to extract it just using Finder.
For Linux
FFmpeg can be installed from the repositories on most Linux systems. Version 2.6 is required for proper GIF support, as we use the palettegen functionality.
For Android
As mentioned above, rendering video on Android is not supported. You can download FFmpeg libraries for Android and there are apps that use FFmpeg’s name, but they will not work with Krita.
Step 2 - Unzipping and Linking to Krita
For Windows
Once you’ve downloaded, go to the file location. Right click on the FFmpeg file, and select Extract All.... Select the file destination, and rename the file to ‚ffmpeg‘.
Hint
It is easiest to save the file under C: drive, but any location is fine.
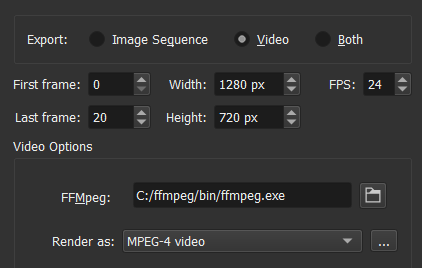
Open Krita back up and go to . Under Export > Video, click the file icon next to FFmpeg. Select this file C:/ffmpeg/bin/ffmpeg.exe and click OK.
Tip
If you have saved FFmpeg to a different location, choose <ffmpeg location>/ffmpeg/bin/ffmpeg.exe.
For macOS
After downloading FFmpeg, you just need to extract it and then simply point to it in the FFmpeg location in Krita like /Users/user/Downloads/ffmpeg (assuming you downloaded and extracted the .7z file to /Users/user/Downloads).
For Linux
FFmpeg is, if installed from the repositories, usually found in /usr/bin/ffmpeg.
Step 3 - Testing out an animation
ffmpeg.exe is what Krita uses to do all of its animation export magic. Now that it is hooked up, let us test it out.
Let’s make an animated GIF. In the Render Animation dialog, change the Render As field to „GIF image“. Choose the file location where it will save with the „File“ menu below. I just saved it to my desktop and called it „export.gif“. When it is done, you should be able to open it up and see the animation.
Opozorilo
By default, FFmpeg will render MP4 files with a too new codec, which means that Windows Media Player won’t be able to play it. So for Windows, select „baseline“ for the profile instead of „high422“ before rendering.
Opomba
macOS does not come with any software to play MP4 and MKV files. If you use Chrome for your web browser, you can drag the video file into that and the video should play. Otherwise you will need to get a program like VLC to see the video.