
Warstwy
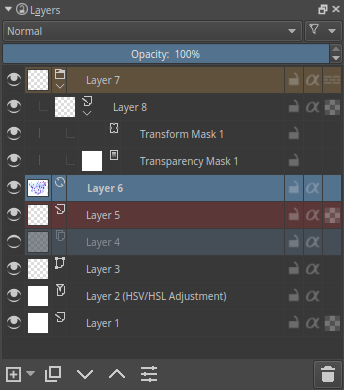
General overview of layer docker for a document with multiple layers
Dok warstw jest jednym z głównych konceptów Krity: Zarządzanie warstwami. Możesz tutaj dodawać, usuwać zmieniać nazwę, powielać i wykonywać wiele innych rzeczy na warstwach.
The interface is split in three main parts:
Controls
Stos warstw
Operations Bar
Controls
At the top there are four controls.

- Blending mode

A dropdown list to set the Blending mode for the active layer.
- Nieprzezroczystość

A slider to set the opacity for the active layer.
- Filter

This allows you to filter all existing layers, which can be useful if you have a lot (say, hundreds!) of layers.
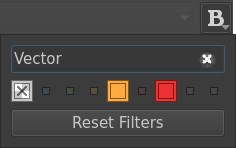
Filter option popup from filter button
Filtering can be applied on:
Color labels (available only if there are color label being used, and only used color labels can be filtered)
Layer names
- Display settings

This allows you to adjust some extra display options of the layer stack.
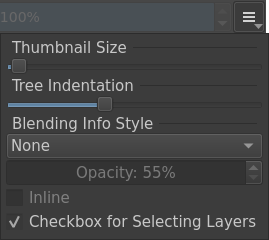
Display settings popup from display settings button
Available display settings are:
Thumbnail size slider, to let you control the size of layer’s thumbnail preview
Tree indentation slider, lets you control the indentation of sub-layers, for either an expanded or compacted view
The blending mode information, defined by 3 parameters
Added in version 5.2.
Drowpdown Detail mode
Mode
Description
None
No extra information is shown.
Simple
This will only display the opacity or the blending mode when these are not 100% and Normal.
Balanced
This will display both the opacity and the blending mode for layers where either the opacity is below 100%, or the blending mode is not Normal.
Detailed
This will always show the opacity and blending options for all layers.
The Opacity slider (enabled if mode is not None) allows you to control the opacity of the extra blending info label.
The Inline checkbox (enabled if mode is not None) will provide information on a single compact line.
The Checkbox for Selecting Layers enables the extra checkboxes between the visibility icon and the label.
This is useful for situations where you may not have access to a Ctrl or Shift key to select multiple layers, such as on a tablet.
Stos warstw
Tutaj możesz zaznaczyć także bieżącą warstwę. Przy użyciu klawiszy Shift oraz Ctrl możesz zaznaczyć wiele warstw, a następnie przeciągać i je upuszczać. Możesz także zmienić widoczność, stan edytowania, dziedziczenie alfy, a także przemianować warstwy. Możesz otwierać i zamykać grupy, a także przeciągać i upuszczać warstwy, aby zmienić ich kolejność lub umieścić je w grupach.
The Layer Stack is organized in three parts:
Left side: an eye-icon and optional checkbox
Middle: layer name and optional information
Right side: Property controls (available controls will vary according to layer type)
- Dziedziczenie kanału alfa
Only available on Layers.
Clicking the alpha inheritance-icon allows you to activate
 or disable
  .
.This will use the alpha of all the layers under the active layer, but within the same group, as a transparency mask.
Check Dziedziczenie alfy lub warstwy przycinające or Maski przycinania oraz dziedziczenie alfy for detailled explanations and examples.
- Blokada alfy
Only available on Warstwy malowania.
Clicking the alpha lock-icon will let you lock
 or unlock
  the alpha channel.
Lock the alpha channel to prevent the transparency of a layer being changed. Useful when coloring images.
- Anti-aliasing
Only available on Warstwy wektorowe.
Clicking the anti-aliasing icon to activate
 or deactivate
  the anti aliasing mode.
- Tryb mieszania
Available on all type of Layers.
Ustawi to Tryb mieszania warstwy.
- Etykieta barwy
Jest to barwa, którą możesz ustawić na warstwie. Wykonanie
 na warstwie przywoła menu, w którym można przypisać jej barwę. Potem możesz odfiltrować po tych barwach.
- Edit State (Layer lock)
Clicking the lock-icon allow to lock
 or unlock
  the layer.
Lock the layer prevents any modifications to be made on layer. Useful when handling large amounts of layers or to ensure not modifying a layer’s content by mistake.
- Expand or Collapse layers
Only available on non-empty Grupa warstw and Layers for which masks are defined.
Clicking the arrow-icon to expand
 or collapse
  group/layer.
- Wygląd warstwy
Only available on Layers which have a Warstwy stylów assigned.
Clicking the FX-icon allow to quickly activate
 or deactivate
  the layer style.
- Nazwa
The Layer name, double-
 to make it editable, and press the Enter key to finish editing.
- Łupina cebuli
Only available on animated layers
Clicking the bulb-icon to activate
 or deactivate
  onion skin features.
- Nieprzezroczystość
Only available on Layers.
Ustawi to nieprzezroczystość całej warstwy.
- Tryb przejścia
Only available on Grupa warstw.
Clicking the pass-through mode icon allows you to activate
 or deactivate
  , which in turns affects how blending modes are composited.
When active, this allows you to have the blending modes of the layers within affect the layers outside the group.
Doesn’t work with masks currently, therefore these have a strike-through on group layers set to pass-through.
Check Jak są składane warstwy w Kricie? or Maski przycinania oraz dziedziczenie alfy for detailled explanations and examples.
- Widoczność
Clicking the eye-icon allow to show
 or hide
  a whole layer.
- Miniatura obrazu
To pokazuje miniaturowy obraz z zawartością warstwy. Jeśli użyjesz Ctrl + | mouseleft| na nim, to możesz dokonać wyboru z zawartości tej warstwy (zobacz sekcję Skróty klawiszowe i lepkie klawisze poniżej).
- Layer Color Space Mismatch Warning
Added in version 5.3.
In Krita layers can have a color space different from the color space of the image. It usually happens when you import an external file as a layer. Such difference is a perfectly valid state for Krita, but it may cause visible slowdowns, because Krita will have convert color space of such layers on the fly. When layer’s color space is different from the color space a small warning icon is shown next to the layer’s properties.
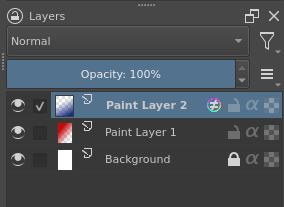
„Paint Layer 2” has a color space different from the rest of the image
To remove the warning you can either manually convert it using dialog or use Unify Layers Color Space action (available via Ctrl + Enter menu).
Aby zmienić te właściwości na wielu warstwach na raz, naciśnij przycisk właściwości, po zaznaczeniu wielu warstw lub naciśnij klawisz F3. Wtedy, aby zmienić nazwy wszystkich warstw, to pole zaznaczane przed Nazwą powinno być zaznaczone. Krita sama doda numer za nazwą warstwy. Możesz zmienić także inne właściwości warstwy, takie jak widoczność, nieprzezroczystość, stan zablokowania, itp.
Added in version 5.0: Poprzez przeciąganie i upuszczanie barw z palety na stos warstw, możesz szybko tworzyć wypełnienia warstw.
Operations bar
Są to przyciski do wykonywania działań na warstwach.

- Dodaj
Clicking the
 button will by default add a new Paint Layer.
The little arrow button aside will popup a sub-menu with all available Wprowadzenie do warstw i masek.
- Powiel
Clicking the
 button will duplicate the active layer(s). Can be quickly invoked with the Ctrl + + drag shortcut.
- Przesuń warstwę wyżej.
Clicking the
 button will move the active layer up. Will switch them out and in groups when coming across them.
- Przesuń warstwę niżej.
Clicking the
button will move the active layer down. Will switch them out and in groups when coming across them.- Właściwości warstwy.
Clicking the
 button open the layer properties window.
The little arrow button aside will popup the
context menu for the currently selected layer. This is useful when you don’t have access to a button.- Usuń
Clicking the
 button will delete the active layer(s). For safety reasons, you can only delete visible and unlocked layers.
Gorące i lepkie klawisze
Klawisz Shift doz zaznaczania wielu ciągłych warstw.
Klawisz Ctrl do zaznaczania i odznaczania warstw bez wpływu na zaznaczenie pozostałych warstw.
Skrót Ctrl +
+ przeciągnięcie tworzy powielenie wybranej warstwy tak, aby można było przeciągnąć i upuścić.Skrót Ctrl + E do scalania warstwy w dół. Scala to także zaznaczone warstwy, wyglądy warstw i zachowa maskę zaznaczenia nietkniętą. Użycie skrótu Ctrl + E na pojedynczej warstwie z maską scali w dół maskę z warstwą.
Skrót Ctrl + Shift + E scali wszystkie warstwy.
- R + shortcut allows you to select the top layer with content below the cursor as the active layer. In addition to this, you can set shortcuts for 4 other modes:
„Select All Layers (Replace Selection)” allows you to select all layers with content below the cursor as the currently selected layers.
„Select All Layers (Add to Selection)” allows you to select all layers that have content below the cursor and add them to the selected layers.
„Select from Menu (Replace Selection)” allows you to select a layer from a pop-up menu or all layers in the menu as the active layer or active layers.
„Select from Menu (Add to Selection)” allows you to select all layers in the menu as the new active layer or active layers. The latter two modes are similar to using Ctrl +
to select a layer in Photoshop.
- R +
Klawisz Ins do dodawania nowej warstwy.
Klawisz Shift + Ins umożliwia dodanie nowej warstwy wektorowej.
Skrót Ctrl + G stworzy warstwę grupującą. Jeśli zaznaczono wiele warstw, to zostaną one umieszczone w tej warstwie grupującej.
Skrót Ctrl + Shift + G szybko stworzy grupę przycinającą z zaznaczonych warstw dodanych do grupy oraz nową warstwą dodaną na szczycie z włączonym dziedziczeniem alfy. Wszystko gotowe do malowania!
Skrót Ctrl + Alt + G rozgrupuje warstwy wewnątrz grupy.
Skrót Alt +
dla oddzielonego widoku warstwy. Zostanie to zachowane pomiędzy warstwami do chwili powtórzenia tego samego działania.Klawisze Page Up oraz Page Down do przełączania pomiędzy warstwami.
Skróty Ctrl + Page Up oraz Ctrl + Page Down przesuną zaznaczoną warstwę w górę i w dół.
Ctrl +
nad miniaturą warstwy, zastąpi bieżące zaznaczenie nowym, utworzonym z zawartości tej warstwy.Ctrl + Shift +
nad miniaturą warstwy doda nowe zaznaczenie, utworzone z zawartości tej warstwy, do bieżącego zaznaczenia.Ctrl + Alt +
nad miniaturą warstwy spowoduje odjęcie od bieżącego zaznaczenia nowego zaznaczenia utworzonego z zawartości tej warstwy.Ctrl + Shift + Alt +
nad miniaturą warstwy, przetnie bieżące zaznaczenie z nowym zaznaczeniem utworzonym z zawartości tej warstwy.