Katmanlar
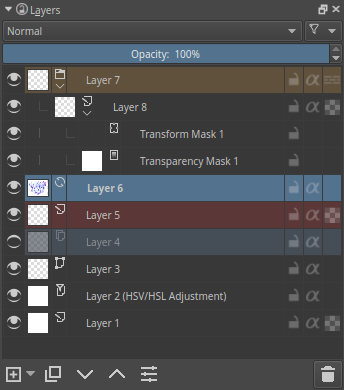
Çok katmanlı bir belge için katman panelinin genel görünümü
Katmanlar paneli, Krita’nın temel kavramlarından biri olan Katman Yönetimi içindir. Burada katmanlar ekleyebilir; onları silebilir, yeniden adlandırabilir, çoğaltabilir ve daha birçok işlem yapabilirsiniz.
Arayüz, üç ana bölüme ayrılır:
Denetimler
Katman Yığını
İşlemler Çubuğu
Denetimler
Yukarıda dört adet denetim bulunur.

- Harmanlama kipi

Etkin katman için harmanlama kipini ayarlamak üzere açılır bir liste.
- Matlık

Etkin katmanın matlığını ayarlamak için bir sürgü.
- Süzgeç

Bu, var olan tüm katmanları süzmenize olanak tanır. Özellikler çok sayıda (örneğin, yüzlerce) katmanınız varsa pek yararlıdır.
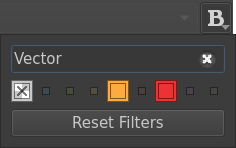
Süzgeç düğmesindeki süzgeç açılır bölümü
Süzme, şunlara uygulanabilir:
Renk etiketleri (yalnızca kullanılan renk etiketleri varsa çalışır ve kullanılan renk etiketleri süzülebilir)
Katman adları
- Display settings

Bu, katman yığınının ek birkaç özelliğini ayarlamanıza olanak tanır.
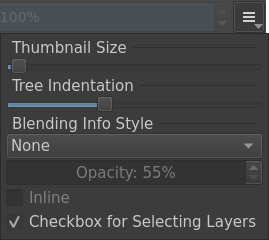
Display settings popup from display settings button
Available display settings are:
Thumbnail size slider, to let you control the size of layer’s thumbnail preview
Tree indentation slider, lets you control the indentation of sub-layers, for either an expanded or compacted view
The blending mode information, defined by 3 parameters
Added in version 5.2.
Drowpdown Detail mode
Mode
Description
None
No extra information is shown.
Simple
This will only display the opacity or the blending mode when these are not 100% and Normal.
Balanced
This will display both the opacity and the blending mode for layers where either the opacity is below 100%, or the blending mode is not Normal.
Detailed
This will always show the opacity and blending options for all layers.
The Opacity slider (enabled if mode is not None) allows you to control the opacity of the extra blending info label.
The Inline checkbox (enabled if mode is not None) will provide information on a single compact line.
The Checkbox for Selecting Layers enables the extra checkboxes between the visibility icon and the label.
This is useful for situations where you may not have access to a Ctrl or Shift key to select multiple layers, such as on a tablet.
Katman Yığını
You can select the active layer here. Using the Shift and Ctrl keys you can select multiple layers and drag-and-drop them. You can also change the visibility, edit state, alpha inheritance and rename layers. You can open and close groups, and you can drag and drop layers, either to reorder them, or to put them in groups.
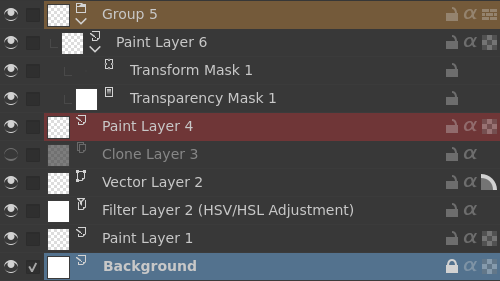
The Layer Stack is organized in three parts:
Left side: an eye-icon and optional checkbox
Middle: layer name and optional information
Right side: Property controls (available controls will vary according to layer type)
- Alfa Devri
Only available on Layers.
Clicking the alpha inheritance-icon allows you to activate
or disable
.
This will use the alpha of all the layers under the active layer, but within the same group, as a transparency mask.
Check Alfayı Devral veya Kırpma Katmanları or Kırpma Maskeleri ve Alfa Devri for detailled explanations and examples.
- Alfa Kilidi
Only available on Boya Katmanları.
Clicking the alpha lock-icon will let you lock
or unlock
the alpha channel.
Lock the alpha channel to prevent the transparency of a layer being changed. Useful when coloring images.
- Kenar Yumuşatma
Only available on Vektör Katmanlar.
Clicking the anti-aliasing icon to activate
or deactivate
the anti aliasing mode.
- Harmanlama Kipi
Available on all type of Layers.
This will set the Harmanlama Kipleri of the layer.
- Color Label
This is a color that you can set on the layer.
 the layer to get a context menu to assign a color to it. You can then later filter on these colors.
- Edit State (Layer lock)
Clicking the lock-icon allow to lock
or unlock
the layer.
Lock the layer prevents any modifications to be made on layer. Useful when handling large amounts of layers or to ensure not modifying a layer’s content by mistake.
- Expand or Collapse layers
Only available on non-empty Grup Katmanlar and Layers for which masks are defined.
- Katman Biçemi
Only available on Layers which have a Katman Biçemleri assigned.
Clicking the FX-icon allow to quickly activate
or deactivate
the layer style.
- Name
The Layer name, double-
 to make it editable, and press the Enter key to finish editing.
- Soğan Zarı
Only available on animated layers
Clicking the bulb-icon to activate
or deactivate
onion skin features.
- Matlık
Only available on Layers.
This will set the opacity of the whole layer.
- Pass-through mode
Only available on Grup Katmanlar.
Clicking the pass-through mode icon allows you to activate
or deactivate
, which in turns affects how blending modes are composited.
When active, this allows you to have the blending modes of the layers within affect the layers outside the group.
Doesn’t work with masks currently, therefore these have a strike-through on group layers set to pass-through.
Check Katmanlar Nasıl Bileşikleştirilir? or Kırpma Maskeleri ve Alfa Devri for detailled explanations and examples.
- Visibility
- Thumbnail Image
This shows a miniature image with the layer contents. If you Ctrl +
 on it then you can make a selection from the contents of that layer (see Hot keys and Sticky Keys section below).
- Layer Color Space Mismatch Warning
Added in version 5.3.
In Krita layers can have a color space different from the color space of the image. It usually happens when you import an external file as a layer. Such difference is a perfectly valid state for Krita, but it may cause visible slowdowns, because Krita will have convert color space of such layers on the fly. When layer’s color space is different from the color space a small warning icon is shown next to the layer’s properties.
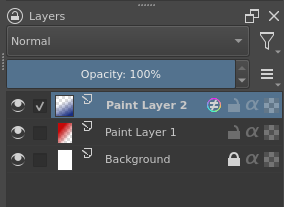
“Paint Layer 2” has a color space different from the rest of the image
To remove the warning you can either manually convert it using dialog or use Unify Layers Color Space action (available via Ctrl + Enter menu).
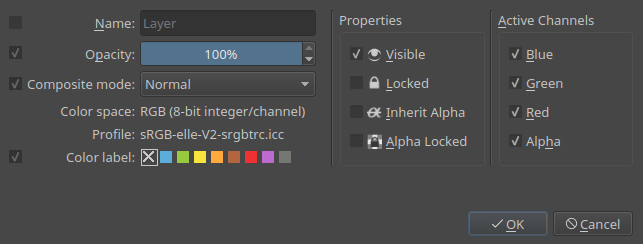
To edit these properties on multiple layers at once, press the properties option when you have multiple layers selected or press the F3 key. There, to change the names of all layers, the checkbox before Name should be ticked after which you can type in a name. Krita will automatically add a number behind the layer names. You can change other layer properties like visibility, opacity, lock states, etc. too.
Added in version 5.0: By drag-and-dropping colors from the palette onto the layer stack, you can quickly create a fill layer.
Operations bar
These are buttons for doing layer operations.

- Add
Clicking the
button will by default add a new Paint Layer.
The little arrow button aside will popup a sub-menu with all available Katmanlara ve Maskelere Giriş.
- Duplicate
Clicking the
button will duplicate the active layer(s). Can be quickly invoked with the Ctrl +
 + drag shortcut.
- Move layer up.
Clicking the
button will move the active layer up. Will switch them out and in groups when coming across them.
- Move layer down.
Clicking the
button will move the active layer down. Will switch them out and in groups when coming across them.
- Layer properties.
Clicking the
button open the layer properties window.
The little arrow button aside will popup the
 context menu for the currently selected layer. This is useful when you don’t have access to a
  button.
- Delete
Clicking the
button will delete the active layer(s). For safety reasons, you can only delete visible and unlocked layers.
Hot keys and Sticky Keys
Shift key for selecting multiple contiguous layers.
Ctrl key for select or deselect layer without affecting other layers selection.
Ctrl +
 + drag shortcut makes a duplicate of the selected layers, for you to drag and drop.
Ctrl + E shortcut for merging a layer down. This also merges selected layers, layer styles and will keep selection masks intact. Using the Ctrl + E shortcut on a single layer with a mask will merge down the mask into the layer.
Ctrl + Shift + E shortcut merges all layers.
- R +
 shortcut allows you to select the top layer with content below the cursor as the active layer. In addition to this, you can set shortcuts for 4 other modes:
 “Select All Layers (Replace Selection)” allows you to select all layers with content below the cursor as the currently selected layers.
“Select All Layers (Add to Selection)” allows you to select all layers that have content below the cursor and add them to the selected layers.
“Select from Menu (Replace Selection)” allows you to select a layer from a pop-up menu or all layers in the menu as the active layer or active layers.
“Select from Menu (Add to Selection)” allows you to select all layers in the menu as the new active layer or active layers. The latter two modes are similar to using Ctrl +
 to select a layer in Photoshop.
- R +
Ins key for adding a new layer.
Shift + Ins key for adding a new vector layer.
Ctrl + G shortcut will create a group layer. If multiple layers are selected, they are put into the group layer.
Ctrl + Shift + G shortcut will quickly set-up a clipping group, with the selected layers added into the group, and a new layer added on top with alpha-inheritance turned on, ready for painting!
Ctrl + Alt + G shortcut will ungroup layers inside a group.
Alt +
 shortcut for isolated view of a layer. This will maintain between layers till the same action is repeated again.
Page Up and Page Down keys for switching between layers.
Ctrl + Page Up and Ctrl + Page Down shortcuts will move the selected layers up and down.
Ctrl +
 over a layer’s thumbnail to replace the current selection with a new one created from the contents of that layer.
Ctrl + Shift +
 over a layer’s thumbnail to add a new selection created from the contents of that layer to the current selection.
Ctrl + Alt +
 over a layer’s thumbnail to subtract a new selection created from the contents of that layer from the current selection.
Ctrl + Shift + Alt +
 over a layer’s thumbnail to intersect the current selection with a new selection created from the contents of that layer.
