
레이어
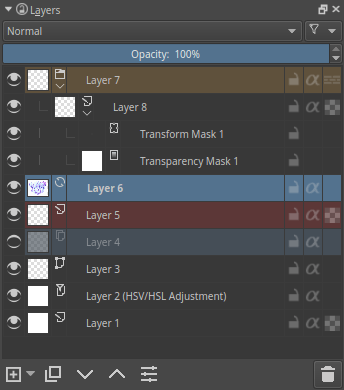
General overview of layer docker for a document with multiple layers
레이어 도커는 Krita의 레이어 관리 핵심 개념 중 하나입니다. 레이어를 추가, 저장, 이름 바꾸기, 복제하는 등 여러 동작이 가능합니다.
The interface is split in three main parts:
Controls
레이어 스택
Operations Bar
Controls
At the top there are four controls.

- Blending mode

A dropdown list to set the Blending mode for the active layer.
- 불투명도

A slider to set the opacity for the active layer.
- Filter

This allows you to filter all existing layers, which can be useful if you have a lot (say, hundreds!) of layers.
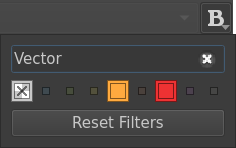
Filter option popup from filter button
Filtering can be applied on:
Color labels (available only if there are color label being used, and only used color labels can be filtered)
Layer names
- Display settings

This allows you to adjust some extra display options of the layer stack.
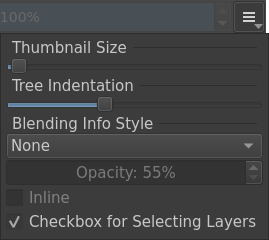
Display settings popup from display settings button
Available display settings are:
Thumbnail size slider, to let you control the size of layer’s thumbnail preview
Tree indentation slider, lets you control the indentation of sub-layers, for either an expanded or compacted view
The blending mode information, defined by 3 parameters
Added in version 5.2.
Drowpdown Detail mode
Mode
Description
None
No extra information is shown.
Simple
This will only display the opacity or the blending mode when these are not 100% and Normal.
Balanced
This will display both the opacity and the blending mode for layers where either the opacity is below 100%, or the blending mode is not Normal.
Detailed
This will always show the opacity and blending options for all layers.
The Opacity slider (enabled if mode is not None) allows you to control the opacity of the extra blending info label.
The Inline checkbox (enabled if mode is not None) will provide information on a single compact line.
The Checkbox for Selecting Layers enables the extra checkboxes between the visibility icon and the label.
This is useful for situations where you may not have access to a Ctrl or Shift key to select multiple layers, such as on a tablet.
레이어 스택
여기서 활성화된 레이어를 선택할 수 있습니다. Shift와 Ctrl 키를 사용해 여러 레이어를 선택하거나 끌어다 놓을 수 있습니다. 레이어 표시 여부 변경, 상태 편집, 알파 상속 및 레이어 이름을 바꿀 수 있습니다. 그룹을 열거나 닫을 수 있고, 그룹 안의 레이어를 끌어다 놓을 수 있고, 다시 정렬 하거나, 그룹에 넣을 수 있습니다.
The Layer Stack is organized in three parts:
Left side: an eye-icon and optional checkbox
Middle: layer name and optional information
Right side: Property controls (available controls will vary according to layer type)
- 알파 상속
Only available on Layers.
Clicking the alpha inheritance-icon allows you to activate
 or disable
  .
.This will use the alpha of all the layers under the active layer, but within the same group, as a transparency mask.
Check Inherit Alpha or Clipping layers or 클리핑 마스크와 알파 상속 for detailled explanations and examples.
- 알파 잠금
Only available on Paint Layers.
Clicking the alpha lock-icon will let you lock
 or unlock
  the alpha channel.
Lock the alpha channel to prevent the transparency of a layer being changed. Useful when coloring images.
- Anti-aliasing
Only available on Vector Layers.
Clicking the anti-aliasing icon to activate
 or deactivate
  the anti aliasing mode.
- 혼합 모드
Available on all type of Layers.
레이어의 혼합 모드를 설정합니다.
- Color Label
레이블을 사용하면 레이어의 색상을 설정할 수 있습니다. 레이어에서
 상황에 맞는 메뉴에서 색상을 할당할 수 있습니다. 적용한 색상으로 레이어를 필터할 수 있습니다.
- Edit State (Layer lock)
Clicking the lock-icon allow to lock
 or unlock
  the layer.
Lock the layer prevents any modifications to be made on layer. Useful when handling large amounts of layers or to ensure not modifying a layer’s content by mistake.
- Expand or Collapse layers
Only available on non-empty Group Layers and Layers for which masks are defined.
Clicking the arrow-icon to expand
 or collapse
  group/layer.
- 레이어 스타일
Only available on Layers which have a 레이어 스타일 assigned.
Clicking the FX-icon allow to quickly activate
 or deactivate
  the layer style.
- 이름
The Layer name, double-
 to make it editable, and press the Enter key to finish editing.
- 어니언 스킨
Only available on animated layers
Clicking the bulb-icon to activate
 or deactivate
  onion skin features.
- 불투명도
Only available on Layers.
레이어의 불투명도를 설정합니다.
- 통과 모드
Only available on Group Layers.
Clicking the pass-through mode icon allows you to activate
 or deactivate
  , which in turns affects how blending modes are composited.
When active, this allows you to have the blending modes of the layers within affect the layers outside the group.
Doesn’t work with masks currently, therefore these have a strike-through on group layers set to pass-through.
Check How are layers composited in Krita? or 클리핑 마스크와 알파 상속 for detailled explanations and examples.
- 보이기
Clicking the eye-icon allow to show
 or hide
  a whole layer.
- Thumbnail Image
This shows a miniature image with the layer contents. If you Ctrl +
on it then you can make a selection from the contents of that layer (see Hot keys and Sticky Keys section below).- Layer Color Space Mismatch Warning
Added in version 5.3.
In Krita layers can have a color space different from the color space of the image. It usually happens when you import an external file as a layer. Such difference is a perfectly valid state for Krita, but it may cause visible slowdowns, because Krita will have convert color space of such layers on the fly. When layer’s color space is different from the color space a small warning icon is shown next to the layer’s properties.
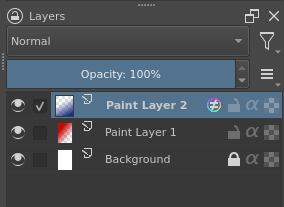
“Paint Layer 2” has a color space different from the rest of the image
To remove the warning you can either manually convert it using dialog or use Unify Layers Color Space action (available via Ctrl + Enter menu).
여러 레이어의 속성을 한 번에 편집하려면 속성 옵션을 누르거나 F3 키를 누르십시오. 선택된 모든 레이어의 이름을 변경하려면 먼저 이름 앞의 체크 상자를 클릭해야 합니다. 이 경우 Krita가 이름에 자동으로 숫자를 붙여 줍니다. 가시성, 불투명도, 잠금 상태 등과 같은 다른 레이어 특성도 변경할 수 있습니다.
Added in version 5.0: By drag-and-dropping colors from the palette onto the layer stack, you can quickly create a fill layer.
Operations bar
이 단추는 레이어 작업을 수행합니다.

- 추가
Clicking the
 button will by default add a new Paint Layer.
The little arrow button aside will popup a sub-menu with all available Introduction to Layers and Masks.
- 복제
Clicking the
 button will duplicate the active layer(s). Can be quickly invoked with the Ctrl + + drag shortcut.
- 레이어 위로 이동.
Clicking the
 button will move the active layer up. Will switch them out and in groups when coming across them.
- 레이어 아래로 이동.
Clicking the
button will move the active layer down. Will switch them out and in groups when coming across them.- 레이어 속성.
Clicking the
 button open the layer properties window.
The little arrow button aside will popup the
context menu for the currently selected layer. This is useful when you don’t have access to a button.- 삭제
Clicking the
 button will delete the active layer(s). For safety reasons, you can only delete visible and unlocked layers.
단축키 및 고정키
Shift 키를 누르고 선택하면 연속하는 레이어들을 선택합니다.
Ctrl 키는 다른 레이어에 간섭 없이 레이어를 선택, 선택 해제할 수 있습니다.
Ctrl +
+ 드래그 단축키는 드래그 동작으로 선택된 레이어를 복제할 수 있습니다.Ctrl + E 단축키는 아래 레이어와 병합합니다. 또한 선택된 레이어를 병합할 경우 레이어 스타일과 선택 마스크를 유지합니다. Ctrl + E 단축키로 마스크를 포함한 단일 레이어를 병합할 경우 마스크가 레이어에 포함됩니다.
Ctrl + Shift + E 단축키는 모든 레이어를 병합합니다.
- R + shortcut allows you to select the top layer with content below the cursor as the active layer. In addition to this, you can set shortcuts for 4 other modes:
“Select All Layers (Replace Selection)” allows you to select all layers with content below the cursor as the currently selected layers.
“Select All Layers (Add to Selection)” allows you to select all layers that have content below the cursor and add them to the selected layers.
“Select from Menu (Replace Selection)” allows you to select a layer from a pop-up menu or all layers in the menu as the active layer or active layers.
“Select from Menu (Add to Selection)” allows you to select all layers in the menu as the new active layer or active layers. The latter two modes are similar to using Ctrl +
to select a layer in Photoshop.
- R +
Ins 키는 새 레이어를 추가합니다.
Shift + Ins key for adding a new vector layer.
Ctrl + G 단축키는 그룹 레이어를 만듭니다. 여러 레이어를 선택하면 선택한 레이어가 그룹 레이어에 들어갑니다.
Ctrl + Shift + G 단축키는 빠른 클리핑 그룹을 생성합니다, 선택된 레이어를 그룹에 추가하고, 상단에 알파 상속이 활성화된 새 레이어를 추가하여 바로 페인팅할 수 있습니다!
Ctrl + Alt + G 단축키로 그룹 안의 레이어를 그룹 해제할 수 있습니다.
Alt +
단축키로 레이어를 격리해서 볼 수 있습니다. 다시 한 번 단축키를 누를 때까지 유지됩니다.Page Up과 Page Down 단축키로 레이어간 전환이 가능합니다.
Ctrl + Page Up과 Ctrl + Page Down 단축키로 선택된 레이어를 위 아래로 옮길 수 있습니다.
Ctrl +
over a layer’s thumbnail to replace the current selection with a new one created from the contents of that layer.Ctrl + Shift +
over a layer’s thumbnail to add a new selection created from the contents of that layer to the current selection.Ctrl + Alt +
over a layer’s thumbnail to subtract a new selection created from the contents of that layer from the current selection.Ctrl + Shift + Alt +
over a layer’s thumbnail to intersect the current selection with a new selection created from the contents of that layer.