
새 문서 만들기
다음 방법으로 새 문서를 만들 수 있습니다.
앱 위쪽에 있는 메뉴에서 파일을 클릭하십시오.
그 다음 새로 만들기를 클릭하십시오. 또는 Ctrl + N 단축키를 눌러 이 작업을 수행할 수 있습니다.
이제 아래 그림과 같이 새 문서 대화 상자가 표시됩니다.
There are various sections in this dialog box which aid in creation of new document, either using custom document properties or by using contents from clipboard and templates. Following are the sections in this dialog box:
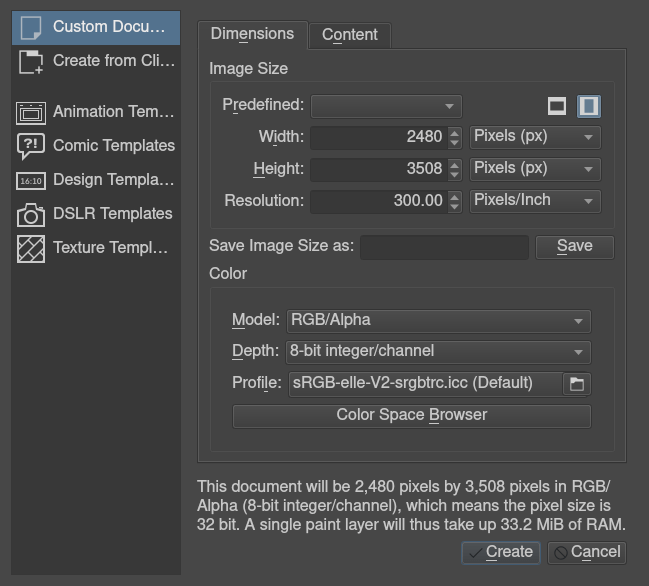
사용자 정의 문서
From this section you can create a document according to your requirements: you can specify the dimensions, color model, bit depth, resolution, etc.
In the top-most field of the Dimensions tab, from the Predefined drop-down you can select predefined pixel sizes and PPI (pixels per inch). You can also set custom dimensions and the orientation of the document from the input fields below the Predefined: drop-down. This can also be saved as a new predefined preset for your future use by giving a name in the Save Image Size as: input box and clicking on the Save button. Below we find the Color section of the new document dialog box, where you can select the color model and the bit-depth. Check Colors for more detailed information regarding color.
On the Content tab, you can define a name for your new document. This name will appear in the metadata of the file, and Krita will use it for the auto-save functionality as well. If you leave it empty, the document will be referred to as ‘Unnamed’ by default. You can select the background color and the amount of layers you want in the new document. Krita remembers the amount of layers you picked last time, so be careful.
Finally, there’s a description box, useful to note down what you are going to do.
클립보드에서 만들기
This section allows you to create a document from an image that is in your clipboard, like a screenshot. It will have all the fields set to match the clipboard image.
템플릿:
These are separate categories where we deliver special defaults. Templates are
just .kra files which are saved in a special location, so they can be pulled up
by Krita quickly. You can make your own template file from any .kra file, by
using in the top menu.
This will add your current document as a new template, including all its
properties along with the layers and layer contents.
Once you have created a new document according to your preference, you should now have a white canvas in front of you (or whichever background color you chose in the dialog).