Tarama Fırça İşletkesi
Bu fırçayı ilk denediğimde, izlenimim “düz paralel çizgiler” olmuştu (ve en sıkıcı fırça ödülü de ona gidiyor…). Neyse ki, var olan önayarlar bana bu fırçanın olanakları hakkında bir fikir verdi.
Ayarlar
Fırça ucu
Fırça ucu, tarama işleminin uygulanacağı alanı belirler.
Saydam fırça ucu alanları daha saydam tarama sağlar; ancak normal bir fırçada olduğu gibi, alanın üzerinden yeniden geçmek matlığı artıracaktır.
Tarama deseni çoğunlukla sabit bir konumdadır, bu nedenle tarama fırçasıyla çizim yapmak, paralel çizgilerden oluşan fırçalarla çizim yapmaktan ziyade alttaki tarama desenini “ortaya çıkarmaya” benzer. İstisnası, Çapraz Tarama dinamikleri açıkken kullanılan Moiré Deseni’dir.
Çeşitli efektler elde etmek için fırça şeklini veya dokusunu değiştirin. Örneğin, otomatik fırçanın yoğunluğunu azaltmak, taramalarınıza tanecikli bir doku kazandıracaktır.
Boyut dinamiği; tarama kalınlığını değil, fırça ucunu etkiler.

Tarama Tercihleri
Sürdürmeden önce: Bu yazıyı yazarken, öntanımlı ayarlarda çizgi kalınlığının değişmemesine neden olan bir hata bulunuyor. Bunu aşmak için Tarama Tercihleri’ne gidin ve Yumuşatılmış çizgiler seçeneğini işaretleyin. Pentalis bu sorunun farkında, bu nedenle hata yakında düzeltilebilir.
Bu üç seçenek şunlardır:
Yumuşatılmış çizgiler: Bu, kenar yumuşatma sorunuyla ilgilenir. Çizgi kalınlığını değiştirmek işe yaramıyorsa bu seçeneği işaretleyin; çünkü farklı bir algoritmaya geçiş yapar ve sorun çözülür.
Alt piksel kesinliği: Tahminimce bu, görüntü kalitesini etkiliyor; ancak çok büyük bir fark görmeyeceksiniz. İsterseniz bunu işaretleyebilirsiniz.
Arka planı renklendir: Bu seçeneği işaretlemek, tarama alanının arkasındaki arka planı renklendirecektir.
İlk iki seçeneğin işaretli olup olmamasına bağlı olarak çıktı biraz farklılık gösteriyor; ancak bu fark endişelenmenizi gerektirecek kadar büyük değil. İlk iki seçeneği işaretli bırakmanızı öneririm.

Tarama Seçenekleri
Ana tarama seçenekleri burada yer alıyor. Oldukça sezgisel:
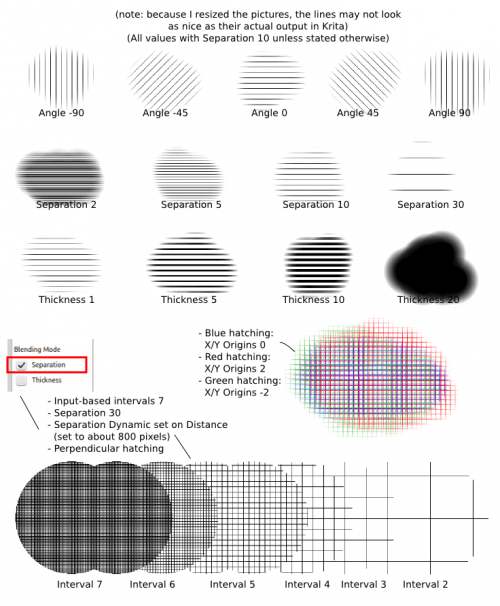
Açı: Taramanın açısı.
Ayrılma: Bu, çizgilerin merkezleri arasındaki uzaklıktır.
2 piksel veya daha yüksek bir değer kullanın, aksi takdirde çizgiler artık belirgin olmayacaktır.
Ayrılma dinamikleri aslında ayrılmaya rastgele değerler atamaz, bunun yerine ızgarayı daha da bölmek için “Girdi tabanlı aralıklar”daki değeri kullanır. “Girdi tabanlı aralıklar”, 2 ile 7 arasında değerler alabilir.
Kalınlık: Çizgi kalınlığı.
Aslında bu, çizginin kalınlığı + boş alanın kalınlığıdır, dolayısıyla çizginin kendisinin kalınlığı bunun yarısı kadardır.
Aynı ayırma değerini ve aynı çizgi kalınlığı değerini kullanırsanız çizgiler ve aralarındaki alan aynı kalınlıkta olacaktır.
Bu değeri kalınlık dinamikleriyle devingen olarak değiştirebilirsiniz.
Eğer çizgi kalınlığı değişmiyorsa tarama tercihlerine gidin ve “Yumuşatılmış çizgiler” seçeneğini işaretleyin.
X orijini ve Y orijini: Tarama sabit bir konumdadır, boyama işlemi sanki alttaki var olan taramayı ortaya çıkarıyormuşsunuz gibi davranır. Taramayı hareket ettirmek için bu iki değeri değiştirebilirsiniz. Bu şekilde çeşitli ızgara efektleri elde edebilirsiniz.

Son olarak, tarama biçemleri:
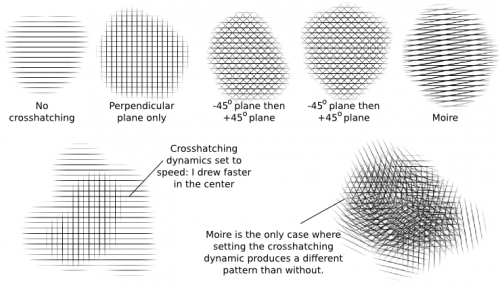
Çapraz tarama yok: Düz paralel çizgiler
Yalnızca dikey düzlem: Izgara çizgileri
−45° düzlem daha sonra +45° düzlem: Örneğe bakınız.
+45° düzlem daha sonra −45° düzlem: Örneğe bakınız; özünde yukarıdakinden pek de farklı değildir; genelde dinamikleri kullanırken sıra değişir.
Moiré deseni: Örneğe bakınız.
Çapraz tarama dinamiği yalnızca önceden bir çapraz tarama biçemi seçtiyseniz çalışır. Bu durumda, çapraz tarama yalnızca dinamiklerin koşullarına (basınç, hız, açı…) göre çizilir.
Çoğu tarama biçeminde, çapraz tarama dinamiklerini kullanmak temelde aynı tarama stilini elde etmenizi sağlar, yalnızca arada sırada bir çizgi belirir.
Moiré deseni bunun istisnasıdır ve farklı bir desen ortaya çıkaracaktır.

Kullanım Senaryoları
Kenarların bulanık olmasını istemiyorsanız Fırça Ucu’na gidin ve Solma değerlerini 1,00 olarak ayarlayın. Tarama işlemini ayrı bir katmanda yapmanızı ve ardından fazla alanları silmenizi öneririm.
Kullanımlar konusunda:
Elbette bunu tamamen normal tarama için de kullanabilirsiniz. Kullandığım sürümlerde öntanımlı ayrılma değeri 1’dir, bu çok düşüktür; bu nedenle bu değeri 2 ile 10 arasında bir değere yükseltin.
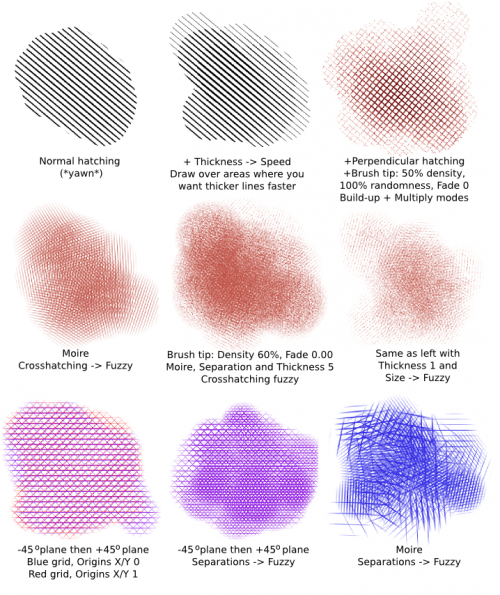
Normal tarama yöntemini çok sıkıcı buluyorsanız kalınlığı artırın ve kalınlık dinamiği ayarını basınç (tablet kullanıyorsanız) veya hız (fare kullanıyorsanız) olarak ayarlayın. Bu daha doğal görünmüyor mu? (Fare kullanırken, daha kalın çizgiler istediğiniz alanların üzerinden daha hızlı çizerek tekrar geçin).
Daha pürüzlü doku: Daha pürüzlü bir doku elde etmek için otomatik fırçanıza biraz yoğunluk ve/veya rastgelelik ekleyin.
Bazı renklerin daha derin bir görünüme sahip olması için boyama kipini “Doluluk Artırma” ve kipi “Çarpma” olarak da ayarlayabilirsiniz (ızgara örneğime bakın).
Aynı desenleri kullanarak X ve Y orijinlerini değiştirin.
Daha karmaşık desenler için ayrılma dinamiklerini kullanın. Daha fazla etki için çizgi kalınlığı ve diğer dinamikleri ekleyin.
Moiré deseni tek başına oldukça sıkıcıdır; ancak Çapraz Tarama dinamikleri bulanık olarak ayarlandığında çok daha ilgi çekici hale gelir.
Daha fazla doku için, çizgi kalınlığını bulanık olarak ayarlayın, Yoğunluğu biraz azaltın ve rastgeleliği artırın; böylece güzel, pürüzlü bir doku elde edersiniz.

