
Color Management Settings
Krita offers extensive functionality for color management, utilising Little CMS We describe Color Management in a more overall level here: Renk Yönetimli İş Akışı.
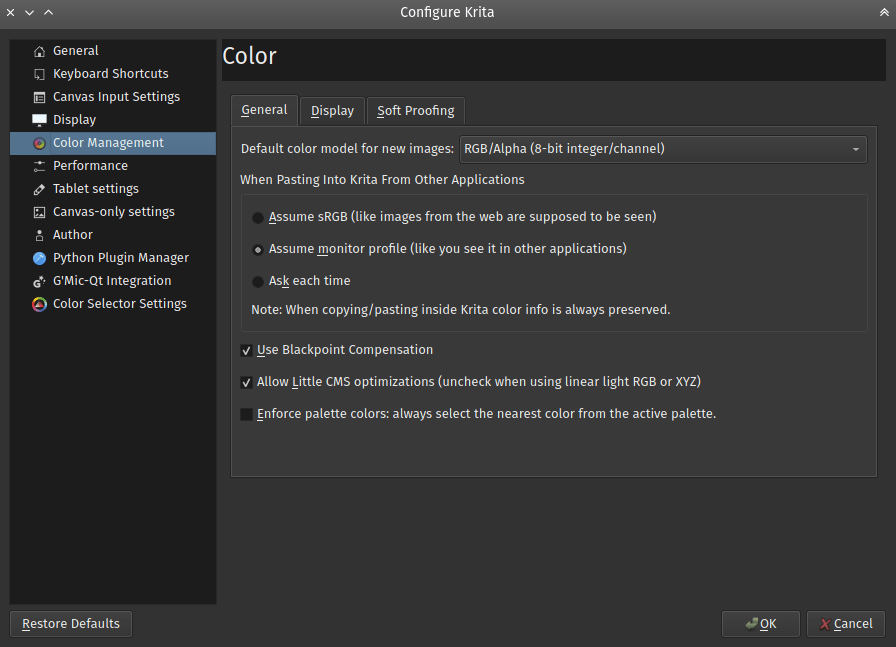
General
Default Color Model For New Images
Choose the default model you prefer for all your images.
When Pasting Into Krita From Other Applications
The user can define what kind of conversion, if any, Krita will do to an image that is copied from other applications i.e. Browser, GIMP, etc.
- Assume sRGB
This option will show the pasted image in the default Krita ICC profile of sRGB.
- Assume monitor profile
This option will show the pasted image in the monitor profile selected in system preferences.
- Ask each time
Krita will ask the user each time an image is pasted, what to do with it. This is the default.
Not
When copying and pasting in Krita color information is always preserved.
Use Blackpoint Compensation
This option will turn on Blackpoint Compensation for the conversion. BPC is explained by the maintainer of LCMS as following:
Allow LittleCMS optimizations
Uncheck this option to turn off optimizations. Sometimes, in case of working with linear colorspaces, the optimizations Little CMS does will not give the best results.
5.0 sürümünde değişti: Since Krita 5.0, we ship the fast-float plugin for LittleCMS. Turning this option off will also turn off the fast float plugin.
Enforce palette colors: always select the nearest color from the active palette
By default, palette selection widgets take the current foreground color, compare it to the swatches in its active palette and highlight the swatch that is nearest to the current foreground color.
When Enforce palette colors option is checked, it switches the internal color selector into a mode in which, instead of just highlighting the swatch, the current foreground color is replaced with the color of the nearest swatch.
Display
On systems providing direct access to the display
On all the platforms except native Wayland Krita assumes that it has direct access to the screen. In this mode, you can basically need to select three simple options to set display color management right.
- Use System Monitor Profile
This option when selected will tell Krita to use the ICC profile selected in your system preferences.
- Display Profiles
There are as many of these as you have displays connected. You can select an ICC profile which Krita will use independent of the monitor profile set in system preferences. The default is
sRGB built-in.If you don’t have a hardware colorimeter device, try using the profile shipped by the manufacturer of your display with your display. For good displays, these profiles are usually decently good (at least in linearizing gradients).
Not
If you use Wayland-compatible compositor, but run Krita in XWayland mode, then you should select
sRGB built-inas the display profile, since Wayland will treat Krita’s window as “unmanaged sRGB surface”.On Unix systems, profile stored in $/usr/share/color/icc (system location) or $~/.local/share/color/icc (local location) will be proposed. Profile stored in Krita preference folder, $~/.local/share/krita/profiles will be visible only in Krita.
- Rendering Intent
Your choice of rendering intents is a way of telling Littlecms how you want colors mapped from one color space to another. There are four options available, all are explained on the ICC Profilleri manual page.
On systems using Wayland
Added in version 6.0.
Not
As of Krita 6.0.0, by default, Krita does not use Wayland protocol even when a Wayland
compositor is available. Krita prefers legacy XWayland protocol. To force Krita use native
Wayland protocol, run it with QT_QPA_PLATFORM environment set:
QT_QPA_PLATFORM=wayland krita
- Rendering Intent
This option instructs Wayland on how it should map the image colors into the display color space. If you have display profile set up properly in Wayland compositor itself, then you should keep this value set to Relative Colorimetric and have Use Blackpoint Compensation option enabled. It will ensure that white and black points of your image will be adjusted to the corresponding points of your display and the entire color volume will be scaled to fit your display space.
If you don’t have the display profile set up properly in Wayland compositor or you would like to use some custom color adjustment features of your compositor, then you can set Perceptual as your intent. Beware though, the colors rendered on your screen may not be colorimetrically correct in this case! In Perceptual mode, the compositor is allowed to change your colors in arbitrary ways, e.g. stretch sRGB space into something wider to make colors “look better” on wide gamut displays. So Perceptual intent may be not suitable for color critical work.
- Enable canvas color management
This switch is present for debugging purposes only. When unchecked, Krita’s canvas stops using a separate wide-gamut native surface for image rendering. Instead, it reused the main sRGB surface of the application. It means that the canvas effectively switches into sRGB mode.
- Canvas surface color space
Selects the color space in which the image data is sent to the compositor.
- Preferred by operating system
The image data will be sent to the compositor in the format preferred by the compositor itself. In most of the cases it will be the most efficient way of communication between Krita and the compositor.
The exact format preferred by the compositor can be seen at the bottom of the page.
Use this option unless you have reasons not to.
- Rec 709 Gamma 2.2
This is an SDR color space with color primaries equal to sRGB and transfer function set to “gamma 2.2”.
- Rec 709 Linear
This is an SDR color space with color primaries equal to sRGB and a linear transfer function. Unless your system supports 16-bit floating point surface bit depth, use this option for debugging purposes only.
- Rec 2020 PQ
This is an HDR color space as defined by Rec. 2100 specification. This is the only color space in which Krita can pass HDR data to the compositor!
Not
In the current implementation of HDR conversions in Krita, the diffuse white of this HDR color space is always fixed to 80 cd/m². In other words, if you take an image in a scene-referred linear space (e.g. ACEScg), convert it into Rec 2020 PQ, then RGB color value
(1.0, 1.0, 1.0)of this image will be mapped to 80 cd/m² value in the PQ-range.When Krita passes “Rec 2020 PQ”-data to the compositor, it correctly declares this diffuse white point to the compositor. The compositor, in turn, applies an additional curve to the image to adapt this level to the “SDR brightness level” selected by the user in the system-wide HDR configuration page.
- Unmanaged (testing only)
This option disables setting any color space metadata on the canvas’ surface. This basically lets the compositor do with the colors whatever it prefers.
- Canvas surface bit depth (needs restart)
Selects bit depth of the canvas surface. Due to limitations in Qt, the bit depth of all the surfaces in the application should be the same, hence changing the value requires full Krita restart.
- Current canvas surface bit depth
The currently used bit depth for the canvas surface. The bit depth of the canvas is selected on Krita start up, and will not change while Krita is running.
- Color space preferred by the operating system
Shows information about the color space preferred by the compositor. This space will be used when Preferred by operating system color space is selected.
This data can show if your compositor currently works in HDR mode. Check the value of
Color Space->Luminance. IfmaxLuminanceis higher thanreferenceLuminance, then your compositor has HDR mode enabled.
Softproofing options
These allow you to configure the default softproofing options. To configure the actual softproofing for the current image, go to .
For indepth details about how to use softproofing, check out the page on softproofing.