
Color Models
Krita has many different color spaces and models. Following here is a brief explanation of each, and their use-cases.
RGB
Red, Green, Blue.
These are the most efficient primaries for light-based color mixing, like computer screens. Adding Red, Green and Blue light together results in White, and is thus named the additive color wheel.
RGB is used for two purposes:
Images that are meant for viewing on a screen:
So that could be images for the web, buttons, avatars, or just portfolio images.
Or for Video games, both sprites and textures are best in RGB there.
Or for 3d rendering, visual effects and cg animation.
And for the working space. A working space is an RGB gamut that is really large and predictable, meaning it’s good for image manipulation. You use this next to a profiled monitor. This way you can have precise colors while also being able to view them correctly on multiple screens.
Blending modes in RGB
Color 1 |
Color 2 |
Normal |
Multiply |
Screen |
|||||||||||
|---|---|---|---|---|---|---|---|---|---|---|---|---|---|---|---|
R |
G |
B |
R |
G |
B |
R |
G |
B |
R |
G |
B |
R |
G |
B |
|
R & G |
1.0 |
0.0 |
0.0 |
0.0 |
1.0 |
0.0 |
0.5 |
0.5 |
0.0 |
0.0 |
0.0 |
0.0 |
1.0 |
1.0 |
0.0 |
Gray |
0.5 |
0.5 |
0.5 |
0.5 |
0.5 |
0.5 |
0.5 |
0.5 |
0.5 |
0.25 |
0.25 |
0.25 |
0.75 |
0.75 |
0.75 |
RGB models: HSV, HSL, HSI and HSY
These are not included as their own color spaces in Krita. However, they do show up in the blending modes and color selectors, so a brief overview:
- Hue
The tint of a color, or, whether it’s red, yellow, green, etc. Krita’s Hue is measured in 360 degrees, with 0 being red, 120 being green and 240 being blue.
- Saturation
How vibrant a color is. Saturation is slightly different between HSV and the others. In HSV it’s a measurement of the difference between two base colors being used and three base colors being used. In the others it’s a measurement of how close a color is to gray, and sometimes this value is called Chroma. Saturation ranges from 0 (gray) to 100 (pure color).
- Value
Sometimes known as Brightness. Measurement of how much the pixel needs to light up. Also measured from 0 to 100.
- Lightness
Where a color aligns between white and black. This value is non-linear, and puts all the most saturated possible colors at 50. Ranges from 0 to 100.
- Intensity
Similar to lightness, except it acknowledges that yellow (1,1,0) is lighter than blue (0,0,1). Ranges from 0 to 100.
- Luma (Y’)
Similar to lightness and Intensity, except it weights the red, green and blue components based real-life measurements of how much light a color reflects to determine its lightness. Ranges from 0 to 100. Luma is well known for being used in film-color spaces.
Grayscale
This color space only registers gray values. This is useful, because by only registering gray values, it only needs one channel of information, which in turn means the image becomes much lighter in memory consumption!
This is useful for textures, but also anything else that needs to stay grayscale, like Black and White comics.
Color 1 |
Color 2 |
Normal |
Multiply |
Screen |
|
|---|---|---|---|---|---|
G |
G |
G |
G |
G |
|
Gray |
0.5 |
0.5 |
0.5 |
0.25 |
0.75 |
CMYK
Cyan, Magenta, Yellow, Key
This is the color space of printers. Unlike computers, printers have these four colors, and adding them all adds up to black instead of white. This is thus also called a ‘subtractive’ color space.
Changed in version 5.2: Krita 5.1 and older had the blending modes apply direct on the channels. Not all software does this, and thus, to make it simpler to work together with other artists, Krita 5.2 by default inverts the channels before applying the blending mode. You can control this in the preferences.
Color 1 |
Color 2 |
Normal |
Multiply |
Screen |
||||||||||||||||
|---|---|---|---|---|---|---|---|---|---|---|---|---|---|---|---|---|---|---|---|---|
C |
M |
Y |
K |
C |
M |
Y |
K |
C |
M |
Y |
K |
C |
M |
Y |
K |
C |
M |
Y |
K |
|
R & G |
0.0 |
1.0 |
1.0 |
0.0 |
1.0 |
0.0 |
1.0 |
0.0 |
0.5 |
0.5 |
1.0 |
0.0 |
0.25 |
0.25 |
1.0 |
0.0 |
0.75 |
0.75 |
1.0 |
0.0 |
Gray |
0.0 |
0.0 |
0.0 |
0.5 |
0.0 |
0.0 |
0.0 |
0.5 |
0.0 |
0.0 |
0.0 |
0.5 |
0.0 |
0.0 |
0.0 |
0.25 |
0.0 |
0.0 |
0.0 |
0.75 |
There’s also a difference between ‘colored gray’ and ‘neutral gray’ depending on the profile.
25% |
50% |
75% |
||||||||||
|---|---|---|---|---|---|---|---|---|---|---|---|---|
C |
M |
Y |
K |
C |
M |
Y |
K |
C |
M |
Y |
K |
|
Colored Gray |
0.25 |
0.25 |
0.25 |
0.25 |
0.5 |
0.5 |
0.5 |
0.5 |
0.75 |
0.75 |
0.75 |
0.75 |
Neutral Gray |
0.0 |
0.0 |
0.0 |
0.25 |
0.0 |
0.0 |
0.0 |
0.5 |
0.0 |
0.0 |
0.0 |
0.75 |
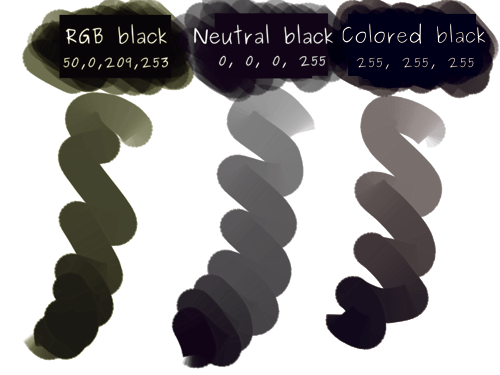
In Krita, there’s also the fact that the default color is a perfect black in RGB, which then gets converted to our default CMYK in a funny manner, giving a yellow look to the strokes. Again, another good reason to work in RGB and let the conversion be done by the printing house.
While CMYK has a smaller ‘gamut’ than RGB, however, it’s still recommended to use an RGB working space profile to do your editing in. Afterwards, you can convert it to your printer’s CMYK profile using either perceptual or relative colorimetric intent. Or you can just give the workspace rgb image to your printer and let them handle the work.
YCrCb
Luminosity, Red-chroma, Blue-chroma
YCrCb stands for:
- Y’/Y
Luma/Luminosity, thus, the amount of light a color reflects.
- Cr
Red Chroma. This value measures how red a color is versus how green it is.
- Cb
Blue Chroma. This value measures how blue a color is versus how yellow it is.
This color space is often used in photography and in (correct) implementations of JPEG. As a human you’re much more sensitive to the lightness of colors, and thus JPEG tries to compress the Cr and Cb channels, and leave the Y channel in full quality.
XYZ
Back in 1931, the CIE (Institute of Color and Light), was studying human color perception. In doing so, they made the first color spaces, with XYZ being the one best at approximating human vision.
XYZ is used as a baseline reference for all other profiles and models. All color conversions are done in XYZ, and all profiles coordinates match XYZ. An RGB color space where Red is set to 100% X, Green is set to 100% Y and Blue is set to 100% Z, with the gamma correction being linear is in effect the same as an XYZ color space.
L*a*b*
A Color space based on the opposition theory of color vision, L*a*b* splits colors into the luminosity, red-green contrast and blue-yellow contrast:
- L*
Lightness, similar to luminosity in this case.
- a*
a* in this case is the measurement of how magenta a color is versus how green it is.
- b*
b* in this case is a measurement of how yellow a color is versus how blue a color is.
L*a*b* is supposed to be a more comprehensible to use that XYZ. It’s often used as an in between color space in conversion, but even more as the correct color space to do color-balancing in. It’s far easier to adjust the contrast and color tone in L*a*b*.
L*a*b* is technically the same as Photoshop’s LAB. Photoshop specifically uses CIELAB d50.
Filters and blending modes
Maybe you have noticed that blending modes in LAB don’t work like they do in RGB or CMYK. This is because the blending modes work by doing a bit of maths on the color coordinates, and because color coordinates are different per color space, the blending modes look different.