Gradient Fill
Ajouté dans la version 4.4.2.
Fills the layer with a gradient in the same way as the gradient tool does.
General Options
- Shape:
- Linear
This will draw a straight gradient. The distance and angle between the start and end points will define the size and rotation of the gradient, respectively.

Left: None. Middle: Forwards. Right: Alternating.
- Bilinear
This will draw a straight gradient, mirrored along the axis. The distance and angle between the start and end points will define the size and rotation of the gradient, respectively.
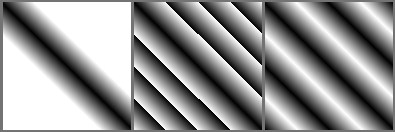
Left: None. Middle: Forwards. Right: Alternating.
- Radial
This will draw the gradient from a center, defined by the start point, with a radius equal to the distance between the start and end points.
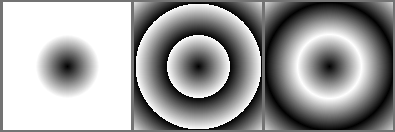
Left: None. Middle: Forwards. Right: Alternating.
- Square
This will draw the gradient from a center in a square shape, defined by the start point. The distance and angle between the start and end points will define the distance from that center to a side of the square and its rotation, respectively.

Left: None. Middle: Forwards. Right: Alternating.
- Conical
This will wrap the gradient around a center, defined by the start point. The angle between the start and end points will define where the gradient starts.
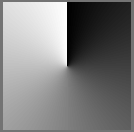
Left: None. Middle: Forwards. Right: Alternating.
- Conical-symmetric
This will wrap the gradient around a center, defined by the start point, but will mirror the wrap once. The angle between the start and end points will define where the gradient starts.
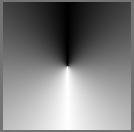
Left: None. Middle: Forwards. Right: Alternating.
- Spiral
This will draw the gradient spiral from a center, defined by the start point. The distance and angle between the start and end points will define the distance between loops and the rotation of the spiral, respectively.
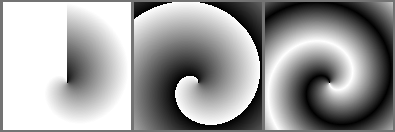
Left: None. Middle: Forwards. Right: Alternating.
- Reverse Spiral
This will draw the gradient spiral from a center, defined by the start point, but direction is flipped perpendicular to the line that passes through the star and end points. The distance and angle between the start and end points will define the distance between loops and the rotation of the spiral, respectively.
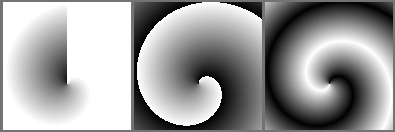
Left: None. Middle: Forwards. Right: Alternating.
- Shaped
This will shape the gradient depending on the image bounds.
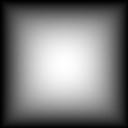
- Repeat:
- None
This will extend the gradient into infinity.
- Forward
This will repeat the gradient into one direction.
- Alternating
This will repeat the gradient, alternating the normal direction and the reversed.
- Reverse
Reverses the direction of the gradient.
- Antialias threshold
Controls how smooth is the border between repetitions.
A value equal to 0 means there is no smoothing. The border is aliased.
A value greater than 0 tells Krita how many pixels to each side of the border should be smoothed.
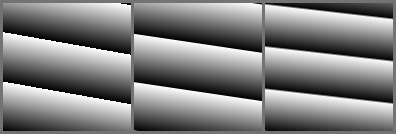
Left: 0. Middle: 0.5. Right: 1.
Positioning Options
- Start
Allows you to set the start point for the gradient (in the gradient tool this is the point where you first click).
- End
Allows you to set the endpoint for the gradient (in the gradient tool this is the point where you release the mouse button after dragging).
- Units
You can make the values set for the start and end points mean different things by changing the units associated with them:
- Pixels
The value indicates a distance in pixels.
- Percent of the width
The value indicates a distance as a percentage of the width of the image. So for example, if the image is 1000 pixels wide and 500 pixels high, and the value is 25, then this would be translated to pixels as 250 (25% of the width).
- Percent of the height
The value indicates a distance as a percentage of the height of the image. So for example, if the image is 1000 pixels wide and 500 pixels high, and the value is 25, then this would be translated to pixels as 125 (25% of the height).
- Percent of the shortest side
The value indicates a distance as a percentage of the shortest side of the image. So for example, if the image is 1000 pixels wide and 500 pixels high, and the value is 25, then this would be translated to pixels as 125 (25% of the shortest side).
- Percent of the longest side
The value indicates a distance as a percentage of the longest side of the image. So for example, if the image is 1000 pixels wide and 500 pixels high, and the value is 25, then this would be translated to pixels as 250 (25% of the longest side).
Values that have percentage units are useful when changing the image size. For example, if you want to have a linear gradient that always goes from the left to the right of the image, you can set the start point to (x = 0 pixels, y = 0 pixels) and the end point to (x = 100% of the width, y = 0 pixels).
On the other hand, if you want a gradient to have the same size regardless of the image size, you should use pixel units.
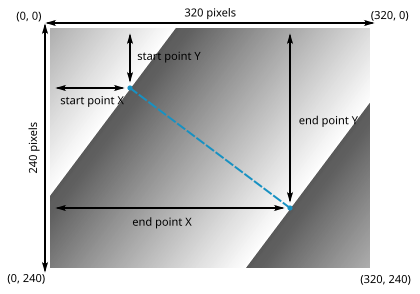
To make a gradient like the one in the image above, you can set the start position's X coordinate to 80 pixels, 25% of the width, or 25% of the longest side, and its Y coordinate to 60 pixels, 25% of the height, or 25% of the shortest side. Likewise, you could set the end position's X coordinate to 240 pixels, 75% of the width, or 75% of the longest side, and its Y coordinate to 180 pixels, 75% of the height, or 75% of the shortest side.
Keep in mind that if you use percentages the gradient's start and end positions will adapt to the size of the image, while using pixel units will make the gradient's positions be static.
- Positioning
You can choose if the end point's coordinates are relative to the start point.
- Absolute
The end coordinate indicates a distance from the top-left corner of the image.
- Relative
The end coordinate indicates a distance from the start point.
- Coordinate System
You can set the end point in cartesian or polar coordinates.
- Cartesian
The coordinates of the end point are set by establishing horizontal and vertical distances relative to the top-left corner of the image or to the start point.
- Polar
The coordinates of the end point are set by establishing an angle and a distance relative to the start point.
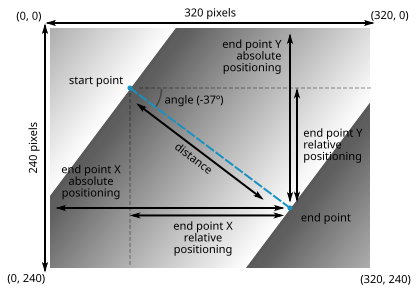
To set the end point's position in the gradient on the image above, you could use cartesian coordinates and set the X and Y coordinates relative to the top-left corner of the image (absolute positioning) or relative to the start point (relative positioning).
However, in some cases it is more convenient using polar coordinates and setting the end point's position by establishing an angle and a distance relative to the start point (polar coordinates are always relative to the start point's position).
Gradient Colors
Here you can select the actual colors used by the gradient.
