
Shape Selection Tool

The shape selection tool used to be called the „default“ tool. This had to do with Krita being part of an office suite once upon a time. But this is no longer the case, so we renamed it to its purpose in Krita: Selecting shapes! This tool only works on vector layers, so trying to use it on a paint layer will give a notification.
After you create vector shapes, you can use this tool to select, transform, and access the shape’s options in the tool options docker. There are a lot of different properties and things you can do with each vector shape. If you have text shapes selected, you can edit their properties with the Text Properties Docker, see Shape Selection Text Options for more information.
Selection
Selecting shapes can be done by three types of actions:
 on a single shape to select it.
- and drag to select multiple shapes.
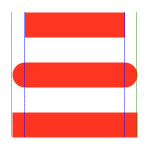
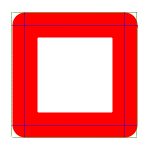
Blue selection (drag left to right): selects only shapes fully covered.
Green selection (drag right to left): selects all the touched shapes.
Press Shift key while
to add or remove a shape from selection.
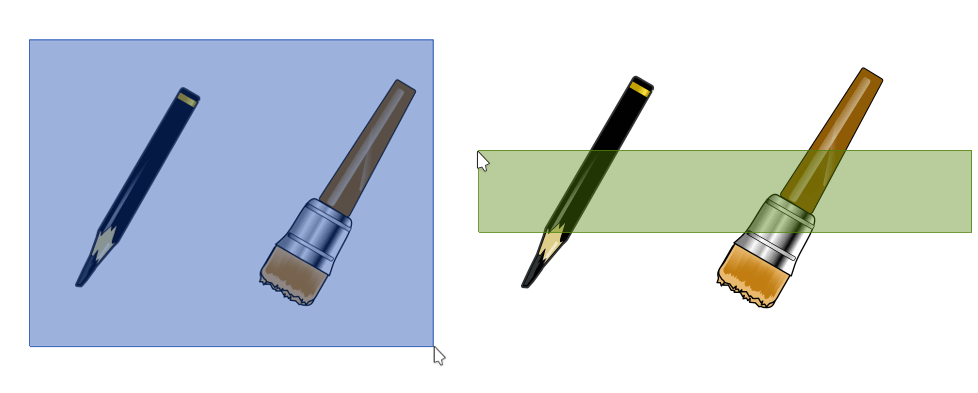
Blue selection: left-to-right, selects fully covered images. – Green selection: right-to-left, selects touched shapes.
Wichtig
Selecting multiple shapes is only possible for shapes within the same Vector Layer
Placement, Scale, Angle and Distortion
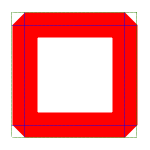
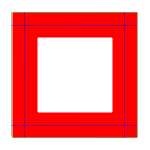
Once an object is selected, a dashed bounding box will appear around it. The box will also have square handles. You can use this bounding box to do adjust: placement, scale, angle and distortion of the selected object.
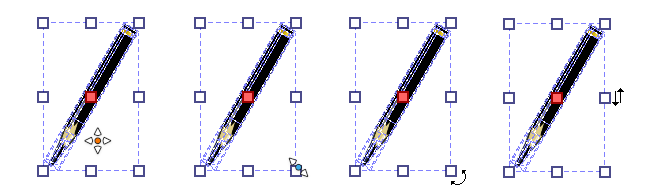
Left to right: Placement, Scale, Angle and Distortion.
- Placement
- and hold inside the bounding box, while holding move the shape to the desired position.
Tipp
You can lock movement to the vertical or horizontal axis: hold
and then press Shift key while moving. - Scale
- and hold inside any of the square handles, move to adjust the dimensions of the object.
Tipp
You can lock width/height ratio when resizing the shape: hold
and then press Shift while resizing.You can resize around the shape center: hold
and then press Ctrl while resizing.Combination of Ctrl + Shift is possible.
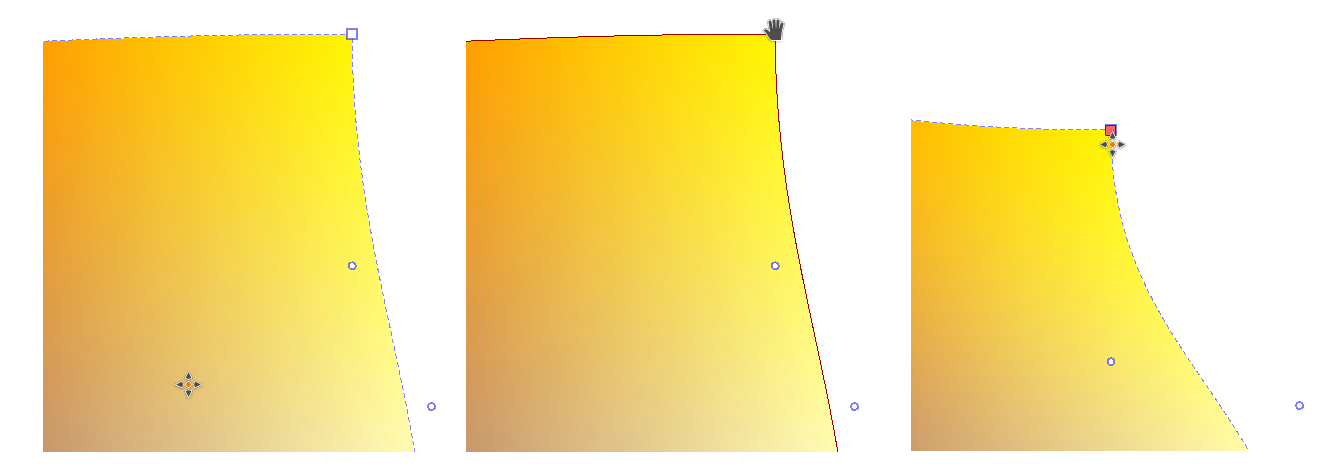
- Angle
Place the cursor slightly outside any of the corner handles.
and drag to adjust the angle of the shape.Tipp
You can constrain rotation to 45°: hold
and then press Ctrl while rotating.- Distortion
Place the cursor slightly outside any of the middle handles.
and drag to skew the shape.
Tool Options
The tool options of this menu are quite involved, and separated over 3 tabs.
Geometry

Geometry is the first section in the tool options.
- Position
Position of a shape is defined by X and Y coordinates.

Also, the origin of position (top-left, middle, bottom-right, …) is defined by the active button:

Provided position coordinates are always relative to the origin: if the origin is modified, X and Y coordinates are updated by consequence.
Tipp
You can also use Docker Arrange tools to easily:
Align shapes
Distribute shapes
Normalize distances between shapes
- Size
Size of a shape is defined by its width and height.
 Aspect ratio of a shape can be locked
 or unlocked
  .When locked, modifying the width value will automatically update the height, modifying the height value will automatically update the width.
- Scale Styles
Enabled: when scaling, it will scale the stroke width with the shape.
Not enabled: when scaling, the stroke width will stay the same.
- Global coordinates
Determines whether the width and height bars use the width and height of the object, while taking transforms into account.
- Fill, Stroke, Markers
Like there’s a Z-Order for painting shapes, there’s also an order to render shape elements (Fill, Stroke, Markers).
Which element is drawn first can change the final look of the shape.
A polygon, solid Red fill, Blue 25px solid stroke, Blue bullet markers¶ 
 Fill, Stroke, Markers
 Stroke, Fill, Markers
Markers, Stroke, Fill
Stroke, Fill, Markers
Markers, Stroke, Fill¶- Opacity
The general opacity, or transparency, of the object. Opacity for stroke and fill are explained in the next two sections.
Warnung
As Anchor Lock is not implemented at the moment, this checkbox is disabled.
Stroke
The stroke tab determines how the stroke around the object should look.
The first set of buttons allows us to set the fill of the stroke: None, Color and Gradient; the same options exist for the fill of the shape, please refer to the following „Fill“ section for more details on how to use both of them.
Then, there are the settings for the stroke style:
- Thickness
Sets the width of the stroke. When creating a shape, Krita will use the current brush size to determine the width of the stroke.
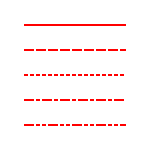
- Cap and corner style
Line Cap defines how the ends of a stroke are drawn, while Line Corner defines how segments joins (from a polyline or polygon) are drawn.
Options can be accessed by pressing the three dots button next to the thickness entry.
Possible Cap values:
 Butt
Butt Round
Round Square
Difference between cap values on 25px thickness lines: Butt, Round and Square
Possible Corner values:
 Bevel
Bevel Miter
Miter Round
Round
Difference between corner values on 25px thickness rectangle: Bevel, Miter and Round
- Line-style
Sets the line style of the stroke: solid, dashes, dots, or mixes of dashes and dots.
- Markers
Adds markers to the stroke. Markers are little figures that will appear at the start, end or all the nodes in between, depending on your configuration.
Fill

This section is about the color that fills the shape. As mentioned above in the Stroke section, the features are the same for both the fill of the stroke and the fill of the shape. Here is the explanation for both:
A fill can be: solid color, gradient, or none (transparent)
- None
No fill. It’s transparent.
- Color
A flat color, you can select a new one by pressing the color button.
- Gradient
As the name implies this type fills the shape with a gradient. It has the following options:
- Type
A linear or radial gradient.
- Repeat
How the gradient repeats itself.
- Preset
A menu for selecting a base gradient from a set of predefined gradient presets, which can be edited as desired.
- Save Gradient
A quick way for saving the current gradient as a preset.
- Stops Options Line
A representation of how the gradient colors should look. The stops are represented by triangles. There are two stops by default one at the beginning and one at the end. You can create more stops just by clicking anywhere on the line. To select a stop
inside the triangle. To delete the stops, drag them to left or right until the end of the line.- Flip Gradient
A quick way to invert the order of the gradient.
- Stop
Choose a color for the current selected stop.
- Opacity
Choose the opacity for the current selected stop.
Hinweis
When a stop triangle is selected, it is highlighted with a slight blue outline. The selected stop triangle will change its color and opacity accordingly when these options are changed.
Hinweis
You can edit the gradient in two ways. The first one is the actual gradient in the docker that you can manipulate. Vectors always use stop-gradients. The other way to edit gradients is editing their position on the canvas.
- Mesh Gradient
Fills the shape with a Mesh Gradient. It has following options:
- Stop
Change the color of the selected stop. Only the color of a Corner can be changed (rectangle), changing the color of Bezier handle (circle) is not possible.
- Rows
Change the number of rows in a Mesh Gradient.
- Columns
Change the number of columns in a Mesh Gradient.
- Smoothing
There are two possible values, Bilinear (default) and Bicubic. Bilinear is the linear interpolation of the color of stops, however it may create Mach Banding effect. Bicubic is the bicubic interpolation of the color stops, this should produce smoother gradient.
Bemerkung
Mesh Gradients follow SVG draft 2 for the rendering.
Creating Mesh Gradients
When Mesh Gradients option is selected for a shape, Krita fills it with default mesh gradient, which is an alternating color (it alternates between background color and white). Changing number of rows and columns from Tool Options, will add more patches to the Mesh Gradient and corners can be changed individually.
Editing Mesh Gradients
The way to edit Mesh Gradients is pretty straight forward. Each curve is an individual Bezier Curve. There are two ways to change the structure, one is by dragging the corner (rectangle) and other is by dragging the handle (circle).
Left to right: Normal, Corner Hovered, Corner Moved and Selected.
To change the color, a corner has to be selected and then Tool Options can be used to change the color of the selected corner.
Bemerkung
When importing from Inkscape, shapes may be grouped, which may not allow Krita to edit Mesh Gradients. To fix this, first ungroup (via  ) them.
Right-click menu
The shape selection tool has a nice right click menu that gives you several features. If you have an object selected, you can perform various functions like cutting, copying, or moving the object to the front or back.
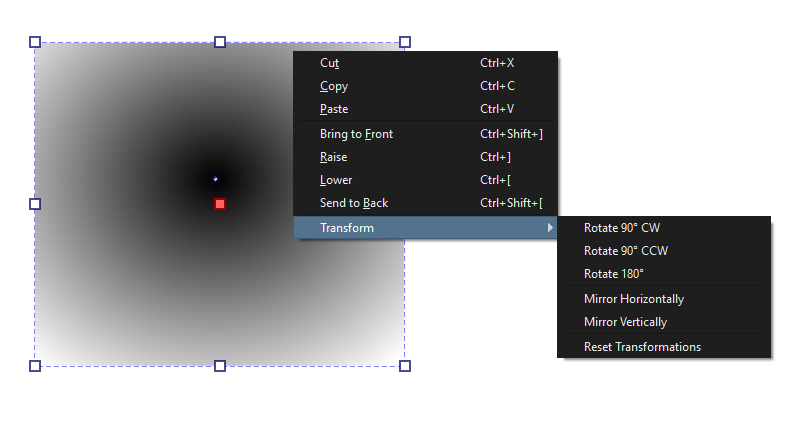
If you have multiple objects selected you can perform „Logical Operators“ on them, or boolean operations as they are commonly called. It will be the last item on the right-click menu. You can unite, intersect, subtract, or split the selected objects.
Shape Selection Text Options
When text shapes are selected, their paragraph properties can be edited all at once with the Text Properties Docker. Beyond that, there’s a number of extra actions available:
- Convert…
See Text Types for more information.
- Flow Text in Shape
Flows the first selected text into all the selected shapes. The visual order determines the initial text flow order.
- Subtract Shape from Text Flow Area
Adds all selected shapes to the first selected text shape as subtraction areas. See Text in Shape for more information.
- Put Text On Path
Puts the whole text on the first selected path. This function will replace any pre-existing paths.
When a Text in Shape is selected, a button appears in the top right. Clicking this will switch the tool into text contour mode. In this mode you can select, move, scale and rotate the shapes that belong with a text. It is also available in the Shape Edit Tool, but automatically disables in the Text Tool. When in this mode, the text properties docker will edit the text regardless of what is selected.
A number of extra actions become available in the right click menu when in the text contour mode:
- Remove Shapes from Text Flow
Remove all selected shapes from the current text.
- Toggle Flow Shape Type
Switches the shape type between Subtract and Inside.
- Set Flow Shape as Last
Make this flow shape the last in the text chain as used by text layout.
- Earlier In Chain
Move this shape earlier in the text chain.
- Later In Chain
Move this shape later in the text chain.
- First In Chain
Make this flow shape the first in the text chain as used by text layout.