Freehand Brush Tool
The default tool you have selected on Krita start-up, and likely the tool that you will use the most.
The freehand brush tool allows you to paint on paint layers without constraints like the straight line tool. It makes optimal use of your tablet’s input settings to control the brush-appearance. To switch the brush, make use of the brush-preset docker.
Hotkeys and Sticky keys
The freehand brush tool’s hotkey is B.
The alternate invocation is the ‚‘color sampler‘‘ (standardly invoked by the Ctrl key). Press the Ctrl key to switch the tool to „color sampler“, use left or right click to sample fore and background color respectively. Release the Ctrl key to return to the freehand brush tool.
The Primary setting is „size“ (standardly invoked by the Shift key). Press the Shift key and drag outward to increase brush size. Drag inward to decrease it.
You can also press the V key as a stickykey for the straight-line tool.
The hotkey can be edited in . The sticky-keys can be edited in .
Tool Options
Smoothing
Smoothing, also known as stabilising in some programs, allows the program to correct the stroke. Useful for people with shaky hands, or particularly difficult long lines.
The following options can be selected:
- No Smoothing.
The input from the tablet translates directly to the screen. This is the fastest option, and good for fine details.
- Basic Smoothing.
This option will smooth the input of older tablets like the Wacom Graphire 3. If you experience slightly jagged lines without any smoothing on, this option will apply a very little bit of smoothing to get rid of those lines.
- Weighted smoothing:
This option allows you to use the following parameters to make the smoothing stronger or weaker:
- Distance
The distance the brush needs to move before the first dab is drawn. (Literally the amount of events received by the tablet before the first dab is drawn.)
- Stroke Ending
This controls how much the line will attempt to reach the last known position of the cursor after the left-mouse button/or stylus is lifted. Will currently always result in a straight line, so use with caution.
- Smooth Pressure
This will apply the smoothing on the pressure input as well, resulting in more averaged size for example.
- Scalable Distance
This makes it so that the numbers involved will be scaled along the zoom level.
- Stabilizer
This option averages all inputs from the tablet. It is different from weighted smoothing in that it allows for always completing the line. It will draw a circle around your cursor and the line will be a bit behind your cursor while painting.
Geändert in Version 5.3,: distance is replaced by smoothing at max and min speed.
- Sample Count at Max Speed
This is the strength of the smoothing when drawing as fast as possible. For the best results, set it much lower than that of min speed. The idea being that a fast stroke needs less smoothing than a slow stroke.
- Sample Count at Min Speed
This is the strength of the smoothing when drawing as slow as possible. For best results, this one can be set much higher than that of max speed.
- Delay
This toggles and determines the size of the dead zone around the cursor. This can be used to create sharp corners with more control.
- Finish Line
This ensures that the line will be finished.
- Stabilize sensors
Similar to Smooth Pressure, this allows the input (pressure, speed, tilt) to be smoother.
- Scalable Distance
This makes it so that the numbers involved will be scaled along the zoom level.
- Pixel
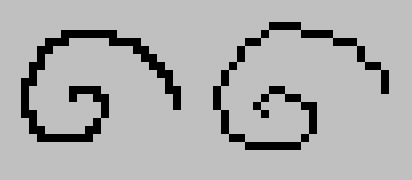
Keeps lines drawn with a single-pixel brush at single-pixel width, avoiding L-shaped corners or doubling-up of pixels.

Left: result without smoothing. Right: result with Pixel smoothing.
Added in version 5.3.
Assistants
Ticking this will allow snapping to Assistant Tool, and the hotkey to toggle it is Ctrl + Shift + L. See Painting with Assistants for more information.
The slider will determine the amount of snapping, with 1000 being perfect snapping, and 0 being no snapping at all. For situations where there is more than one assistant on the canvas, the defaultly ticked Snap Single means that Krita will only snap to a single assistant at a time, preventing noise. Unticking it allows you to chain assistants together and snap along them.
You may not always want erasers to snap, especially when using assistants liberally during the sketching process. Snap Eraser will allow you to turn off snapping for brushes with the blending mode Erase.
