
Strokes queue
Strokes, jobs… What it is all about? (theory)
Structure of a stroke
An abstraction of a stroke represents a complete action performed by a user. This action can be canceled when it has not been finished yet, or can be undone after it's undo data has been added to the undo stack. Every stroke consists of a set of stroke jobs. Every job sits in a queue and does a part of work that the stroke as a whole must perform on an image. A stroke job cannot be canceled while execution and you cannot undo a single job of the stroke without canceling the whole stroke.
Example: Lets look at how the Freehand Tool works. Every time the user paints a single line on a canvas it creates a stroke. This stroke consists of several stroke jobs: one job initializes indirect painting device and starts a transaction, several jobs paint dabs of a canvas and the last job merges indirect painting device into the canvas and commit the undo information.
The jobs of the stroke can demand special order of their execution. That is the way how they will be executed on a multi-core machine. Every job can be either of the type:
CONCURRENTconcurrent job may be executed in parallel with any other concurrent job of the stroke as well as with any update job executed by the scheduler
Example: in Scale Image action each job scales its own layer. All the jobs are executed in parallel.
SEQUENTIALif the job is sequential, no other job may interleave with this one. It means that when the scheduler encounters a sequential job, it waits until all the other stroke jobs are done, starts the sequential job and will not start any other job until this job is finished. Note that a sequential job can be executed in parallel with update jobs those merge layers and masks.
Example: All the jobs of the Freehand Tool are sequential because you cannot rearrange the painting of dabs. And more than that, you cannot mix the creation of the transaction with painting of anything on a canvas.
BARRIERbarrier jobs are special. They created to allow stroke jobs to synchronize with updates when needed. A barrier job works like a sequential one: it does not allow two stroke jobs to be executed simultaneously, but it has one significant addition. A barrier job will not start its execution until all the updates (those were requested with
setDirty()calls before) has finished their execution. Such behavior is really useful for the case when you need to perform some action after the changes you requested in previous jobs are done and the projection of the image does now correspond the changes you've just done.Example: in Scale Image action the signals of the image like
sigSizeChangedshould be emitted after all the work is done and all the updates are finished. So it runs as a barrier job. SeeKisProcessingApplicatorclass for details.
Besides one of the types above a job may be defined as EXCLUSIVE.
Exclusive property makes the job to be executed on the scheduler
exclusively. It means that there will be no other jobs (strokes or
updates) executed in parallel to this one.
The queue of strokes
The strokes themselves are stored in a queue and executed one by one. This is important to know that any two jobs owned by different strokes cannot be executed simultaneously. That is the first job of a stroke starts its execution only after the last job of the previous stroke has finished.
The stroke is just a container for jobs. It stores some information
about the work done, like id() and name(). Alongside storing
this information it can affect the order of execution of jobs as well.
The stroke can be defined exclusive. The meaning of this resembles the
behavior of stroke job's exclusive property. Exclusive stroke is a
stroke that executes its jobs with all the updates blocked. The
execution of updates will start only after the stroke is finished.
Implementation (practice)
Implementation of a stroke

Overview of stroke classes
Each stroke is represented by a KisStroke object. It has all the
basic manipulating methods like: addJob(), endStroke() and
cancelStroke(). The behavior of a stroke is defined by a stroke
strategy (KisStrokeStrategy class). This strategy is passed to the
KisStroke object during construction and owned by the stroke.
Each stroke job is represented by KisStrokeJob object. The queue of
KisStrokeJob objects is stored in every stroke object. This very
object is used for actual running the job (KisUpdateJobItem calls
KisStrokeJob::run() method while running). The behavior of the
stroke job is defined by a strategy (KisStrokeStrategy) and a data
(KisStrokeJobData). Those two objects are passed during the
construction of the KisStrokeJob object.
A stroke can have four types of jobs:
initialization
canceling
finishing
actual painting (named as 'dab' in the code)
During construction the stroke asks its strategy to create strategies
for all the four types of job. Then it uses these strategies on creation
of jobs on corresponding events: initialization, canceling, finishing
and when the user calls addJob() method.
The strategies define all the properties of strokes and stroke jobs we were talking above. The data class is used for passing information to the stroke by high-level code.
Example: FreehandStrokeStrategy::Data accepts such information
as: node, painter, paintInformation, dragDistance
Other information that is common to the whole stroke like names of the paintOp, compositeOp are passed directly to the constructor of the stroke strategy.
Execution of strokes by KisStrokesQueue
The key class of the strokes' execution is KisStrokesQueue. The most
important method that is responsible for applying all the rules about
interleaving of jobs mentioned above is
KisStrokesQueue::processOneJob. This method is called by the update
scheduler each time a free thread appears. First it gets the number of
merge and stroke jobs currently executing in the updater context. Then
it checks all the rules one by one.
Canceling and undo information trick
It was stated above that a stroke can be canceled in each moment of
time. That happens when a user calls KisStroke::cancelStroke()
method. When it is requested the stroke drops all the jobs those are
present in its queue and has not been started yet. Then it enqueues a
special kind of job named cancel job that reverts all the work done by
the stroke. This is used for interactive canceling of tools' strokes.
Taking into account that the strokes can be reverted, we cannot use
QUndoStack capabilities directly. We should add commands to the
stack after they have been executed. This resembles the way how
KisTransactionData works: its first redo() method doesn't do
anything because everything has already been painted on a device. Here
in strokes this "after-effect-addition" is implemented in general way.
Strokes work with a special kind of undo adapter:
KisPostExecutionUndoAdapter. This adapter wraps the commands in a
special wrapper that puts them into the stack without calling redo()
and controls their threaded undo() and redo() operations. See
information about KisPostExecutionUndoAdapter in a separate
document.
Queues balancing
So we ended up with a solution where our scheduler has two queues that it should spread between limited amount of threads. Of course there should be some algorithm that balances the queues. Ideally, we should balance them by the total area of image the queue should process. But we cannot achieve that currently. So the formula for size metrics is quite simple:
updatesMetric = <number of update jobs in the queue>
strokesMetric = <number of strokes> * <jobs in the first stroke>
Balancing formula:
balancingRatio = <updatesMetric> / <strokesMetric>
Starting a stroke
The main entry point to strokes for the user is KisStrokesFacade
interface. This interfaces provides four methods: startStroke(),
addJob(), endStroke() and cancelStroke(). So every time you
work with strokes you should work using this interface.
Note: KisImage and KisUpdateScheduler both implement this interface, so you can use them as a strokes facade. But please try not to store pointers to the whole image. Try store a link to interface only, if possible.
So if you want to start a stroke you should do the following:
Create a stroke strategy
Start a stroke with:
KisStrokeId strokeId = strokesFacade->startStroke(myStrategy);Note: you'll get a KisStrokeId handle for the stroke you created. This handle will be used in all the other methods for controlling the stroke. This handle is introduced, because several users can access the strokes facade simultaneously, so there may be several strokes opened simultaneously. It's important to understand that even when several strokes are opened simultaneously, only one of them executes on the cpu. All the other strokes will be delayed until it is finished.
Create a data for your stroke job
Add a job to the execution queue:
strokesFacade->addJob(strokeId, myData);You may add as many jobs as you wish
End or cancel the stroke:
strokesFacade->endStroke(strokeId);or
strokesFacade->cancelStroke(strokeId);
Strokes public API
Simplified stroke classes
As you might noticed the internal strokes API is quite complex. If you decide to create your own stroke you need to create at least six new classes:
stroke strategy class
four stroke jobs strategies (init, finish, cancel, dab)
data that will be passes to a dab-strategy-based job
That is not really a good solution for a public API, so we introduced an
adapter that simplifies all these stuff. The class is called
KisSimpleStrokeStrategy. It allows you to define all the jobs you
need in a single class.
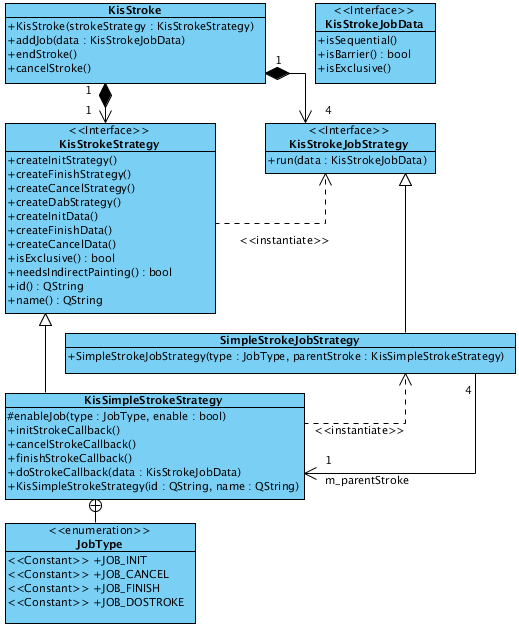
Simple stroke classes
This class has four virtual methods those you can use as callbacks. When you need to use one of them just override it in your own class and add activation of the corresponding callback to the constructor of your class:
class MyOwnStroke : public KisSimpleStrokeStrategy {
    MyOwnStroke() {
        enableJob(KisSimpleStrokeStrategy::JOB_INIT);
        enableJob(KisSimpleStrokeStrategy::JOB_FINISH);
        enableJob(KisSimpleStrokeStrategy::JOB_CANCEL);
        enableJob(KisSimpleStrokeStrategy::JOB_DAB);
    }

    void initStrokeCallback()
    {
    }

    void finishStrokeCallback()
    {
    }

    void cancelStrokeCallback()
    {
    }

    void doStrokeCallback(KisStrokeJobData *data)
    {
        Q_UNUSED(data);
    }
};
Internally, KisSimpleStrokeStrategy creates all the job strategies
needed for the lowlevel API. And these internal job strategies call the
callbacks of the parental class.
Important: Notice that the job data passed to init, finish and cancel jobs is always null. It means that these jobs will always be sequential and non-exclusive. That is done intentionally to simplify the API. At the same time that is a limitation of the API. But currently, this is perfectly enough for us.
Unit-testing of the strokes
One of the benefits of using the strokes is that you are able to test them separately from the UI using a common infrastructure.
utils::StrokeTester class
That is a really simple class that you can use to test your own stroke. It test the following aspects of your stroke:
canceling of the stroke
working with indirect painting activated
testing updates of the image projection after your stroke
working with a layer that is not connected to any image
The result of the execution is compared against the reference png files those you create manually while writing your test.
How to write your own test
You can check examples in MoveStrokeTest and FreehandStrokeTest
tests.
You need to inherit your tester class from
utils::StrokeTester. The constructor of that class accepts the name of your stroke (it'll be used for generating filenames), size of the image and a filename of the preset for the paintOp.StrokeTester(const QString &name, const QSize &imageSize, const QString &presetFileName = "autobrush_300px.kpp");
Then you need to override at least two methods:
KisStrokeStrategy* createStroke(bool indirectPainting,
                                KisResourcesSnapshotSP resources,
                                KisPainter *painter,
                                KisImageWSP image);
void addPaintingJobs(KisImageWSP image,
                     KisResourcesSnapshotSP resources,
                     KisPainter *painter);
If you thing you need it you may do some corrections for the image and active node in the following method:
void initImage(KisImageWSP image, KisNodeSP activeNode);
Run your test in a testing slot:
void MyStrokeTest::testStroke()
{
    MyTester tester();
    tester.test();
}
During the first run the test will report you many fails and will generate you several files with actual result of the test. You need to check these files, then move them into the tests' data folder:
tests/data/<your_stroke_name>/After you copied the files the tester will compare the actual result against these very files. That means it'll catch all the changes in the work of your stroke, so you'll be able to catch all the regressions automatically.
Predefined classes for usage as base classes
KisPainterBasedStrokeStrategy
This class can be used for the strokes those work with the node using a
painter (or painters like in KisToolMultihand). This class accepts
resources snapshot (KisResourcesSnapshot) and a painter (painters).
Initialization, finishing and canceling callbacks of this class do all
the work for dealing with indirect painting support, creation of
transaction, reverting the stroke on canceling. This base class is used
for FreehandStroke mostly.
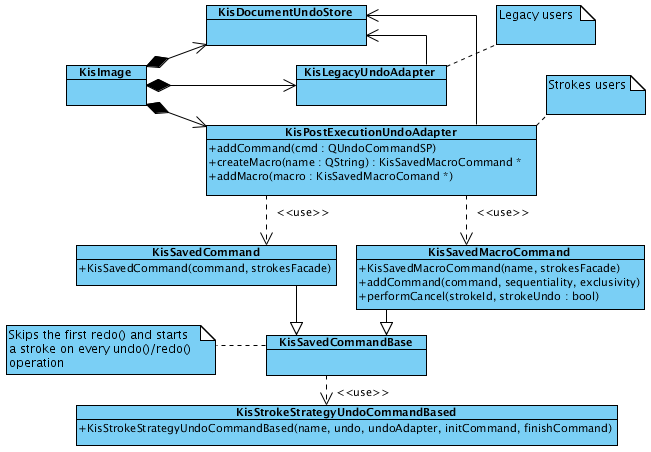
KisStrokeStrategyUndoCommandBased
It is obvious from the name of the class that it works with undo commands. In constructor you define which method of undo command should be used undo() or redo(). Afterwards, you just add commands to the stroke and they are executed with any the sequentiality constraints. This stroke strategy does all the work for adding the commands to the undo adapter and for canceling them if needed.
Example classes
KisPainterBasedStrokeStrategyFreehandStrokeStrategyKisStrokeStrategyUndoCommandBasedMoveStrokeStrategy
Internals of the freehand tool
Freehand tool classes
Motivation for so many classes
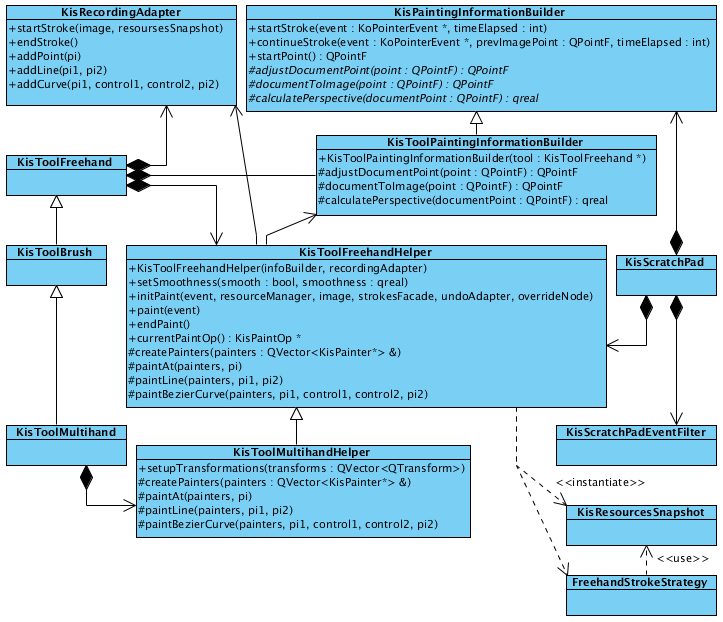
We need to share the codebase between at least four classes:
KisToolFreehand, KisToolMultihand, KisScratchPad. All these
classes paint on a canvas with KisPainter, so they share quite much
common code.
KisResourcesSnapshot
After we introduced the strokes, the moments of time when user paints
with mouse and when the line is actually painted on the canvas do not
coincide. It means that by the time a thread starts actual changing the
device, the contents of KoCanvasResourceProvider might have already
changed. So before we start a stroke we should create a snapshot of all
the resources we have and pass this snapshot to the stroke.
For this purpose we introduced KisResourcesSnapshot class. It solves
two problems at the same time: first it stores all the resources we
might have and second it encapsulates the algorithm of loading these
resources into a KisPainter object. So this class is really easy to
use. You just create the snapshot and then just load all the resources
to the painter when needed.
KisResourcesSnapshotSP resources =
    new KisResourcesSnapshot(image,
                             undoAdapter,
                             resourceManager);
KisPainter painter;
painter.begin(device, selection);
resources->setupPainter(&painter);

// paint something

painter.end();
In our implementation this class is usually created by
KisToolFreehandHelper and passed to the
KisPainterBasedStrokeStrategy class. The latter one creates painters
and initializes them using setupPainter().
KisToolFreehand and KisScratchPad
The freehand tool is split into four classes:
KisToolFreehandhighlevel tool class that get the mouse events from the Ko-classes and distributes events among internal classes.
KisToolPaintingInformationBuilderconverts mouse events represented by
KoPointerEventobjects intoKisPaintInformationobjects.KisRecordingAdapterstays in charge of adding recording information into the image's action recorder. This class has two purposes: first we need to be able to disable recording for the scratch pad (then we just pass NULL instead of a recording adapter), second when the strokes are able to do their own recording, it'll be easier to port the freehand tool to it.
KisToolFreehandHelperthis is the main class that combines all the classes we were talking above. It accepts a mouse event, converts it using a painting information builder into the paint information, notifies recording adapter, takes the snapshot of resources and finally starts a stroke. Then it populates the stroke with stroke jobs, when the user moves the mouse (
paint(event)method) and finishes the stroke in the end.
Such splitting allows us to use the same classes in both
KisToolFreehand and KisScratchPad. The only difference between
them is that the scratch pad doesn't have a recording adapter at all,
and uses base class KisPaintingInformationBuilder instead of
KisToolPaintingInformationBuilder. The latter differs from the
former one in a way that it supports painting assistants
(adjustDocumentPoint() method), complex coordinate transformations
with KisCoordinatesConverter (documentToImage() method) and
perspective painting (calculatePerspective() method). The rest of
the code is shared.
KisToolMultihand
Multihand tool uses the same classes. The only difference, it has a
couple of modifications in its helper (KisToolMultihandHelper),
those allow it to have several painters at the same time. The tool's
class inherits the freehand tool's class and just substitutes the helper
with its own (with resetHelper() method).
Scheduled Undo/Redo
Two ways of working with undo commands
The key problem of designing the undo system for strokes was that there are two ways of working with undo commands. That is we have two types of commands actually:
Qt-like command - command's redo() method is executed while the command is added into the undo stack
Transaction-like command - the command is added to the stack after its action has already been performed. It means that the first redo() of this command (the one that is called by undo stack) does nothing. That is a transaction-like command just saves undo data for the future and does not perform anything on addition.
You already know that our strokes can be reverted on the go, it means that the stroke's undo command should be added to the undo stack only after all the actions of the stroke have been performed. So it looks like the stroke's commands are transaction-like.
But there is another problem: the stroke should be able to execute
regular undo commands those are not transaction-like (like is it done in
KisStrokeStrategyUndoCommand). More than that, undo and redo of for
such strokes should be performed with the same sequentiality properties
(read "undo/redo operations should be threaded as well").
It follows that the undo commands generated by the stroke should be
wrapped in a special wrapper command, lets call it
KisSavedCommand, that hold the following properties:
the wrapper skips the first redo(). It means the wrapped command's redo() method will not be called on its addition to the stack. Obviously, it is not needed, because the action has already been performed by the stroke itself.
when undo stack calls to undo/redo methods of the wrapper-command, the command creates a stroke (
KisStrokeStrategyUndoCommandBased) and runs the wrapped command in a context of this stroke.a special macro wrapper command, lets call is
KisSavedMacroCommand, should be able to save all the commands executed by a stroke and undo/redo all of them in the original order with original sequentiality properties (concurrent, sequential, barrier, exclusive).
That is exactly what we have: KisSavedUndoCommand skips the first
redo and runs undo()/redo() of an internal command in a separate stroke.
We have KisSavedMacroCommand as well to save the contents of the
whole stroke.
Scheduled commands
New Undo Adapters
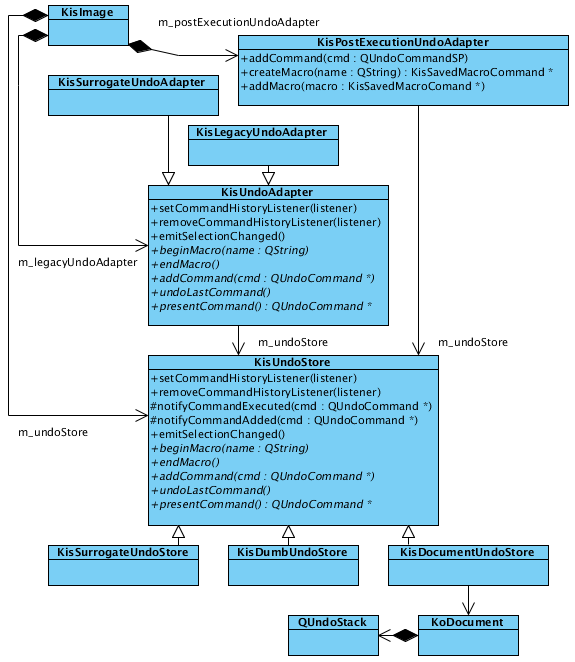
Well, it would be quite insane to ask all the users of strokes to wrap
their commands into wrapper, so we introduced a separate undo adapter
for strokes: KisPostExecutionUndoAdapter. This adapter wraps your
command and puts it into the undo stack automatically. This is the only
adapter we can use inside strokes, that is why all the strokes accept
the pointer to it.
For the legacy code we still have KisUndoAdapter, but now we call it
"legacy undo adapter". It works as usual: it adds a command to undo
stack directly, so it gets executed right in the moment of addition. But
there still is one trick. Stroke's commands come to the undo stack
asynchronously, so if we try to simply add a command to the stack, we
can catch a race condition easily. That's why the legacy undo adapter
must guard itself from strokes with locking the strokes system. That is
done with a special kind of lock barrierLock(). This barrier lock
differs from a regular lock in a way that it ways for all the running
strokes are finished, while a regular lock waits for all the running
stroke jobs are done. That's the only difference.
The same race conditions problem applies to the undo()/redo() signals
from the UI. The user may request the undo operation while the stroke is
adding its commands. This will surely lead to a crash. We solved this
problem in a bit hacky way: we hacked QUndoStack and made it's
undo()/redo() slots virtual. After that we overridden the stack with our
own, and changed these methods to block the strokes while undo()/redo()
is happening. We use tryBarrierLock() there, because it is easier to
cancel the undo than to wait until all the strokes are finished.
Undo Adapters and Undo Stores
Well, we have two types of undo adapters now (not counting
KisSurrrogateUndoAdapter). It's obvious that they should share some
code. That is why we split the work with the actual undo stack into a
separate class KisUndoStore. So now the undo store defines "where to
store the undo data", and undo adapter defines "how to adapt krita's
commands to qt's stack". There are additional types of store classes for
using in tests and for special purposes.
Undo Adapter vs Undo Store
Processings framework
Motivation
In Krita we have many actions which have common structure of execution. Take a look at actions like Scale Image, Rotate Image, Change Color Space - all of them have common phases:
Lock the image
Do the processing of nodes
Unlock the image
Emit setDirty() calls and update the projection of the nodes
Wait until all the setDirty()'es are finished
Emit image's signals like sigImageSizeChanged
More than that, you should pay attention to the fact that all these actions should support undo/redo operations. And the last two phases cannot be implemented as usual qt-commands inside a usual macro, because they should always be executed in the end of the action (in qt commands are executed in reverse order during undo operations, that is not what we want).
And, btw, it would be really good idea to have multithreading support for such actions, because some of them (like Scale Image) may be quite slow.
KisNodeVisitor cannot fit all these requirements, because it has
important design limitations: first, walking through nodes is
implemented inside the visitor itself and, second, emitting signals is
put into visitors as well. These two limitations prevent the code to be
shared between actions. That is why we introduced new shiny
KisProcessingVisitor and a separate framework for them.
Processing visitors
Processing framework
The key class of the processing framework is KisProcessingVisitor.
Its main difference from the old visitor is that it is extremely simple.
It performs one task only, it processes one node. And that is all. It
does no locking, performs no updates, emits no signals. It just
processes (that is, changes the content) a single node. You can look at
the reference implementation of it in KisCropProcessingVisitor and
KisTransformProcessingVisitor. The key idea of this framework is to
keep the processings as simple as possible. So the rest of the work is
done by external classes, those are shared between all the processings.
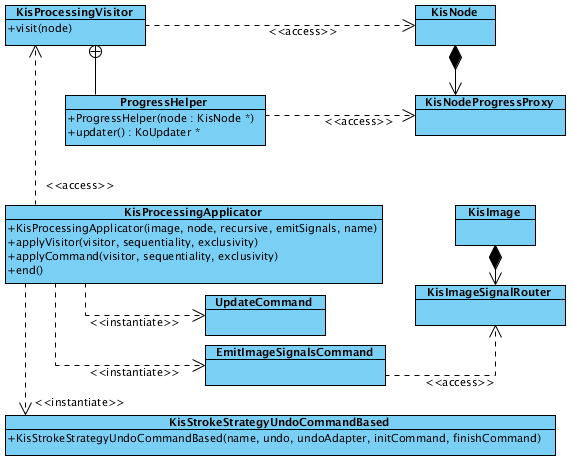
We have one such class. Its name is KisProcessingApplicator. This
class performs several tasks:
creates a stroke. So all the actions executed with this applicator will be undo/redo'able.
applies a visitor to a requested node.
applies a visitor recursively to a node and all its children. Note, that you can choose any sequentiality property for the execution of your visitor. It means that the visitors can be applied to nodes concurrently in multithreaded way.
applies a usual qt-command to the image. Sequentiality properties may vary as well.
emits setDirty() calls for all the nodes which need it. It is done in efficient way, so no nodes are updated twice.
emits image signals after all the actions and updates are finished.
Lets look at an example:
void KisImage::resizeImageImpl(const QRect& newRect, bool cropLayers)
{
    if(newRect == bounds()) return;

    QString actionName = cropLayers ? i18n("Crop Image") : i18n("Resize Image");

(1) KisImageSignalVector emitSignals;
(2) emitSignals << SizeChangedSignal << ModifiedSignal;

(3) KisProcessingApplicator applicator(this, m_d->rootLayer,
                                       KisProcessingApplicator::RECURSIVE,
                                       emitSignals, actionName);

    if(cropLayers || !newRect.topLeft().isNull()) {
(4)     KisProcessingVisitorSP visitor =
            new KisCropProcessingVisitor(newRect, cropLayers, true);
(5)     applicator.applyVisitor(visitor, KisStrokeJobData::CONCURRENT);
    }
(6) applicator.applyCommand(new KisImageResizeCommand(this, newRect.size()));
(7) applicator.end();
}
In lines (1) and (2) we create a list of signals we should emit after the execution of the applicator. This list should be passed to the constructor of the applicator (3) (the list is passed to the constructor instead of end() function, because we face a limitation connected with the internals of the implementation of undo for processings, I doubt it can create any troubles). In the line (3) we create a recursive applicator. In lines (4) and (5) we create a visitor and apply it to nodes recursively in a multithreaded way. Warning: the visitor is shared between all the threads so it should be written in a thread-safe way. In line (6) we apply a command sequentially, it means that it'll be executed right after all the threads with visitors has finished. Line (7) closes the stroke an tells it to perform all the updates and emit all the signals.
Implementation of KisProcessingApplicator
The applicator is based on the "undo command"-based stroke
(KisStrokeStrategyUndoCommandBased). It starts the stroke in the
constructor and adds undo commands to it on every user request. The
processings are internally wrapped into a special command
(KisProcessingCommand). This command has its own undo stack that
collects the transactions executed by the processing. This can be easily
achieved with our undo adapters interface. The command just defines its
own KisSurrogateUndoAdapter and passes it to the processing.
Processing adds its transactions to the fake adapter. And later, the
command just uses the undo stack to undo/redo actions executed by the
transaction.
The applicator defines several internal commands as well:
UpdateCommand and EmitSignalsCommand. These commands are added
to the beginning and to the end of every stroke, so that they can be
executed in the end of both undo and redo operations. The parameter
finalUpdate controls whether the command is executed during its
redo() or undo() operation.
Emission of signals trick
After actions have been moved to separate threads, problems with image
signals appeared. When everything was executed in a single thread the
connection of signals like sigAboutToAddNode and
sigNodeHasBeenAdded worked as Qt::DirectConnection. So these
signals were effectively function calls. After we moved the actions to a
separate thread, all of them became Qt::QueuedConnection. I guess you
know what it means. They simply lost all their sense. So we had to start
to use Qt::BlockingQueuedConnection. But there is another problem with
it. Some of the (old) code is still executed in a context of the UI
thread and they emit signals as well. So all that code causes deadlocks
when using Qt::BlockingQueuedConnection. That is why we had to
introduce KisImageSignalRouter. This class checks which thread emits
the signal and emits it either using Qt::DirectConnection or
Qt::BlockingQueuedConnection. So no deadlocks are possible.
Progress reporting
The fact that a processing visitor does a really simple task (processes
a single node) that is very easy to report progress using progress bars
in the layer box. We just need to use progress proxy of the node we
process (KisNodeProgressProxy). Our processings framework provides
an even easier way of doing this. You just need to instantiate a
ProgressHelper object and ask it to create a KoUpdater object
for you. And all is done. You can see an example in
KisTransformProcessingVisitor class.
Testing
Usage of a common framework makes testing really simple. There is a
separate unittest in image's tests folder: KisProcessingsTest. To
test a processing you need to write just a couple of lines. Everything
is done by BaseProcessingTest helper class. This class will run your
processing and compare results against reference png files those are
stored in data folder. If there are some problems found, it'll dump
result files to the current directory.