Hatching Brush Engine
When I first tried this brush, my impression of it was „plain parallel lines“ (and the award for most boring brush goes to…). Fortunately, existing presets gave me an idea of the possibilities of this brush.
Settings
Brush tip
The brush tip simply defines the area where the hatching will be rendered.
Transparent brush tip areas give more transparent hatching, but as with a normal brush, passing over the area again will increase opacity.
The hatching itself is mostly fixed in location, so drawing with a hatching brush usually acts more like „revealing“ the hatching underneath than drawing with brushes of parallel lines. The exception is for Moiré pattern with Crosshatching dynamics on.
Vary the brush shape or texture for a variety of effects. Decreasing the density of the autobrush will give a grainy texture to your hatching, for example.
The Size dynamic affects the brush tip, not the hatching thickness.

Hatching preferences
Before going on: at the time of this writing, there is a bug that causes line thickness to not vary on default settings. To get around this, go to Hatching preferences and check Antialiased Lines. Pentalis is aware of this issue so the bug may get fixed soon.
The three options are:
Antialiased lines: This controls aliasing. If changing line thickness isn’t working, check this option and it should work, because it switches to a different algorithm.
Subpixel precision: I’m guessing this affects the rendering quality, but you won’t see much of a difference. Check this if you want to.
Color background: Checking this will color in the background at the back of the hatching.
The output is slightly different depending on whether the first two options are checked, but the difference isn’t enough for you to worry about. I recommend just keeping the first two options checked.

Hatching options
This is where the main hatching options go. They’re intuitive enough:
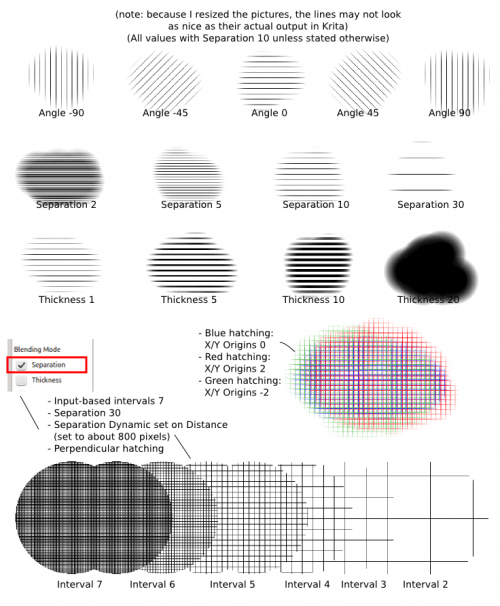
Angle: The angle of the hatching.
Separation: This is the distance between the centers of the lines.
Use a value of 2 pixels or higher, or the lines won’t be distinct anymore.
The Separations dynamic doesn’t actually assign random values to Separation, instead it will take the value in „Input-based intervals“ to divide the grid further. „Input-based intervals“ can take values between 2 and 7.
Thickness: The line thickness.
Actually, this is the thickness of the line + blank area, so the line itself has a thickness of half this value.
If you use the same separation value and the same line thickness value, then the lines and the area between them will be of the same thickness.
You can vary this value dynamically with the Thickness dynamics.
If the line thickness isn’t changing for you, go to Hatching Preferences and check „Antialiased Lines“.
Origin X and Origin Y: The hatching has a fixed location, painting acts as though you’re revealing the existing hatching underneath. To nudge the hatching, you can tweak these two values. You can get various grid effects this way.

Finally, we have the hatching styles:
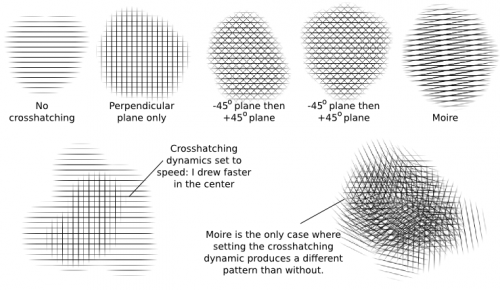
No crosshatching: basic parallel lines
Perpendicular plane only: grid lines
-45 degrees plane then +45 degrees plane: see example.
+45 degrees plane then -45 degrees plane: see example, actually not much different from the above, it’s mostly the order that changes when using dynamics.
Moiré pattern: See example.
The Crosshatching dynamic only works if you have already chosen a crosshatching style. When that happens, the crosshatching only gets drawn according to the conditions of the dynamics (pressure, speed, angle…).
With most hatching styles, using crosshatching dynamics basically gets you the same hatching style, minus the occasional line.
The exception is with Moire, which will produce a different pattern.

Use cases
If you don’t want the edges to be fuzzy, go to Brush Tip and set the Fade values to 1.00. I recommended doing the hatching on a separate layer, then erasing the extra areas.
Now for the uses:
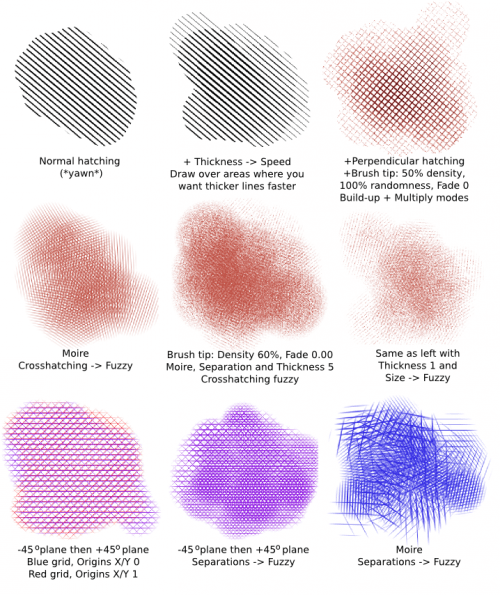
You can, of course, just use this for completely normal hatching. In versions I’m using, the default Separation is 1, which is too low, so increase Separation to a value between 2 to 10.
If you find normal hatching too boring, increase the Thickness and set the Thickness dynamic to either Pressure (if you have a tablet) or Speed (if you’re using a mouse). Doesn’t that look more natural? (When using a mouse, pass over the areas where you want thicker lines again while drawing faster).
Grittier texture: add some density and/or randomness to your autobrush for a grittier texture.
You can also set Painting Mode to Build up, and Mode to Multiply, to make some colors have more depth. (see my grid example).
Vary Origin X and Origin Y while using the same patterns.
Use the Separations dynamic for more complex patterns. Add in Line Thickness and other dynamics for more effect.
Now, the Moiré pattern is quite boring on its own, but it is much more interesting with Crosshatching dynamics set on Fuzzy.
For more texture, set Line Thickness to Fuzzy, decrease Density a bit and increase Randomness and you get a nice gritty texture.

