Bristle Brush Engine
A brush intended to mimic real-life brushes by drawing the trails of their lines or bristles.
Brush Tip
Simply put:
The brush tip defines the areas with bristles in them.
Lower opacity areas have lower-opacity bristles. With this brush, this may give the illusion that lower-opacity areas have fewer bristles.
The Size and Rotation dynamics affect the brush tip, not the bristles.
You can:
Use different shapes for different effects. Be aware that complex brush shapes will draw more slowly though, while the effects aren’t always visible (since in the end, you’re passing over an area with a certain number of bristles).
To decrease bristle density, you can also just use an autobrush and decrease the brush tip’s density, or increase its randomness.

Bristle Options
The core of this particular brush-engine.
- Scale
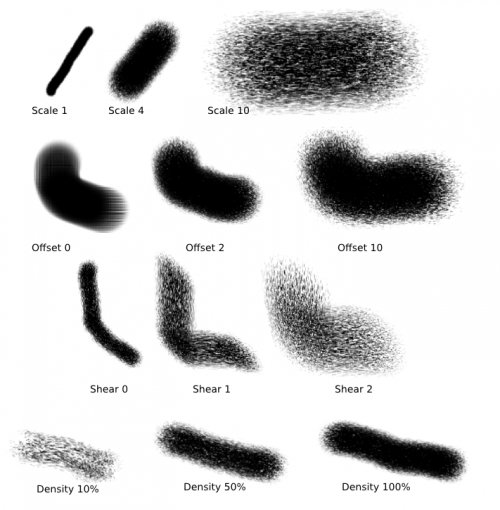
Think of it as pressing down on a brush to make the bristles further apart.
Larger values basically give you larger brushes and larger bristle spacing. For example, a value of 4 will multiply your base brush size by 4, but the bristles will be 4 times more spaced apart.
Use smaller values if you want a „dense“ brush, i.e. you don’t want to see so many bristles within the center.
Negative values have the same effect as corresponding positive values: -1.00 will look like 1.00, etc.
- Random Offset
Adds a jaggy look to the trailing lines.
At 0.00, all the bristles basically remain completely parallel.
At other values, the bristles are offset randomly. Large values will increase the brush size a bit because of the bristles spreading around, but not by much.
Negative values have the same effect as corresponding positive values.
- Shear
Shear introduces an angle to your brush, as though you’re drawing with an oval brush (or the side of a round brush).
- Density
This controls the density of bristles. Scale takes a number of bristles and expands or compresses them into a denser area, whereas density takes a fixed area and determines the number of bristles in it. See the difference?

- Mouse Pressure
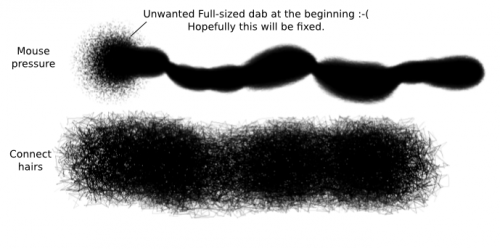
This one maps „Scale“ to mouse speed, thus simulating pressure with a graphics tablet!
Rather, it uses the „distance between two events“ to determine scale. Faster drawing, larger distances.
This doesn’t influence the „pressure“ input for anything else (size, opacity, rotation etc.) so you still have to map those independently to something else.
- Threshold
This is a tablet feature. When you turn this on, only bristles that are able to „touch the canvas“ will be painted.
- Connect Hairs
The bristles get connected. See for yourself.
- Anti-Aliasing
This will decrease the jaggy-ness of the lines.
- Composite Bristles
This „composes the bristle colors within one dab,“ but explains that the effect is „probably subtle“.

Ink Depletion
This simulated ink depletion over drawing time. The value dictates how long it will take. The curve dictates the speed.
- Opacity
The brush will go transparent to simulate ink-depletion.
- Saturation
The brush will be desaturated to simulate ink-depletion.

- Soak Ink
The brush will pick up colors from other brushes. You don’t need to have Ink depletion checked to activate this option, you just have to check Soak ink. What this does is cause the bristles of the brush to take on the colors of the first area they touch. Since the Bristle brush is made up of independent bristles, you can basically take on several colors at the same time.
Bemerkung
It will only take colors in the unscaled area of the brush, so if you’re using a brush with 4.00 scale for example, it will only take the colors in the 1/4 area closest to the center.
When the source is transparent, the bristles take black color.

Warnung
Be aware that this feature is a bit buggy though. It’s supposed to take the color from the current layer, but some buggy behavior causes it to often use the last layer you’ve painted on (with a non-Bristle brush?) as source. To avoid these weird behaviors, stick to just one layer, or paint something on the current active layer first with another brush (such as a Pixel brush).
- Weighted saturation
Works by modifying the saturation with the following:
Pressure weight
Bristle length weight
Bristle ink amount weight
Ink depletion curve weight
