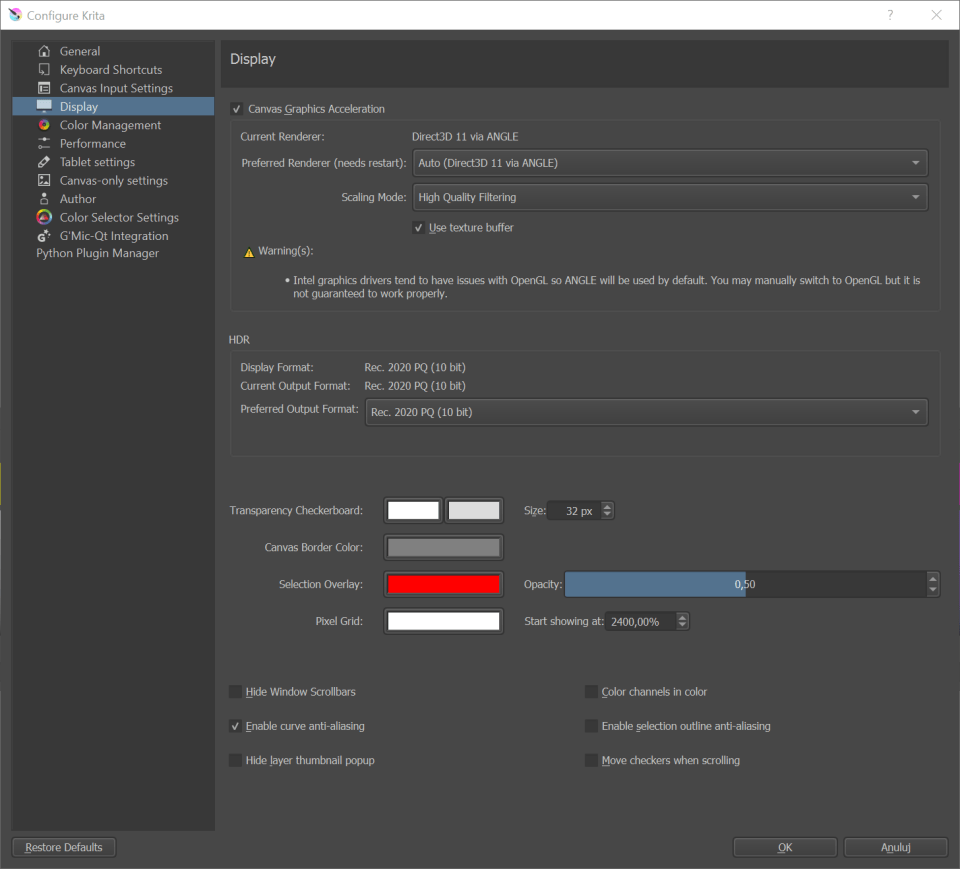
Display Settings

Here various settings for the rendering of Krita can be edited.
Canvas Graphics Acceleration
Bemerkung
In Krita 3.2 and before, this used to be named OpenGL, with the checkbox for Canvas Graphics Acceleration being named Enable OpenGL.
OpenGL is a bit of code especially for graphics cards. Graphics cards a dedicate piece of hardware for helping your computer out with graphics calculations, which Krita uses a lot. All modern computer have graphics cards.
On Windows, Krita also supports using Direct3D instead with the help of the ANGLE library. ANGLE works by converting the OpenGL functions that Krita makes use of to the equivalent in Direct3D. It may (or may not) be slower than native OpenGL, but it has better compatibility with typical Windows graphics drivers.
- Canvas Graphics Acceleration
Selecting this checkbox will enable the OpenGL / ANGLE canvas drawing mode. With a decent graphics card this should give faster feedback on brushes and tools. Also the canvas operations like Rotate, Zoom and Pan should be considerably faster.
Renderer (Requires Restart)
- Auto (Recommended)
Krita will decide the best renderer to use based on some internal compatibility checking.
- OpenGL
Krita will use OpenGL.
- OpenGL ES
Krita will use OpenGl ES, which is a subset of OpenGL. Using this can be useful for less powerful devices.
- ANGLE Direct3D (Windows Only)
Krita will use the ANGLE compatibility layer to convert the OpenGL calls to Direct3D calls. Whether this works better than regular OpenGL depends on the graphics drivers of the computer.
- Scaling Mode
The user can choose which scaling mode to use while zooming the canvas. The choice here only affects the way the image is displayed during canvas operations and has no effect on how Krita scales an image when a transformation is applied.
- Nearest Neighbour
This is the fastest and crudest filtering method. While fast, this results in a large number of artifacts - ‚blockiness‘ during magnification, and aliasing and shimmering during minification.
- Bilinear Filtering
This is the next step up. This removes the ‚blockiness‘ seen during magnification and gives a smooth looking result. For most purposes this should be a good trade-off between speed and quality.
- Trilinear Filtering
This should give a little better result than Bilinear Filtering.
- High Quality Filtering
Only available when your graphics card supports OpenGL 3.0. As the name suggests, this setting provides the best looking image during canvas operations.
- Use Texture Buffer
This setting utilizes the graphics card’s buffering capabilities to speed things up a bit. Although for now, this feature may be broken on some AMD/Radeon cards and may work fine on some Intel graphics cards.
- Use Large Pixmap Cache
This should be enabled if you experience artifacts with the assistants.
HDR
Added in version 4.2.
Bemerkung
These settings are only available when using Windows. For configuring HDR on Linux see this page
Since 4.2 Krita can not just edit floating point images, but also render them on screen in a way that an HDR capable setup can show them as HDR images.
The HDR settings will show you the display format that Krita can handle, and the current output format. You will want to set the preferred output format to the one closest to what your display can handle to make full use of it.
- Display Format
The format your display is in by default. If this isn’t higher than 8bit, there’s a good chance your monitor is not an HDR monitor as far as Krita can tell. This can be a hardware issue, but also a graphics driver issue. Check if other HDR applications, or the system HDR settings are configured correctly.
- Current Output format
What Krita is rendering the canvas to currently.
- Preferred Output Format
Which surface type you prefer. This should be ideally the closest to the display format, but perhaps due to driver issues you might want to try other formats. This requires a restart.
Canvas Decorations
- Transparency Checkerboard:
Krita supports layer transparency. Of course, the nasty thing is that transparency can’t be seen. So to indicate transparency at the lowest layer, we use a checker pattern. This part allows you to configure it.
- Size
This sets the size of the checkers which show up in transparent parts of an image.
- Color
The user can set the colors for the checkers over here.
- Canvas Border
- Color
The user can select the color for the canvas i.e. the space beyond a document’s boundaries.
- Pixel Grid
Added in version 4.0.
This allows configuring an automatic pixel-by-pixel grid, which is very useful for doing pixel art.
- Color
The color of the grid.
- Start Showing at
This determines the zoom level at which the pixel grid starts showing, as showing it when the image is zoomed out a lot will make the grid overwhelm the image, and is thus counter productive.
- Selection Overlay
Miscellaneous
- Hide canvas scrollbars.
Hides the scrollbars on the canvas.
- Enable Curve Anti-Aliasing
This allows anti-aliasing on previewing curves, like the ones for the circle tool, or the path tool.
- Hide Layer thumbnail popup
This disables the thumbnail that you get when hovering over a layer.
- Color Channels in Color
This configures whether the image display should be colored when only a single channel is selected in the channels docker.
- Enable Selection Outline Anti-Aliasing
This allows automatic anti-aliasing on selection. It makes the selection feel less jaggy and more precise.
- Move Checkers When Scrolling
When selected the checkers will move along with opaque elements of an image during canvas Panning, Zooming, etc. Otherwise the checkers remain stationary and only the opaque parts of an image will move.
