Shape Edit Tool
The shape editing tool is for editing vector shapes.

You can access the Edit Shapes tool by clicking on the icon in the toolbox, but you can also access it by pressing the Enter key or double- when in the Shape Selection tool and having a shape selected that can be most efficiently edited with the edit shapes tool (right now, that’s all shapes but text).
On Canvas Editing of Shapes
As detailed further in the Tool Options, there’s a difference between path shapes and specialized vector shapes that make it easy to have perfect ellipses, rectangles and more.
Path Shapes
Path shapes can be recognized by the different nodes they have.
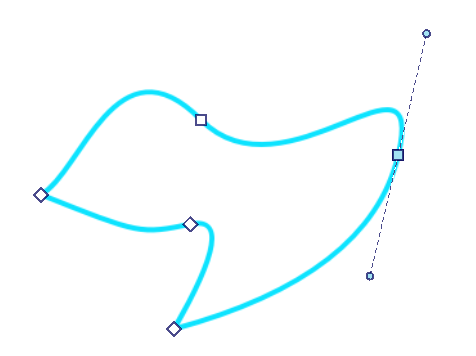
Paths in Krita are mostly bezier curves, and are made up of nodes. For straight lines, the nodes are connected by a line-segment and that’s it. For curved lines, each node has a side handle to allow curving of that segment using the cubic bezier curve algorithm.
What that means, in short, is that moving the side handles into a given direction will make the segment curve in that direction, and the longer the line of the node to the side handle, the stronger the curving.
Selecting Nodes for Editing
You can select a single node with  , they will turn bright blue if selected.
You can also select multiples nodes:
 + Shift on unselected nodes will add them to a selection.
 + drag will make a selection rectangle. All nodes whose handles are touched by the rectangle will be selected. This combines with the
  + Shift shortcut above.
 on a segment will add both nodes that define segment to a selection.
Selected Nodes
You can add and remove side handles from a selected node with the  + Shift shortcut.
Krita has several node-types that allow you control the side handles more efficiently. These are the corner, smooth and symmetric modes.
- Corner
Represented by a diamond, the corner type allows you to have handles that can point in different directions and have different lengths.

- Smooth
Represented by a circle, the smooth type will ensure a smooth transition by always pointing the handles into opposite directions, but they can still have different lengths.

- Symmetric
Represented by a square, the symmetric node will force handles to always point in opposite directions and have the same length.

 + Ctrl on a selected node will cycle between the node-types.
Del key will remove the selected node.
Selected Segments
Segments are the lines between nodes. Hovering over a segment will show a dotted line, indicating it can be selected.

You can  and drag on a segment to curve it to the mouse point. Clicking on different parts of the segment and dragging will curve it differently.
Double  on a segment will add a node on the segment under the mouse cursor. The new node will be selected.
Other Shapes
Shapes that aren’t path shapes only have a single type of node: A small diamond like, that changes the specific parameters of that shape on-canvas. For example, you can change the corner radius on rectangles by dragging the nodes, or make the ellipse into a pie-segment.
Tool Options

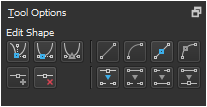
Path shapes have options. The top left options are for converting to different anchor point types. The bottom left options are for adding or removing points. The top right options are for converting the line to different types. The bottom right options are for breaking and joining line segments.
The tool options of the Edit Shapes Tool change depending on the type of shape you have selected. With the exception of the path shape, all shapes have a Convert to Path action, which converts said shape to a path shape.
Path Shapes
,
,
,
,
Path shapes are the most common shape and can be made with the following tools:
- Node Editing
Edit the nodes.
- Corner Point
-
Make the selected node a corner or cusp. This means that the side handles can point in different directions and be different lengths.
- Smooth Point
-
Make the selected node smooth. The two side handles will always point in opposite directions, but their length can be different.
- Symmetric Point
-
Make the selected node symmetric. The two side handles will always point in opposite directions, and their length will stay the same.
- Insert Point
-
Insert a new node into the middle of the selected segment.
- Remove Point
-
Remove the selected node.
- Line Segment Editing
Edit line segments between nodes.
- Segment To Line
-
Make the current segment a straight line.
- Segment To Curve
-
Make the current segment a curve: It’ll add side handles for this segment to the nodes attached to it.
- Make Line Point
-
Turn the selected node into a sharp corner: This will remove the side handles.
- Make Curve Point
-
Turn the selected node into one that can curve: This will add side handles to the node.
- Break at Point
-
Break the path at this point.
- Break Segment
-
Break the path at the selected segment.
- Join with Segment
-
Join two nodes that are only attached on one side with a segment.
- Merge Points
-
Merge two nodes into one, if the nodes are adjacent or if both nodes are only attached on one side with a segment.
Specialized Vector Shapes: Rectangle
Rectangle shapes are the ones made with the Rectangle Tool. It has extra options to make rounded corners easy.

- Corner radius x
The radius of the x-axis of the corner curve.
- Corner radius y
The radius of the y-axis of the corner curve.

Editing a rectangle object, click and drag anchor in top-right corner to change border radius¶ |

Editing a rectangle object for which a border radius has been applied: anchor indicates border radius size¶ |
Specialized Vector Shapes: Ellipse
Ellipse shapes are the ones made with the Ellipse Tool. It has extra options to easily create arc, pie and cord.

- Type
The type of ellipse shape it is.
- Arc
An arc shape will keep the path open when it isn’t fully circular.

- Pie
A pie shape will add two extra lines to the center when the shape isn’t fully circular, like how one cuts out a piece from a pie.

- Chord
A cord shape will add a straight line between the two ends if the path isn’t fully circular, as if a cord is being strung between the two points.

- Start Angle
The angle at which the shape starts.
- End Angle
The angle at which the shape ends.
- Close Ellipse
An action to quickly make the ellipse fully circular.

Specialized Vector Shapes: Calligraphy
Calligraphy shapes are the ones made with the Calligraphy Tool. It has no extra options.
